About the project
My team and I developed ORGANice during our 2nd year of our Computer Science degree in National University of Singapore for our Software Engineering Project. ORGANice is a desktop application for hospital administration staff who prefer to use Command Line Interface applications to manage organ transplants. The purpose of this project portfolio is to demonstrate my contribution to the project as well as to the user and developer guides
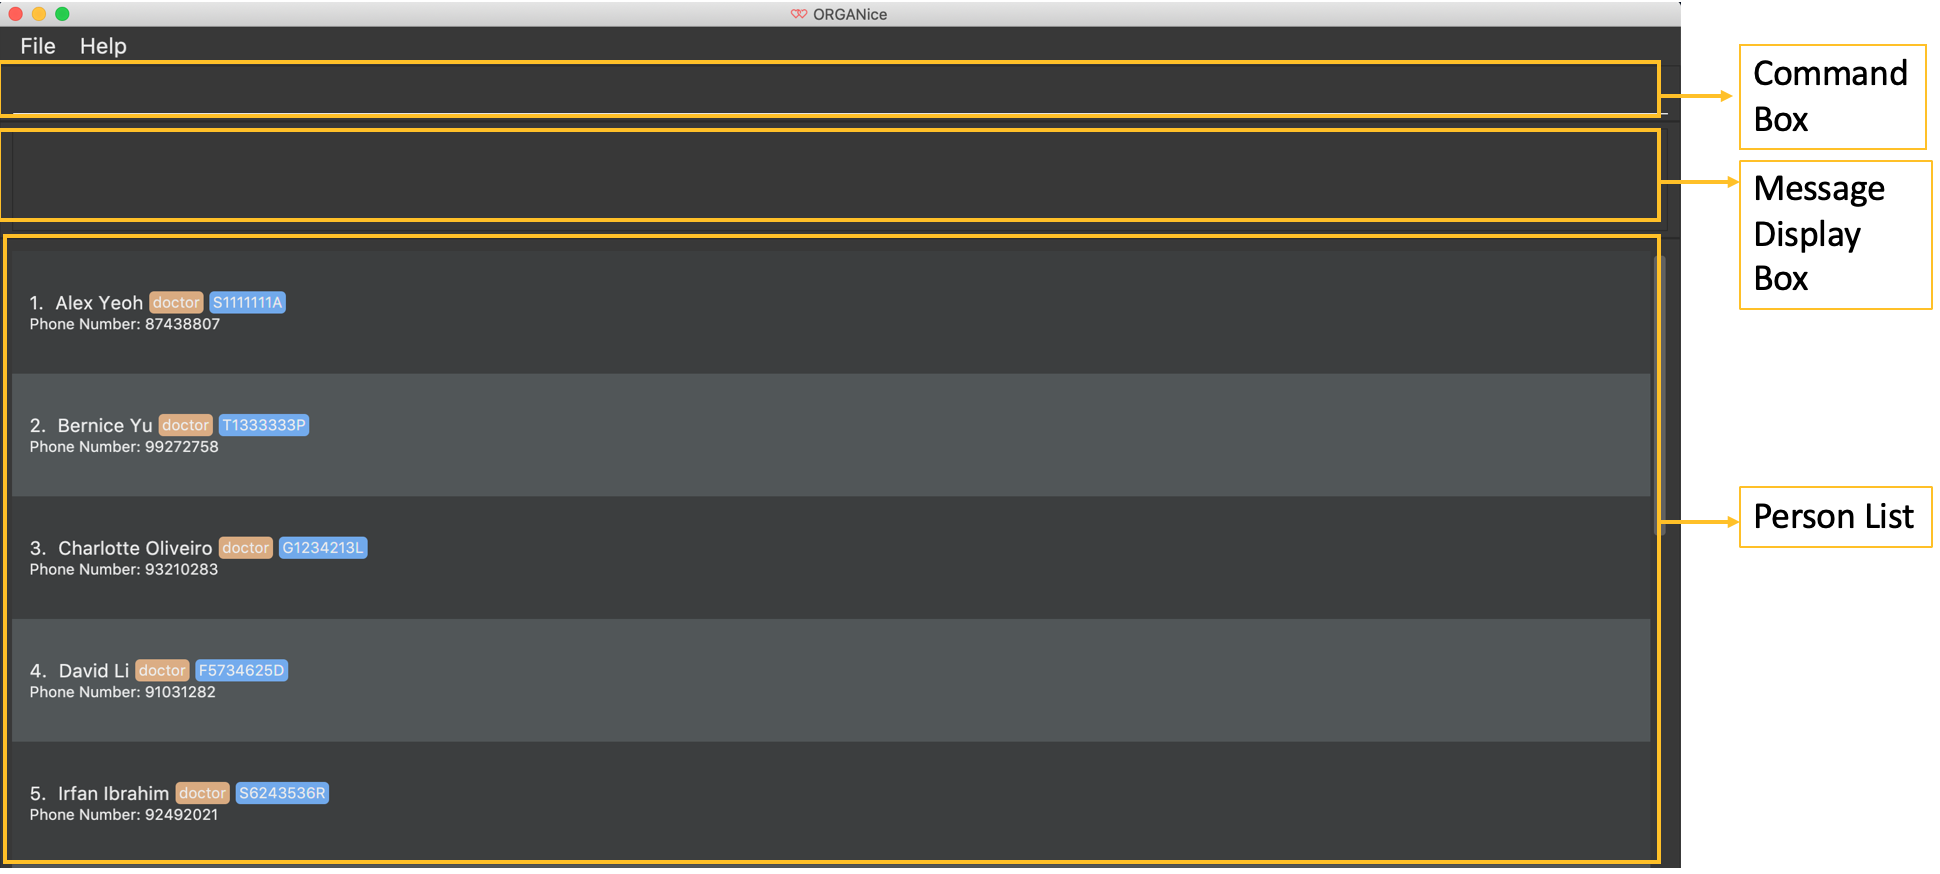
This is what our project looks like:
Below is the list of main features that are available in our application:
-
Form mode feature
-
Matching feature
-
Sorting feature
-
Finding feature
-
Processing feature
Summary of contributions
Below are the summary of my contributions for this project which include feature enhancements, project management, and documentation.
-
Major enhancement: Added the ability to add a person with form mode.
-
What it does: Allows user to add a person by typing each attribute one at a time.
-
Justification: This feature improves the product significantly because a user can ensure that he/she enter the person’s attributes correctly which is essential for an application that will be used in a hospital.
-
Highlights: This feature includes other special commands such as 'undo' if the user typed in a wrong input and
Find Matchbutton so that the user can click on this button to directly find the potential donor for a patient without typing another command.
-
-
Code contributed: Code contributed
-
Other contributions:
-
Project management:
-
Managed releases
v1.1-v1.4(4 releases) on GitHub
-
-
Enhancements to existing features:
-
Documentation:
-
Community:
-
Tools:
-
Integrated a github plugin (TravisCI) and update Coveralls badge to the project (#7)
-
-
Contributions to the User Guide
Given below are sections I contributed to the User Guide. They showcase my ability to write documentation targeting end-users. |
{start of extract}
Form mode
In this mode, instead of typing a long command at one go, you can add a person’s attribute one by one. After entering an attribute, the system will prompt you to input another attribute.
To add a person in this mode, enter the following command of the format: add t/TYPE
ORGANice will prompt you to type in each attribute, one by one until all the fields are filled. Here are some special commands that might be useful when you are in the process of filling up the form:
-
/abort- The command to abandon the current form that you are currently filling. -
/undo- The command to undo the last entry that you entered, which is useful when you want to undo any changes made. -
/done- The command to indicate that you are done with filling all the required attributes and want to add the person into the application. -
/exit- The command to exit the application.
Note that /exit, /abort, and /undo commands can be used at any point in time, while /done command can only be used once all the required attributes have been filled.
These are the important commands for this feature, so now let’s take a look at an example on how you can use this feature.
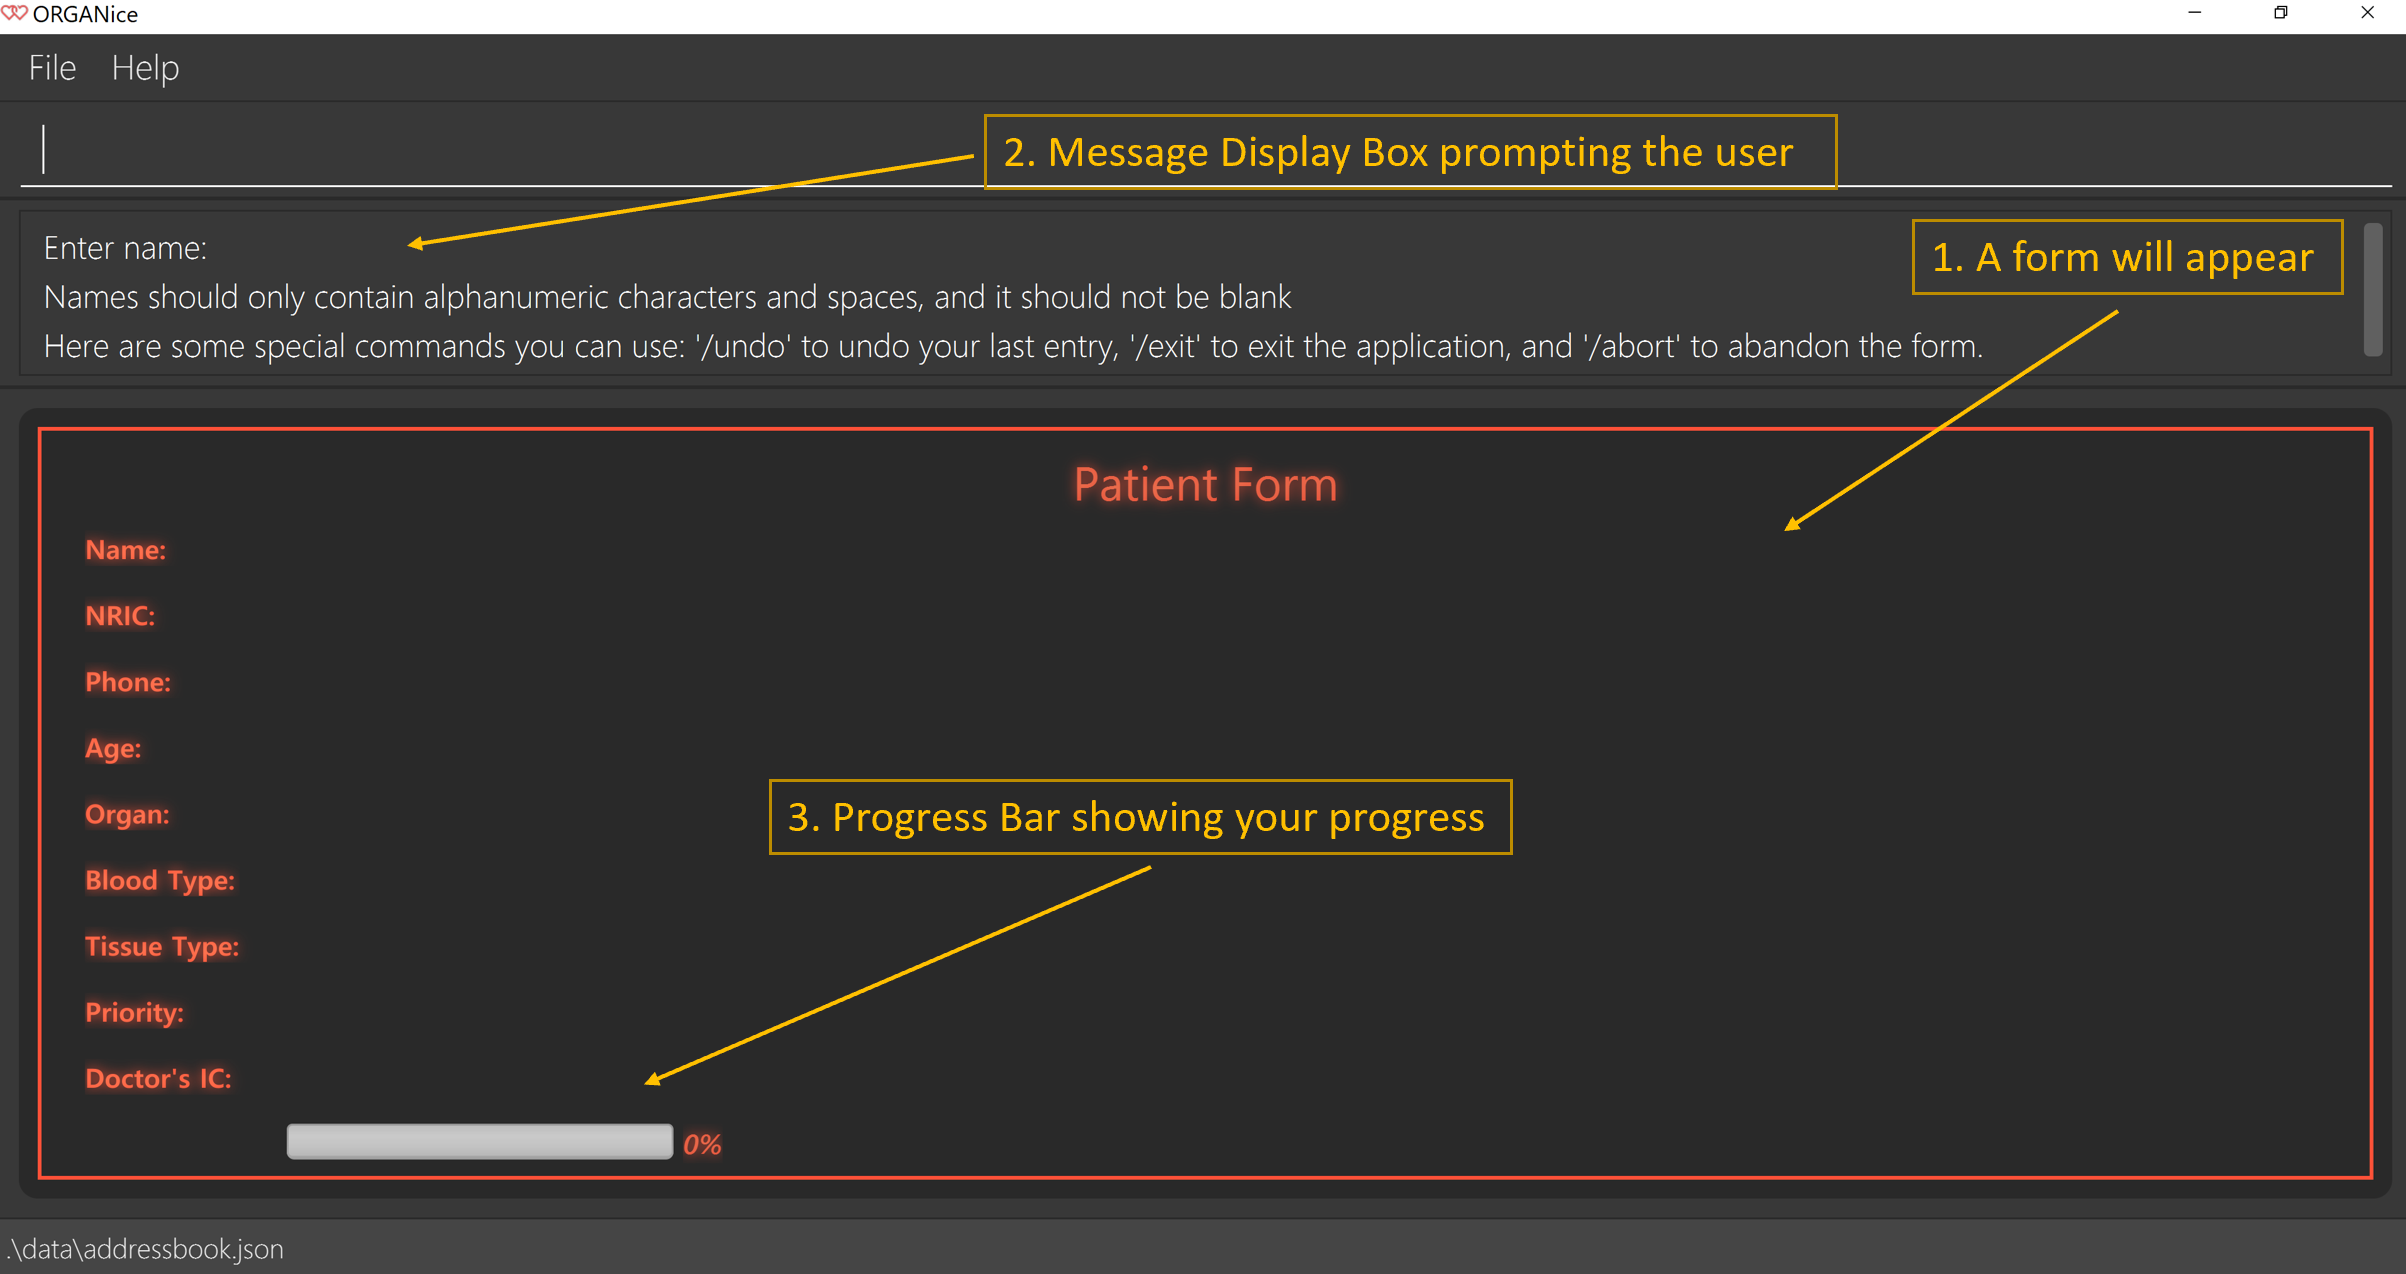
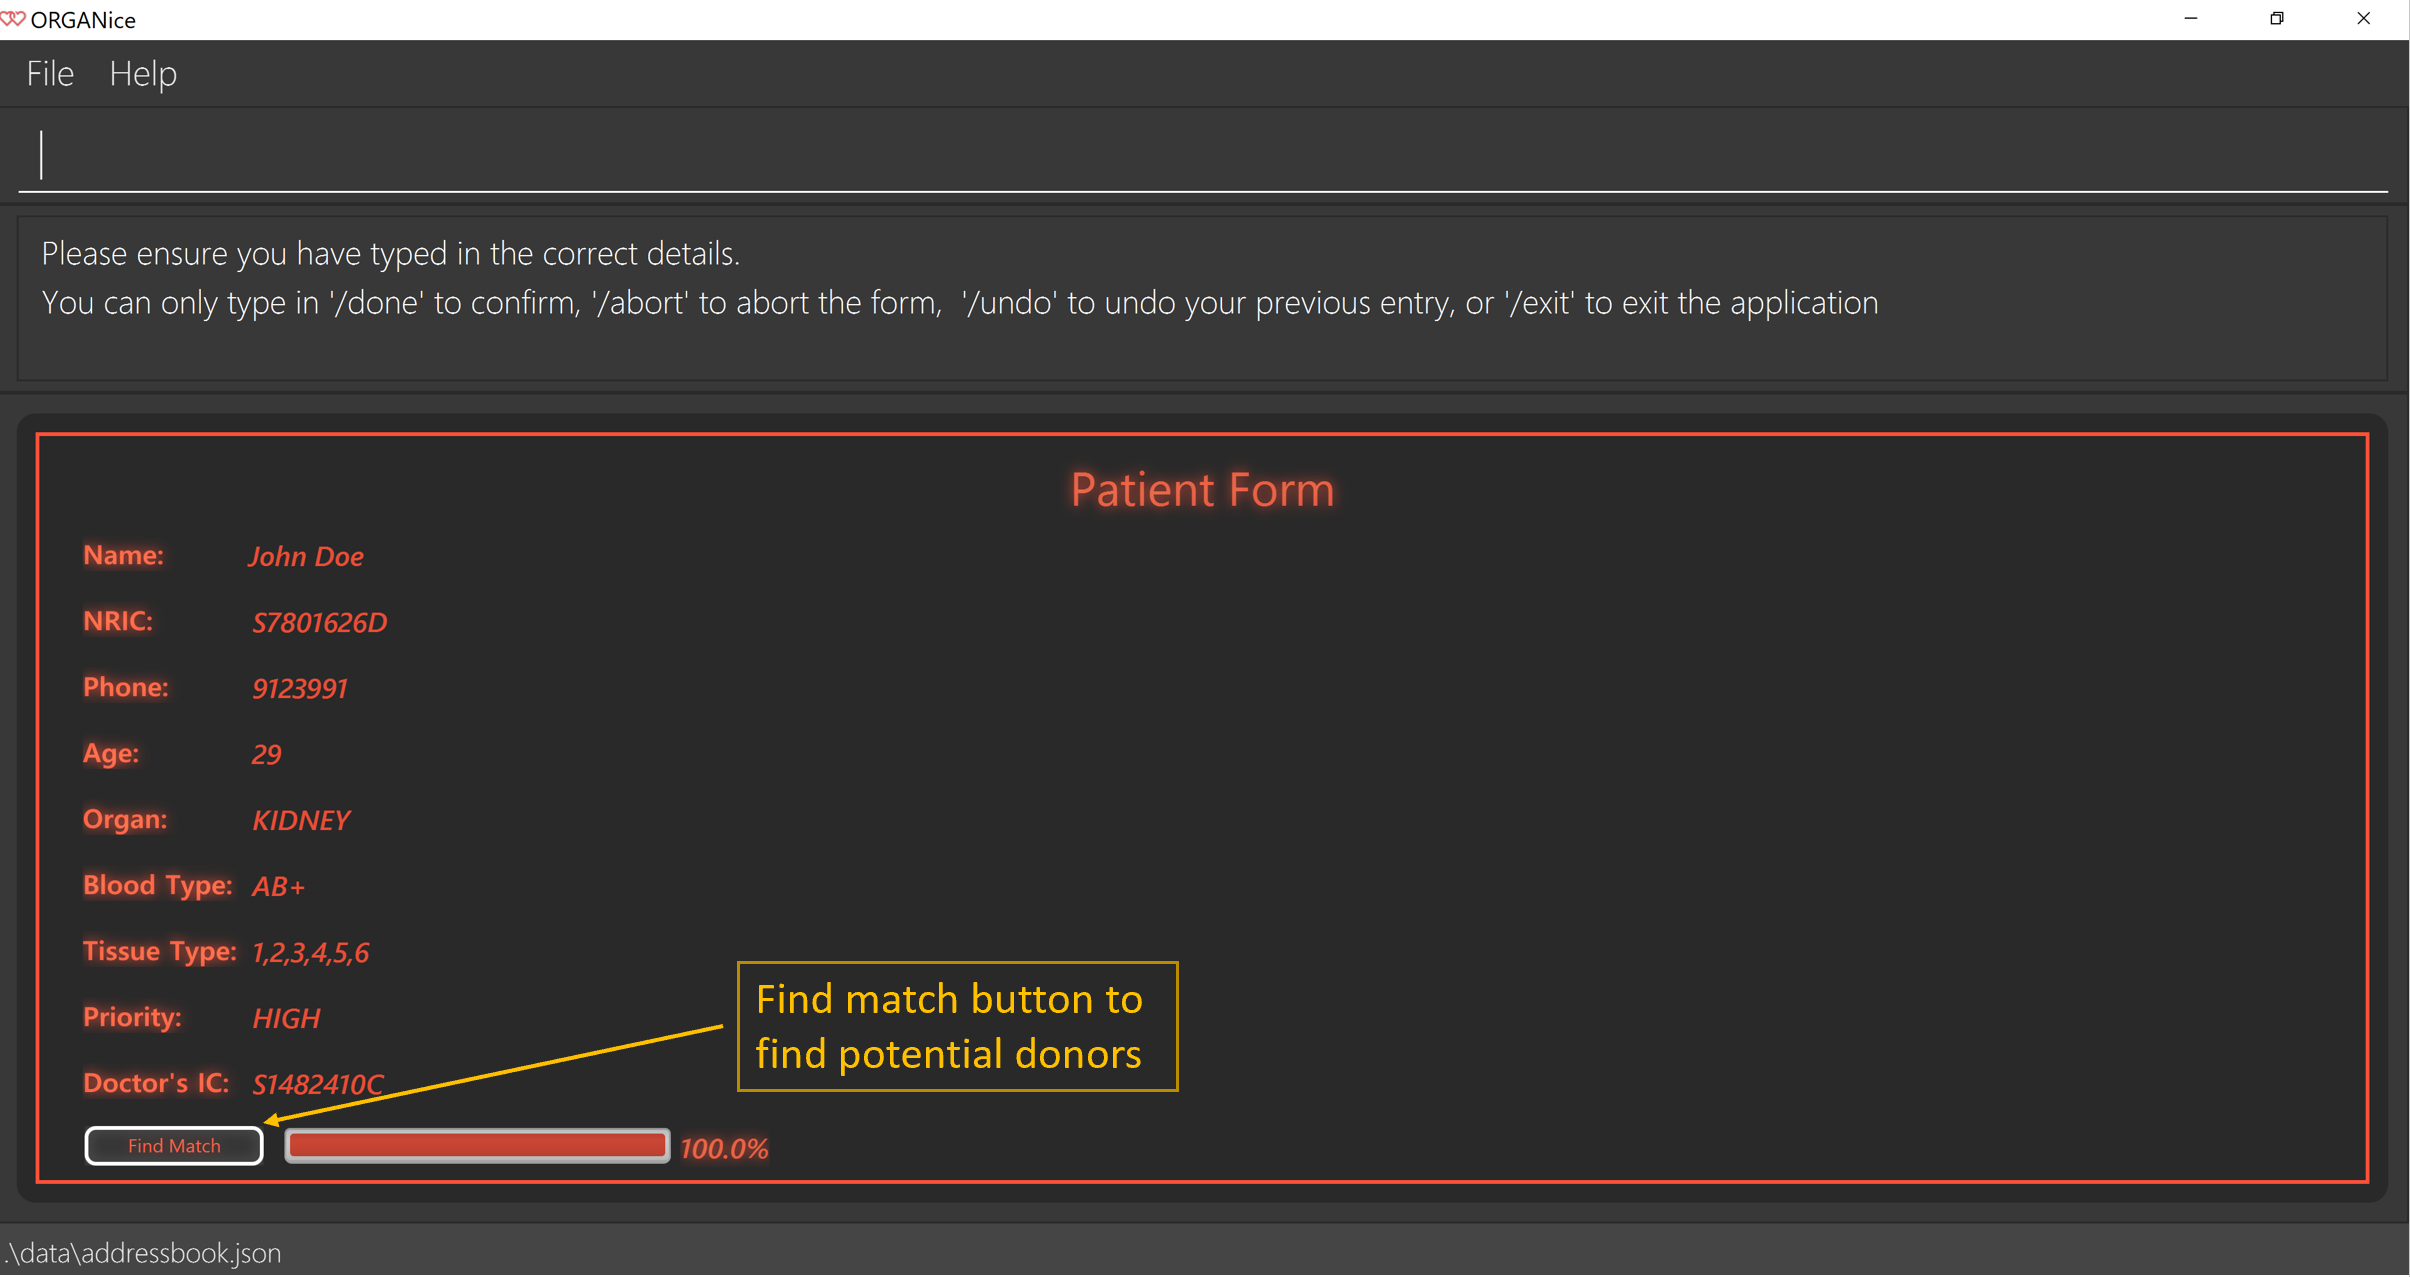
Let’s say you want to add a patient to the application. You should type add t/patient in the Command Box. Three changes will occur on your screen:
-
A form will appear in the space where the Person List used to occupy.
-
The Message Display Box will display a message that prompts you to enter the patient’s name.
-
There is a Progress Bar detailing your progress in filling up the form.
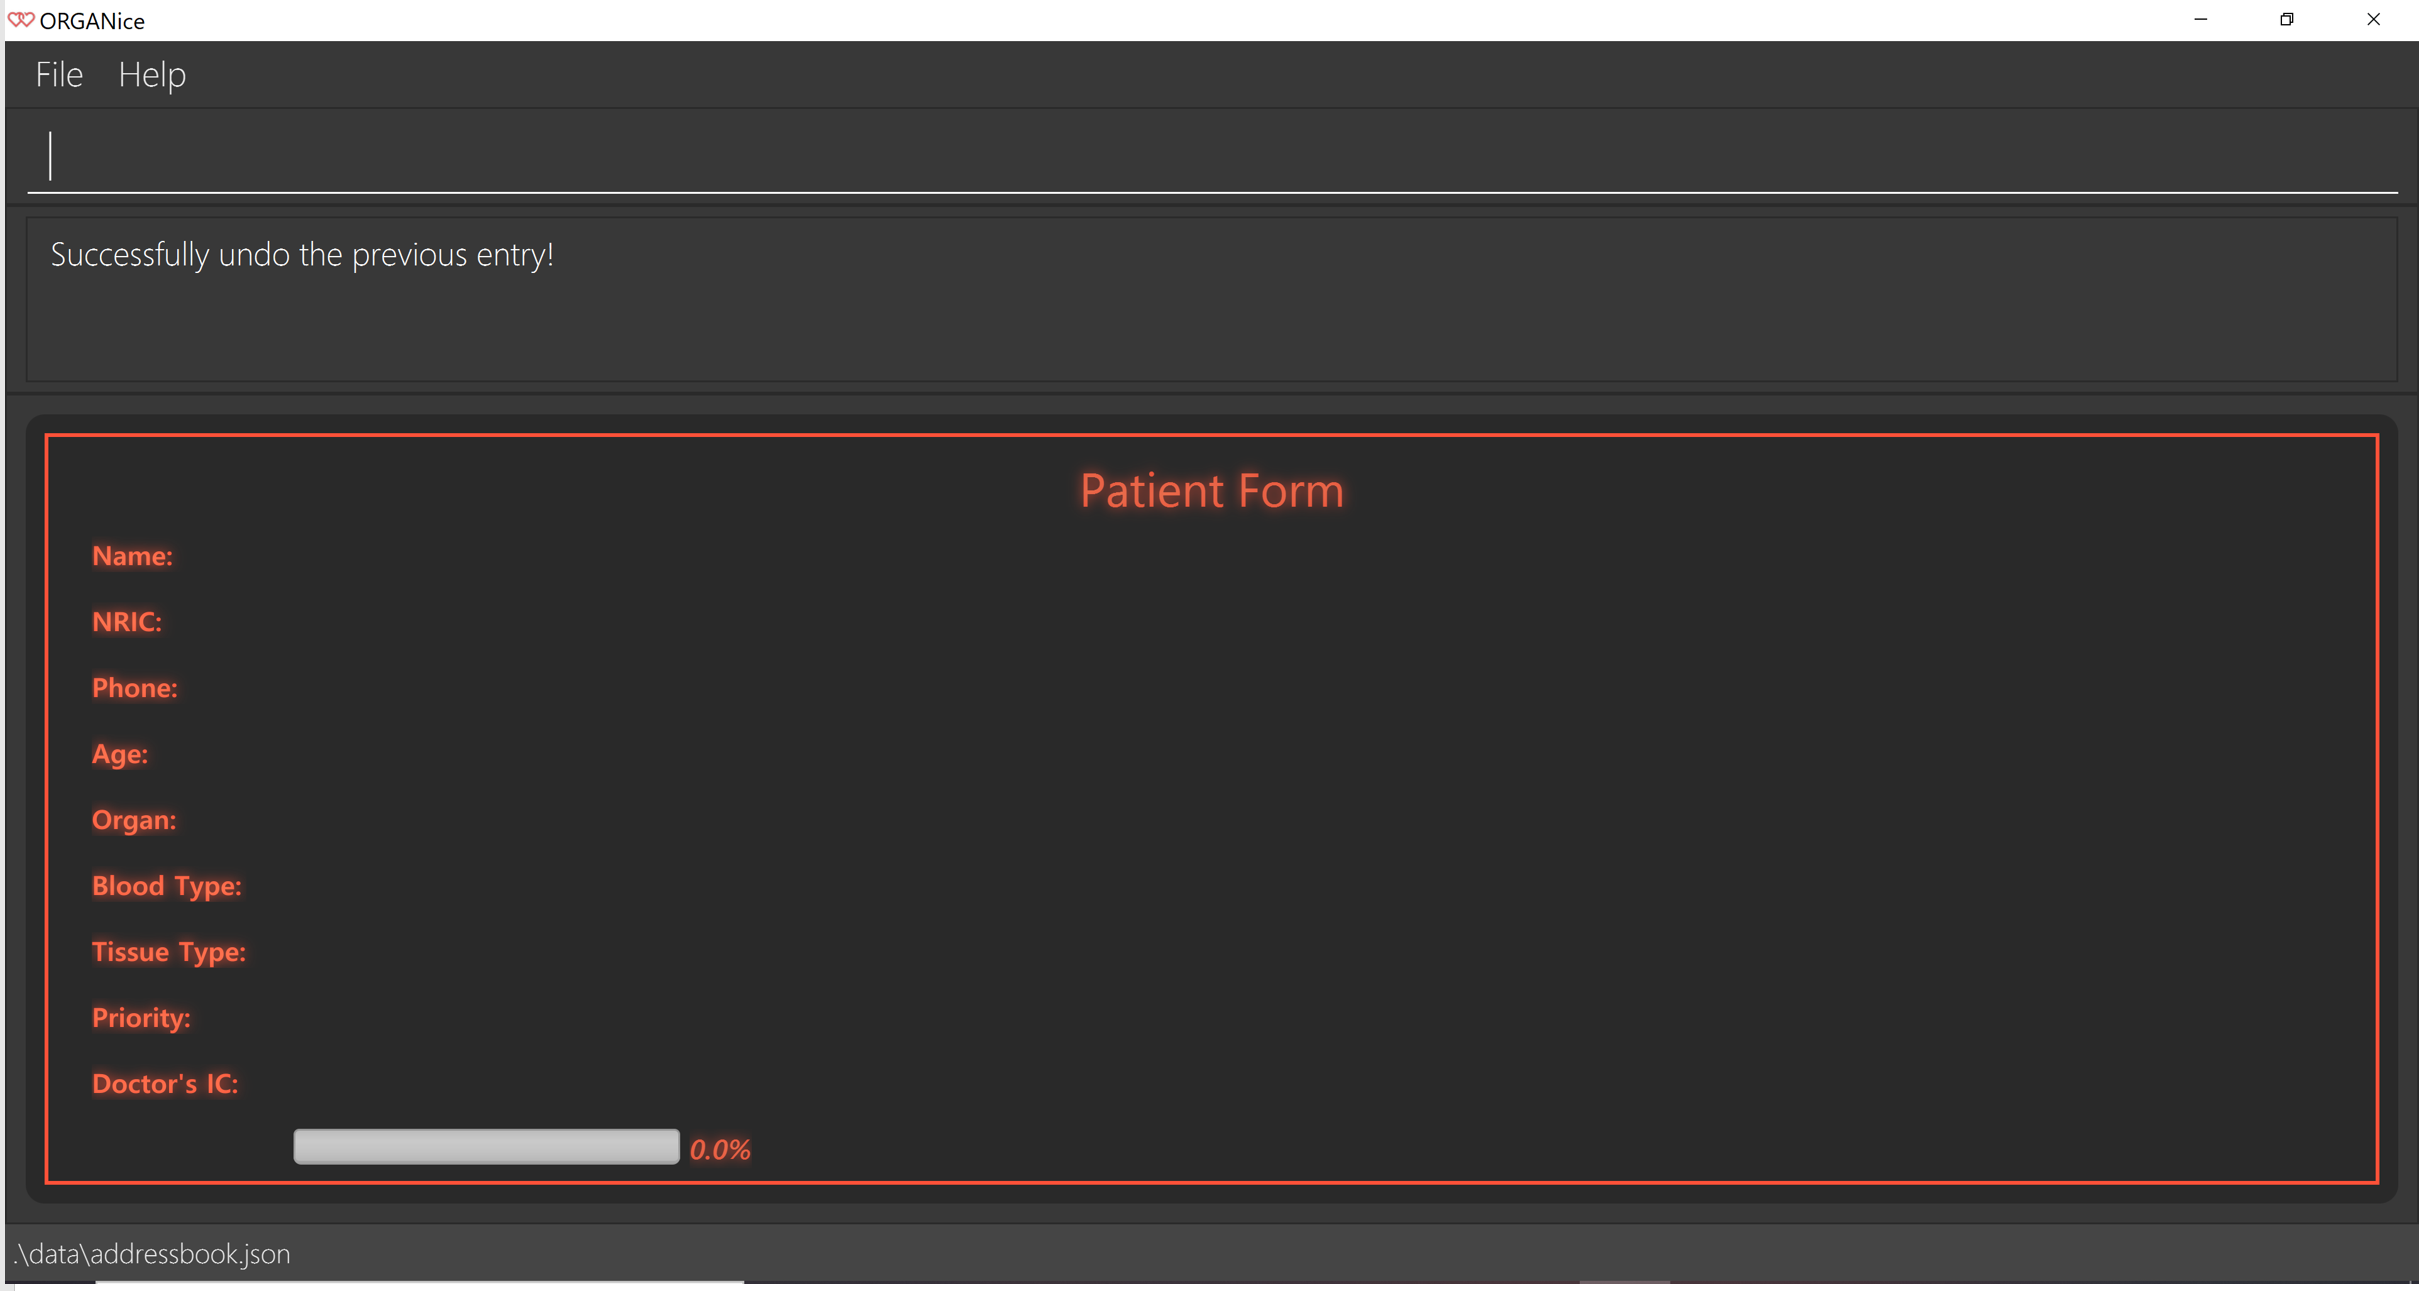
Refer to the Figure 4 to see how the resulting screen will look like.
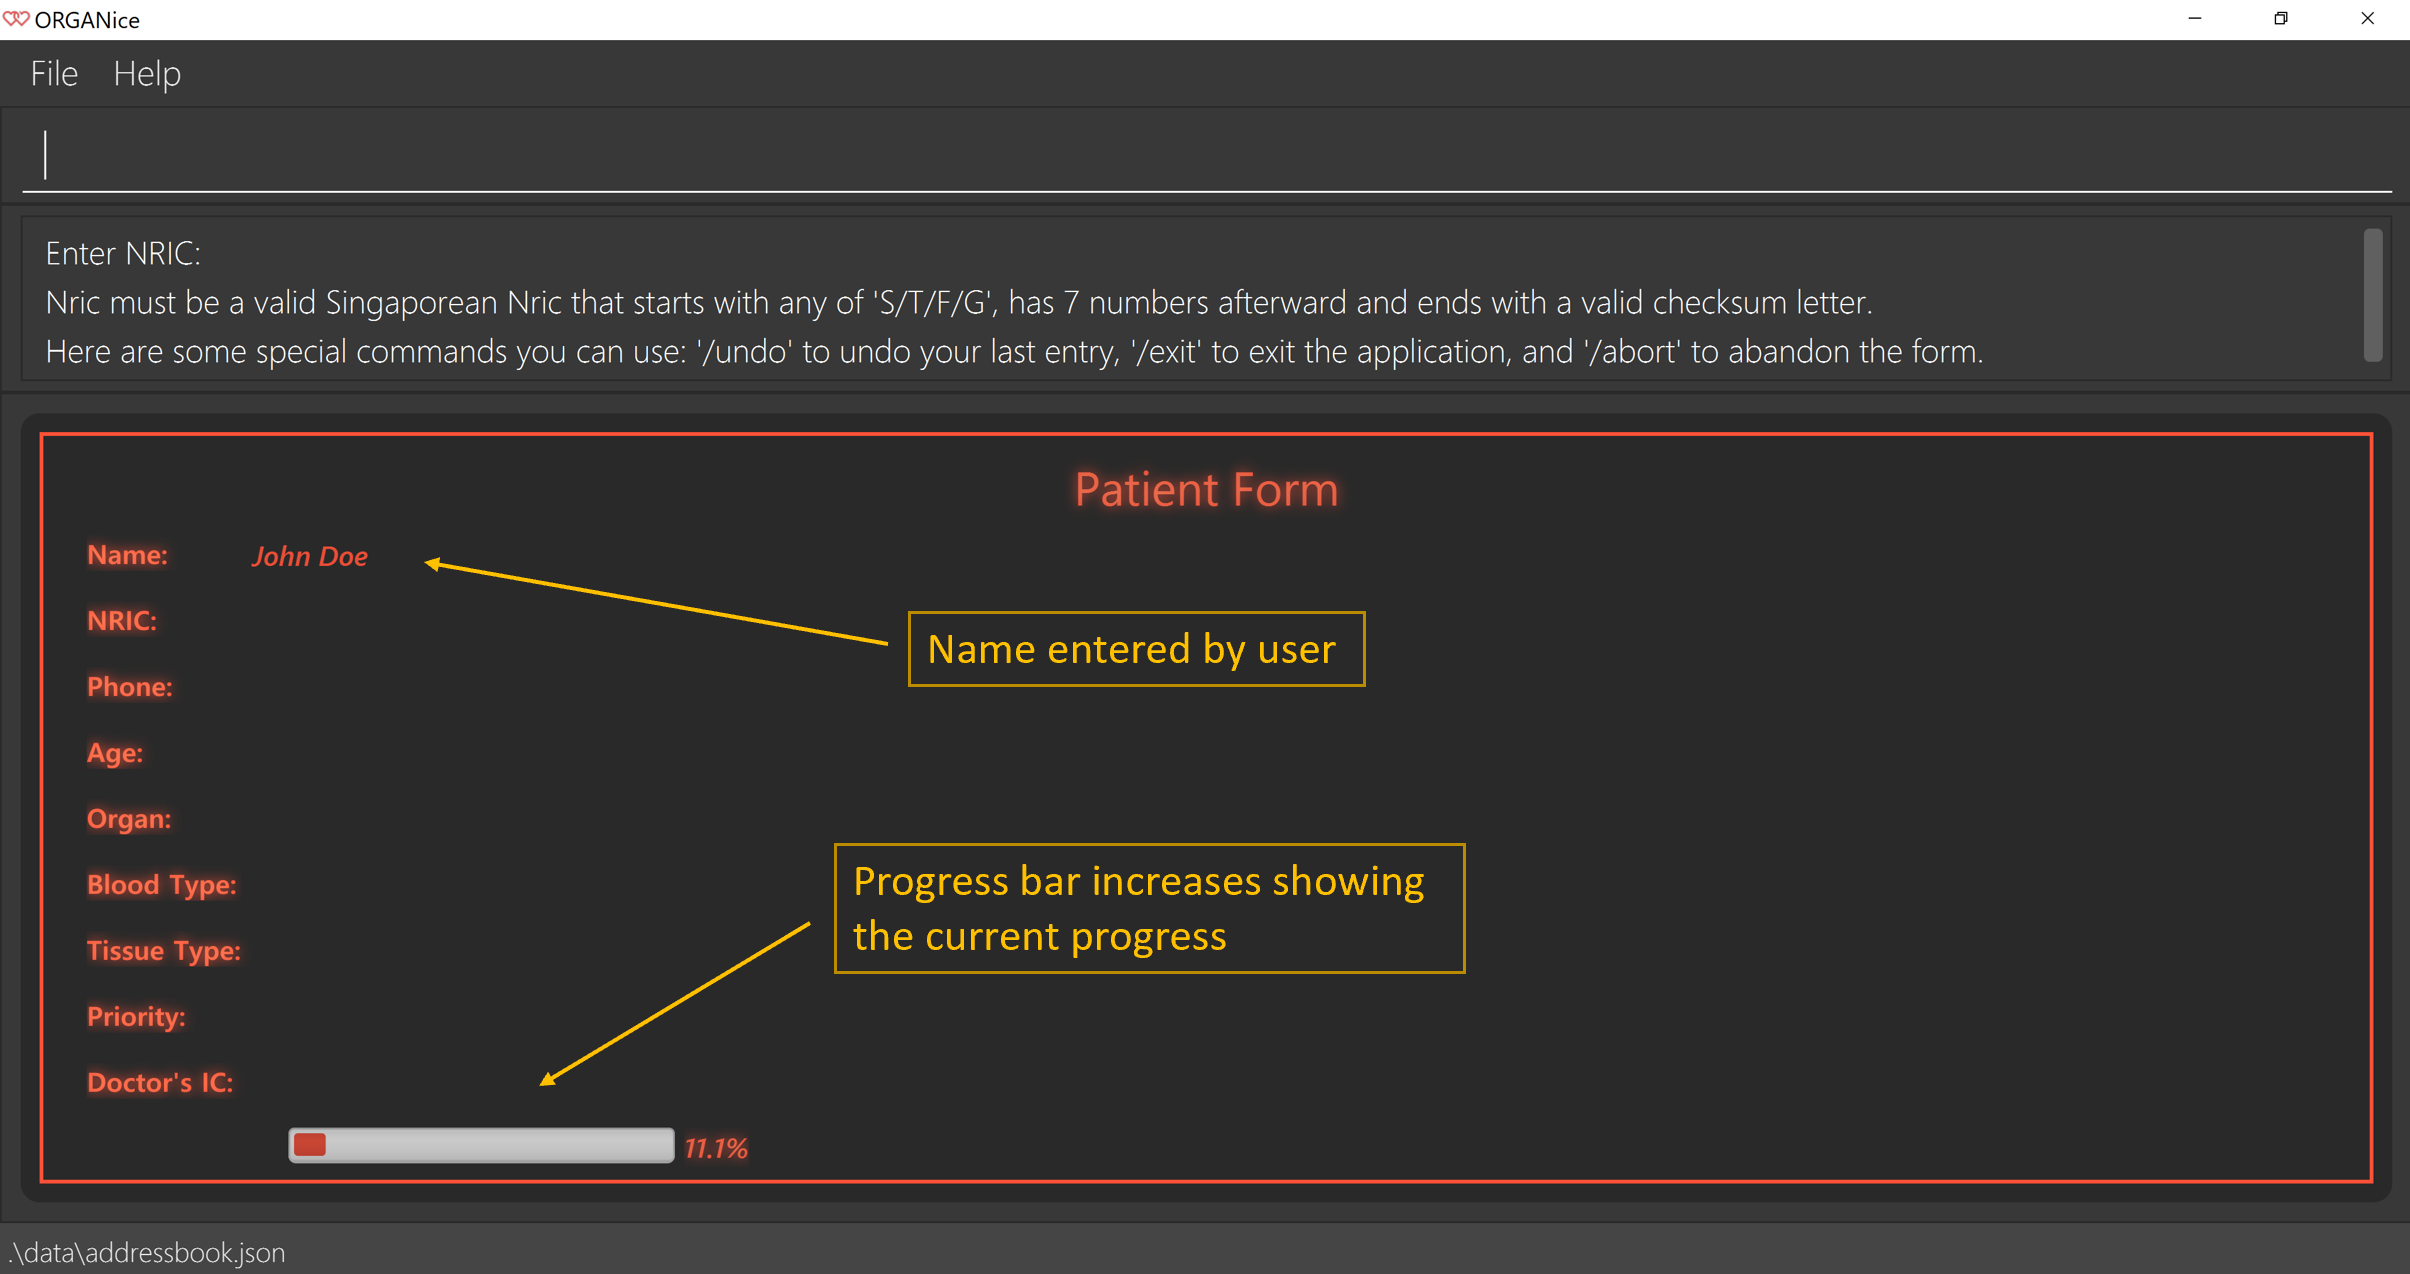
If you want to add a patient named "John Doe", type John Doe and then press Enter.
After entering the name, the patient’s name will be displayed on the form and the progress bar will increase as seen in Figure 5.
Each time you type an input, ORGANice will check if it is a valid input. If the input is valid, it will be reflected on the form. If not, ORGANice will display a warning message stating the criteria for a valid input of that attribute.
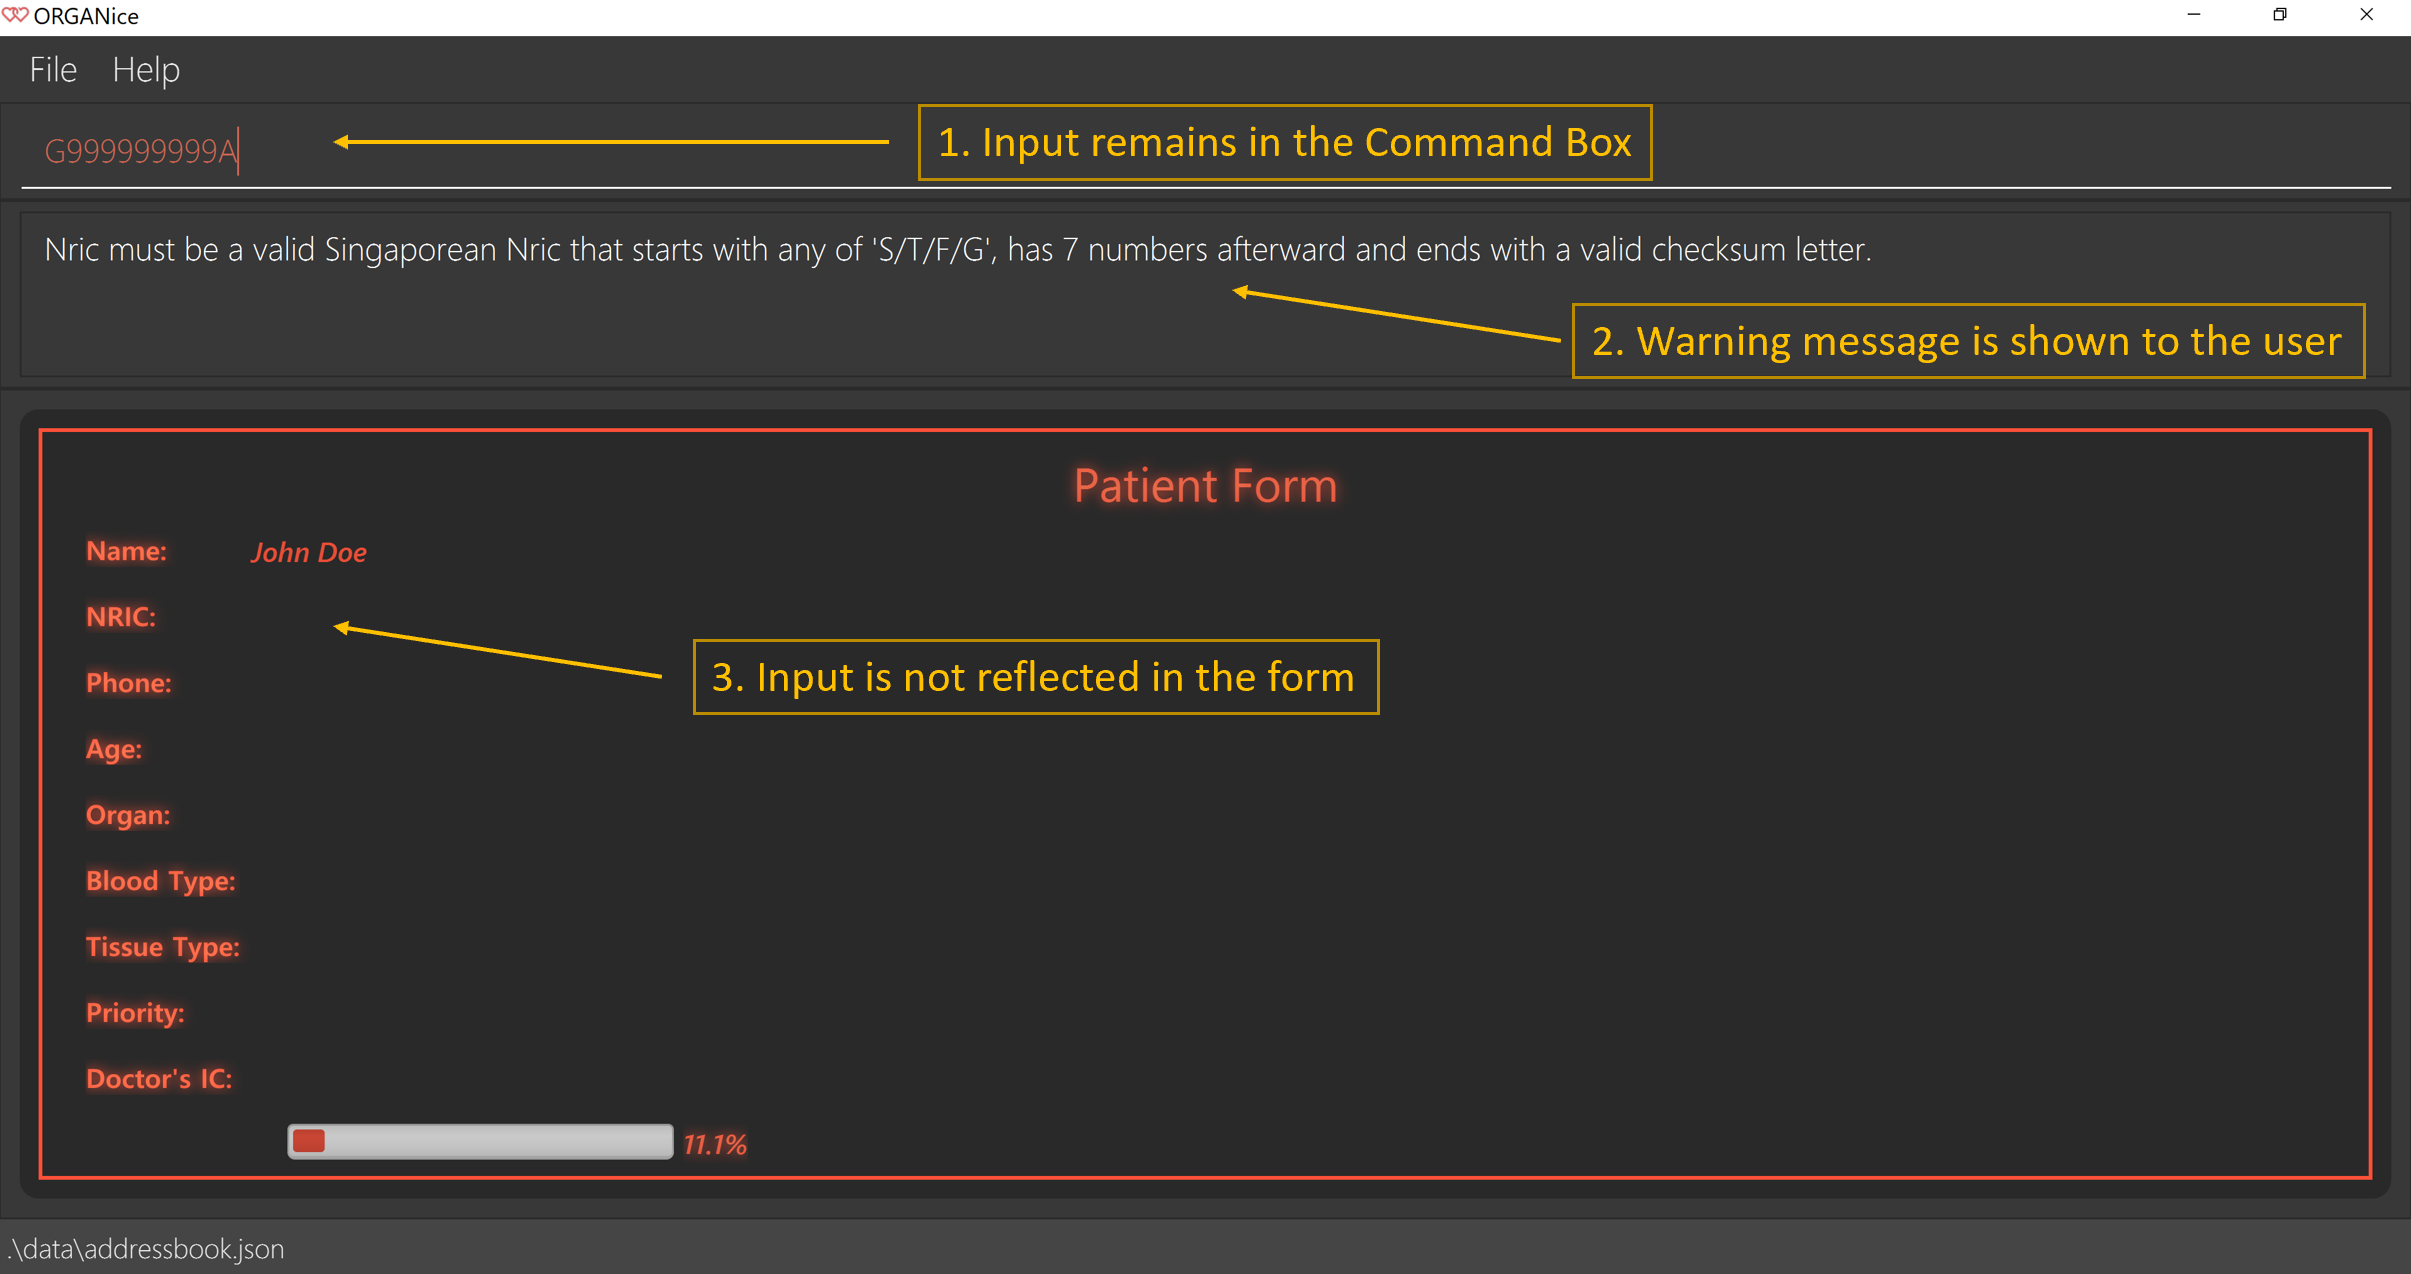
Say you typed in "G999999999A" and pressed Enter when ORGANice prompts you to type in the NRIC of the patient. Three changes occur to ORGANice, which can be seen in the Figure 6:
-
Your input will remain in the Command Box, but the colour of the input text turns to red.
-
A warning message is displayed in the Message Display Box. This warning message details the criteria for a valid NRIC input. This error message is specific to the attribute type. For example if you typed in an invalid NRIC, an error message detailing the criteria for a valid NRIC will be displayed.
-
Your input will not be reflected in the form.
After all of the attributes have been specified, you can type in:
-
/doneto add the person to the ORGANice list of persons -
Click the
Find Matchbutton to directly add the person and find the potential donors at the same time. Note that theFind Matchbutton will only appear on thePatientform. Note that this action is only applicable if you are adding a patient.
The Figure 7 will show how the form will look like after you have entered all the required attributes.
When you type in /done, the Person List will return to its original state of displaying people in ORGANice.
The Message Display Box will show a success message, indicating that you have successfully added a new person to the Person List as seen in Figure 8.
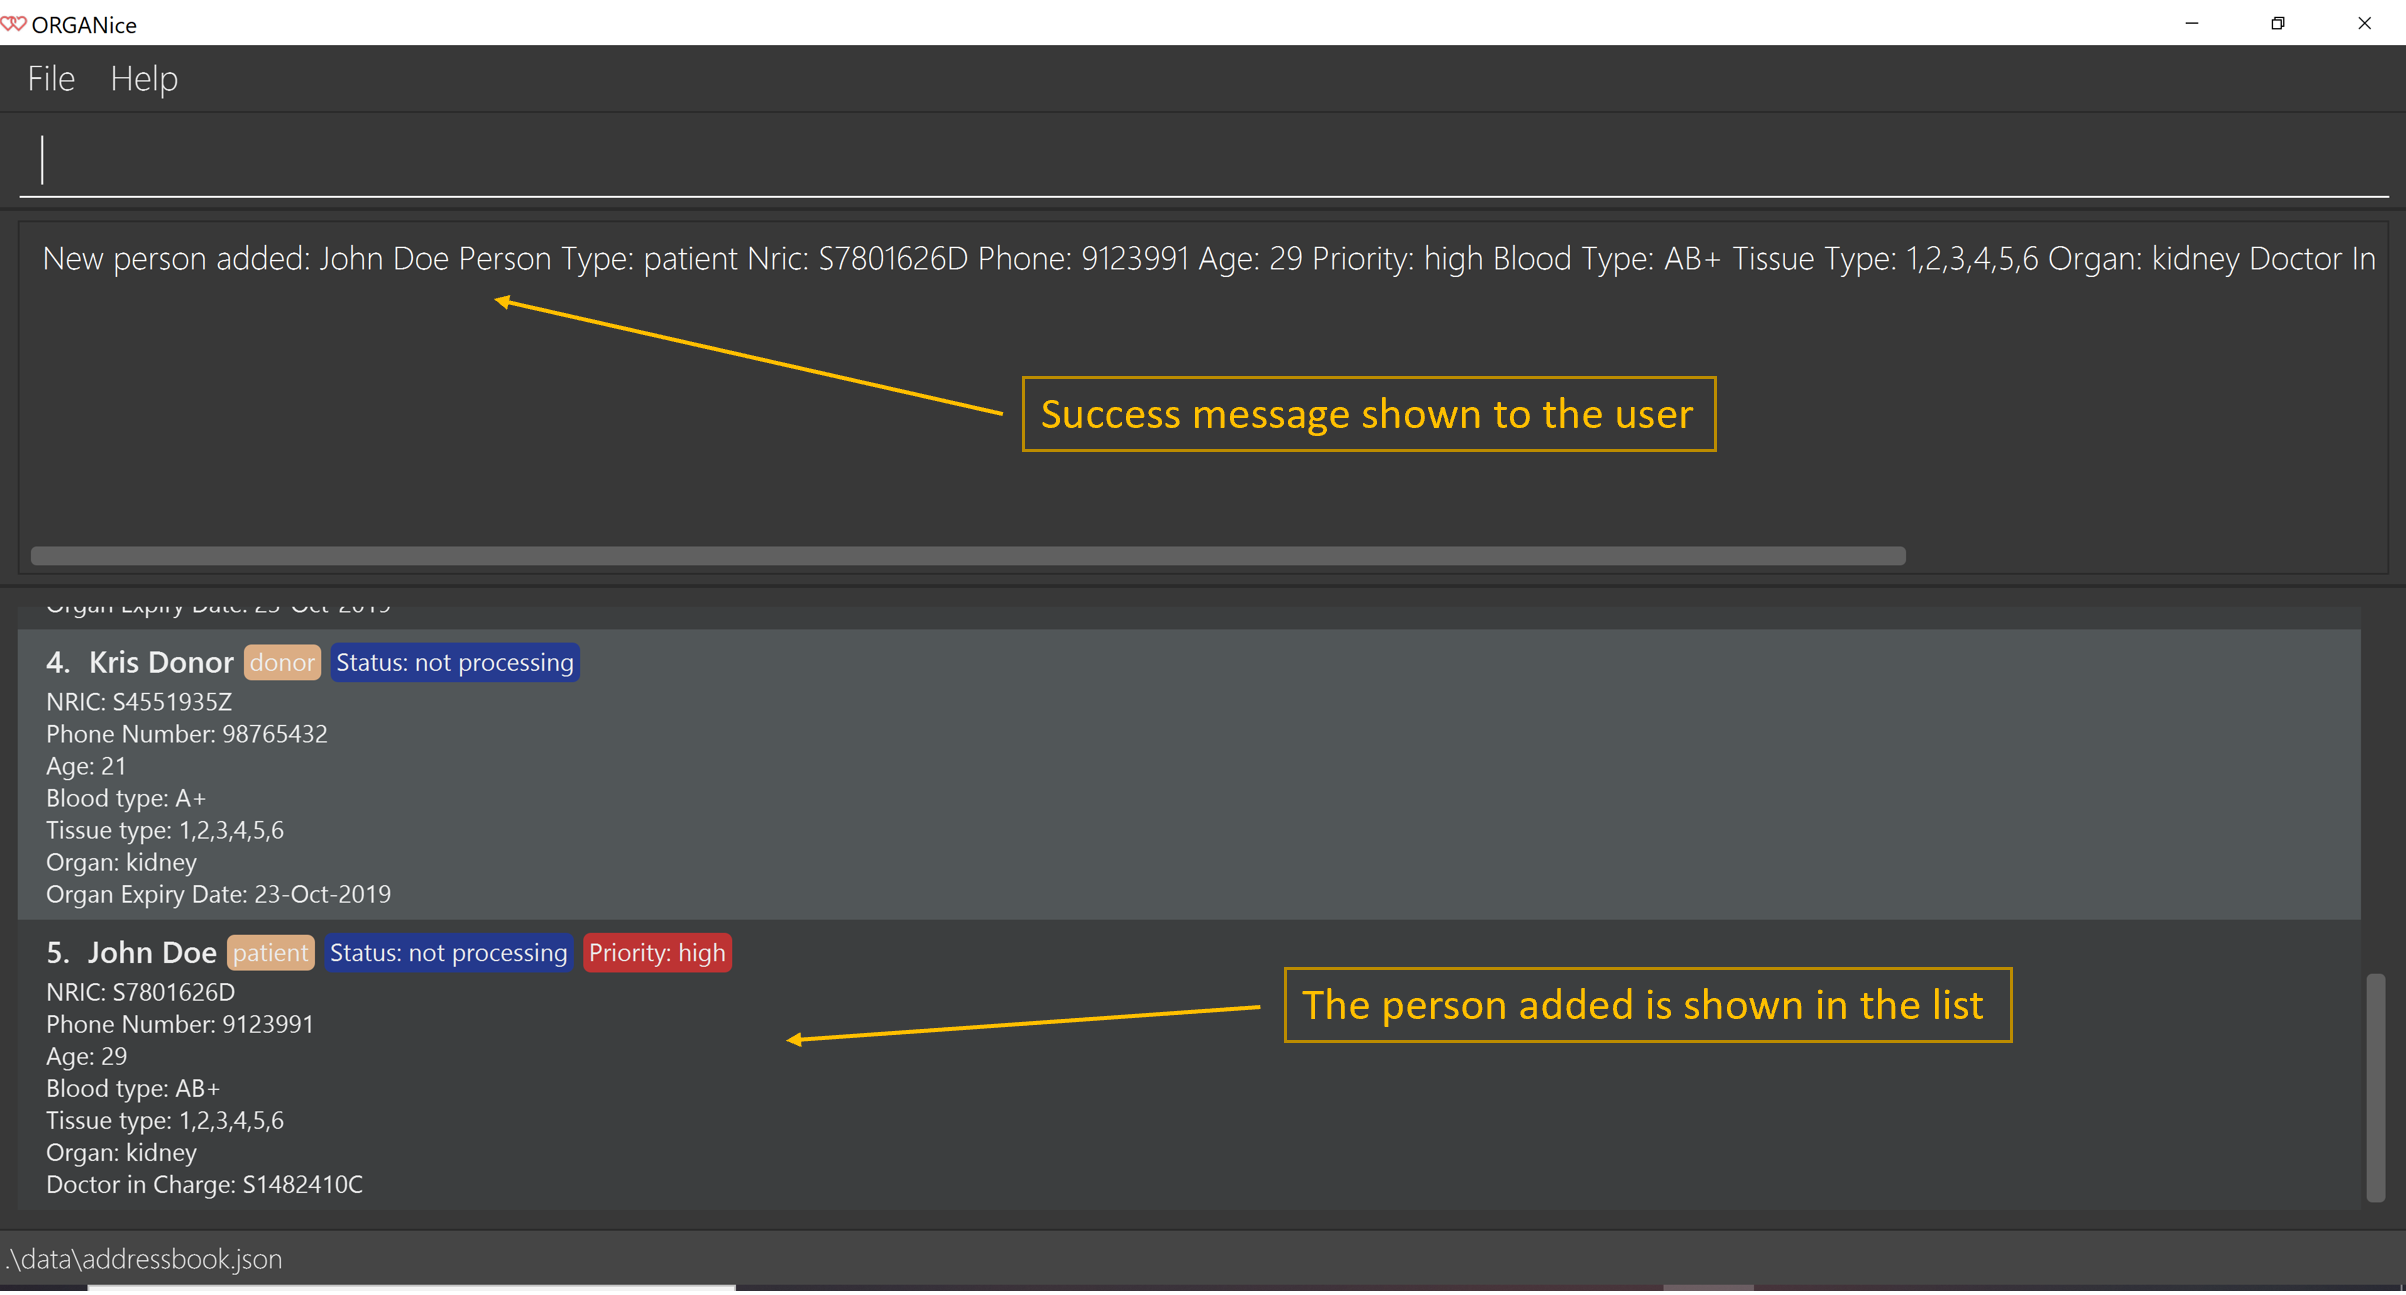
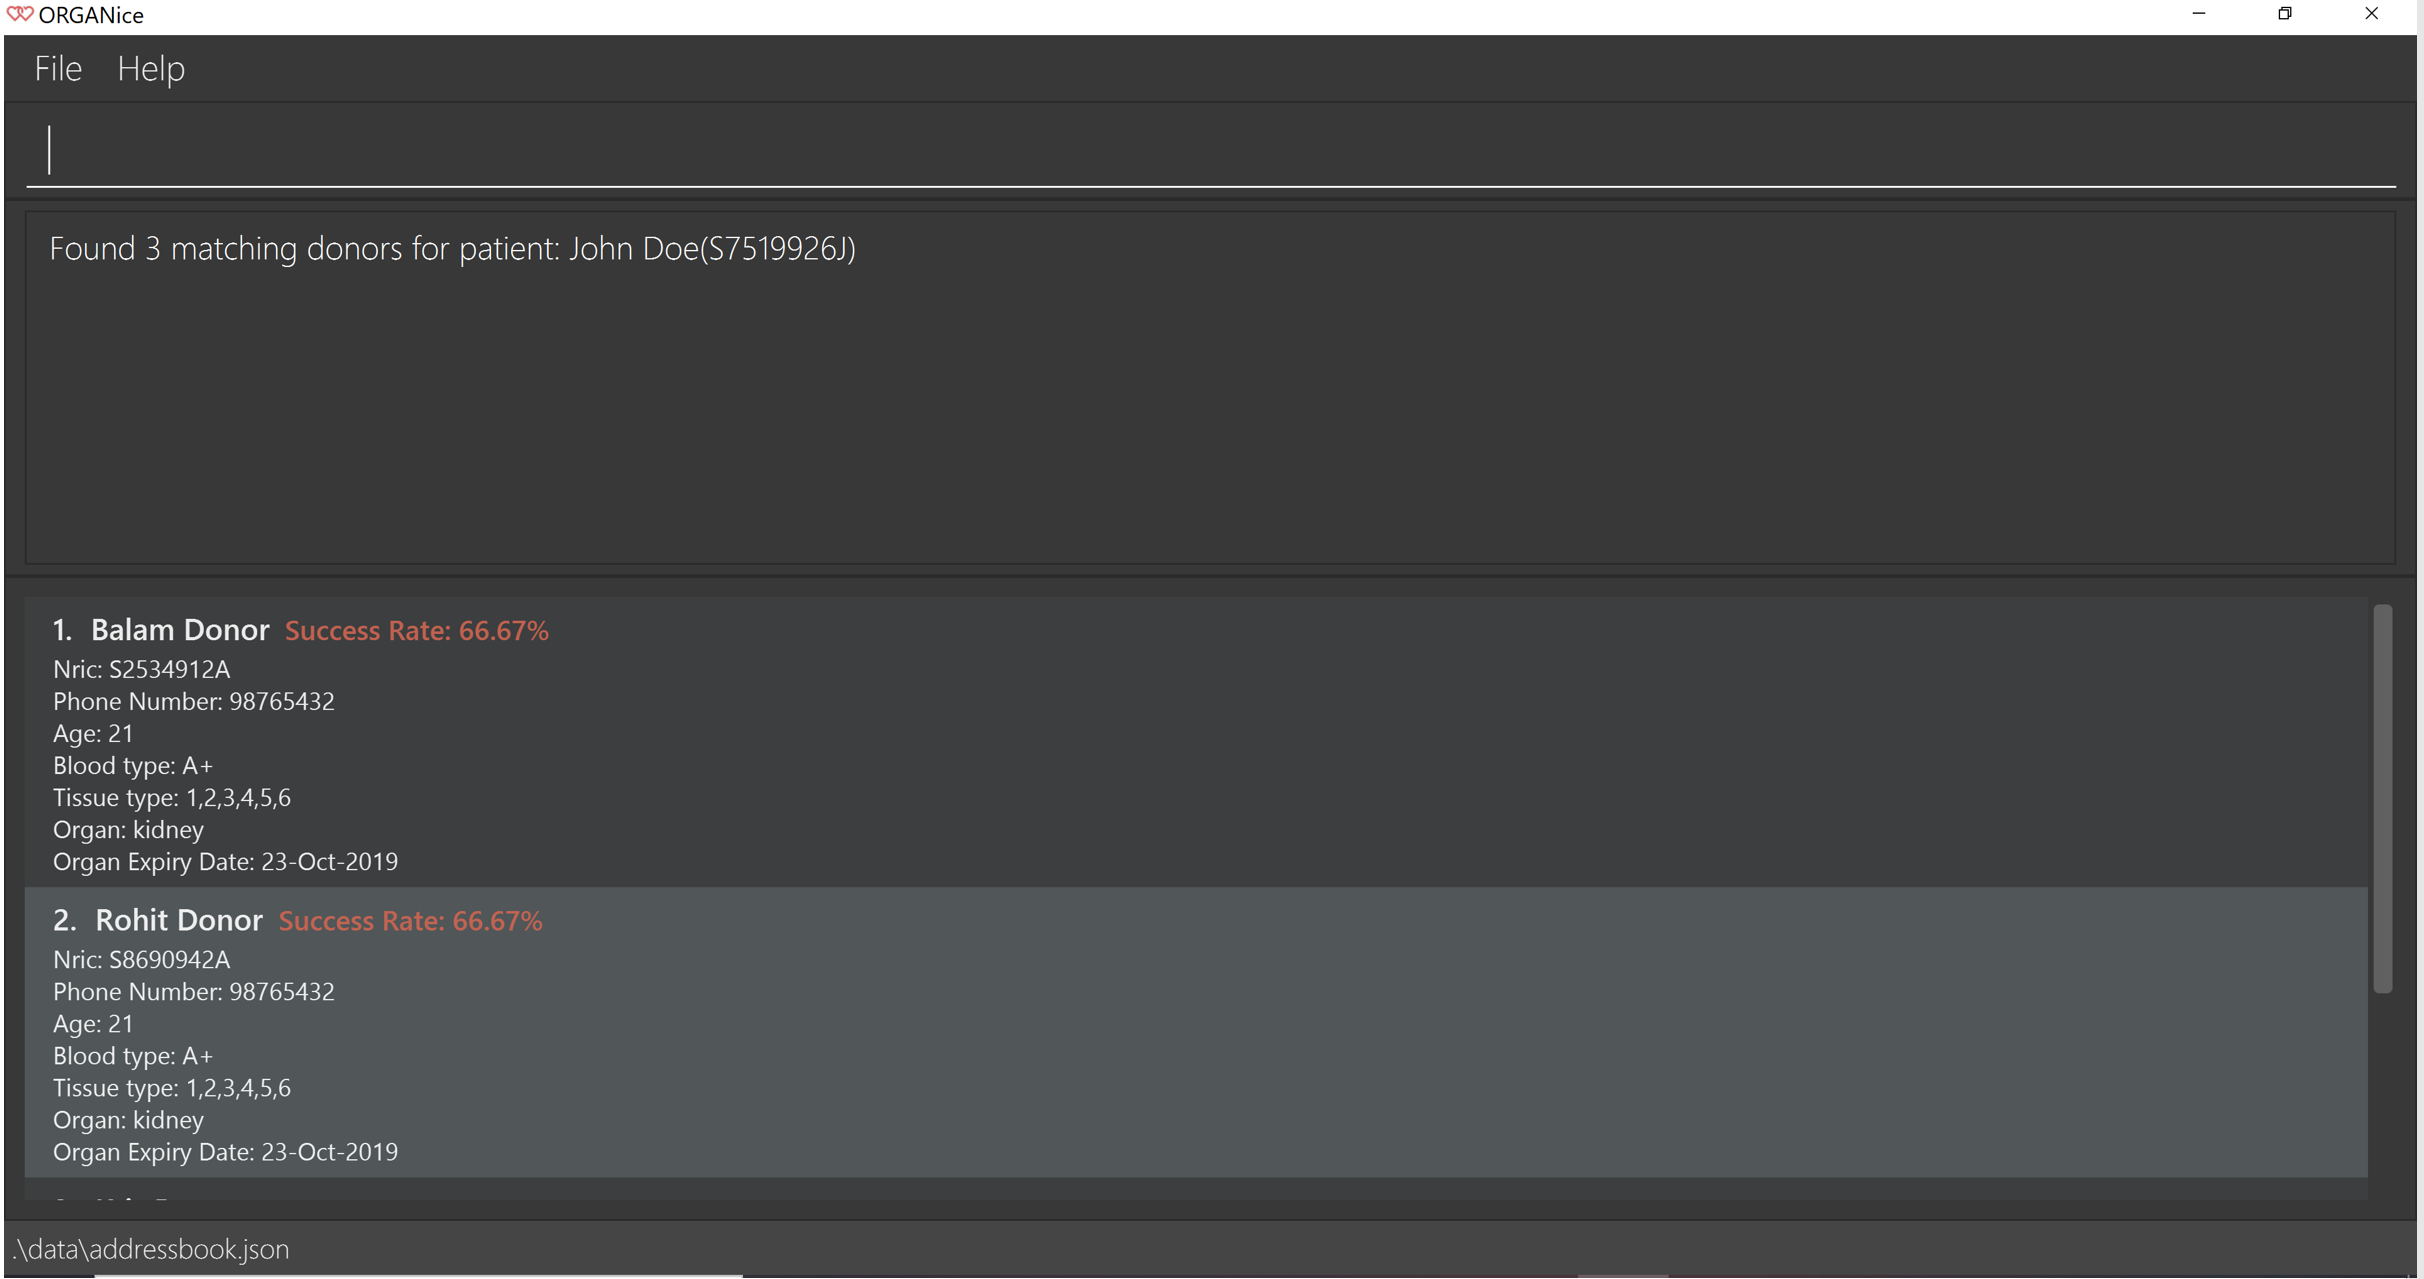
The 'Find Match' button will appear when all attributes are filled. After you clicked this button, ORGANice will add the patient to the list and it will execute the 'match' command.
ORGANice will then return back to its original state(exits from the form mode) and shows the list of potential donors for the patient you have just added as seen in Figure 10. Note that this button only appeared if you are adding a patient.
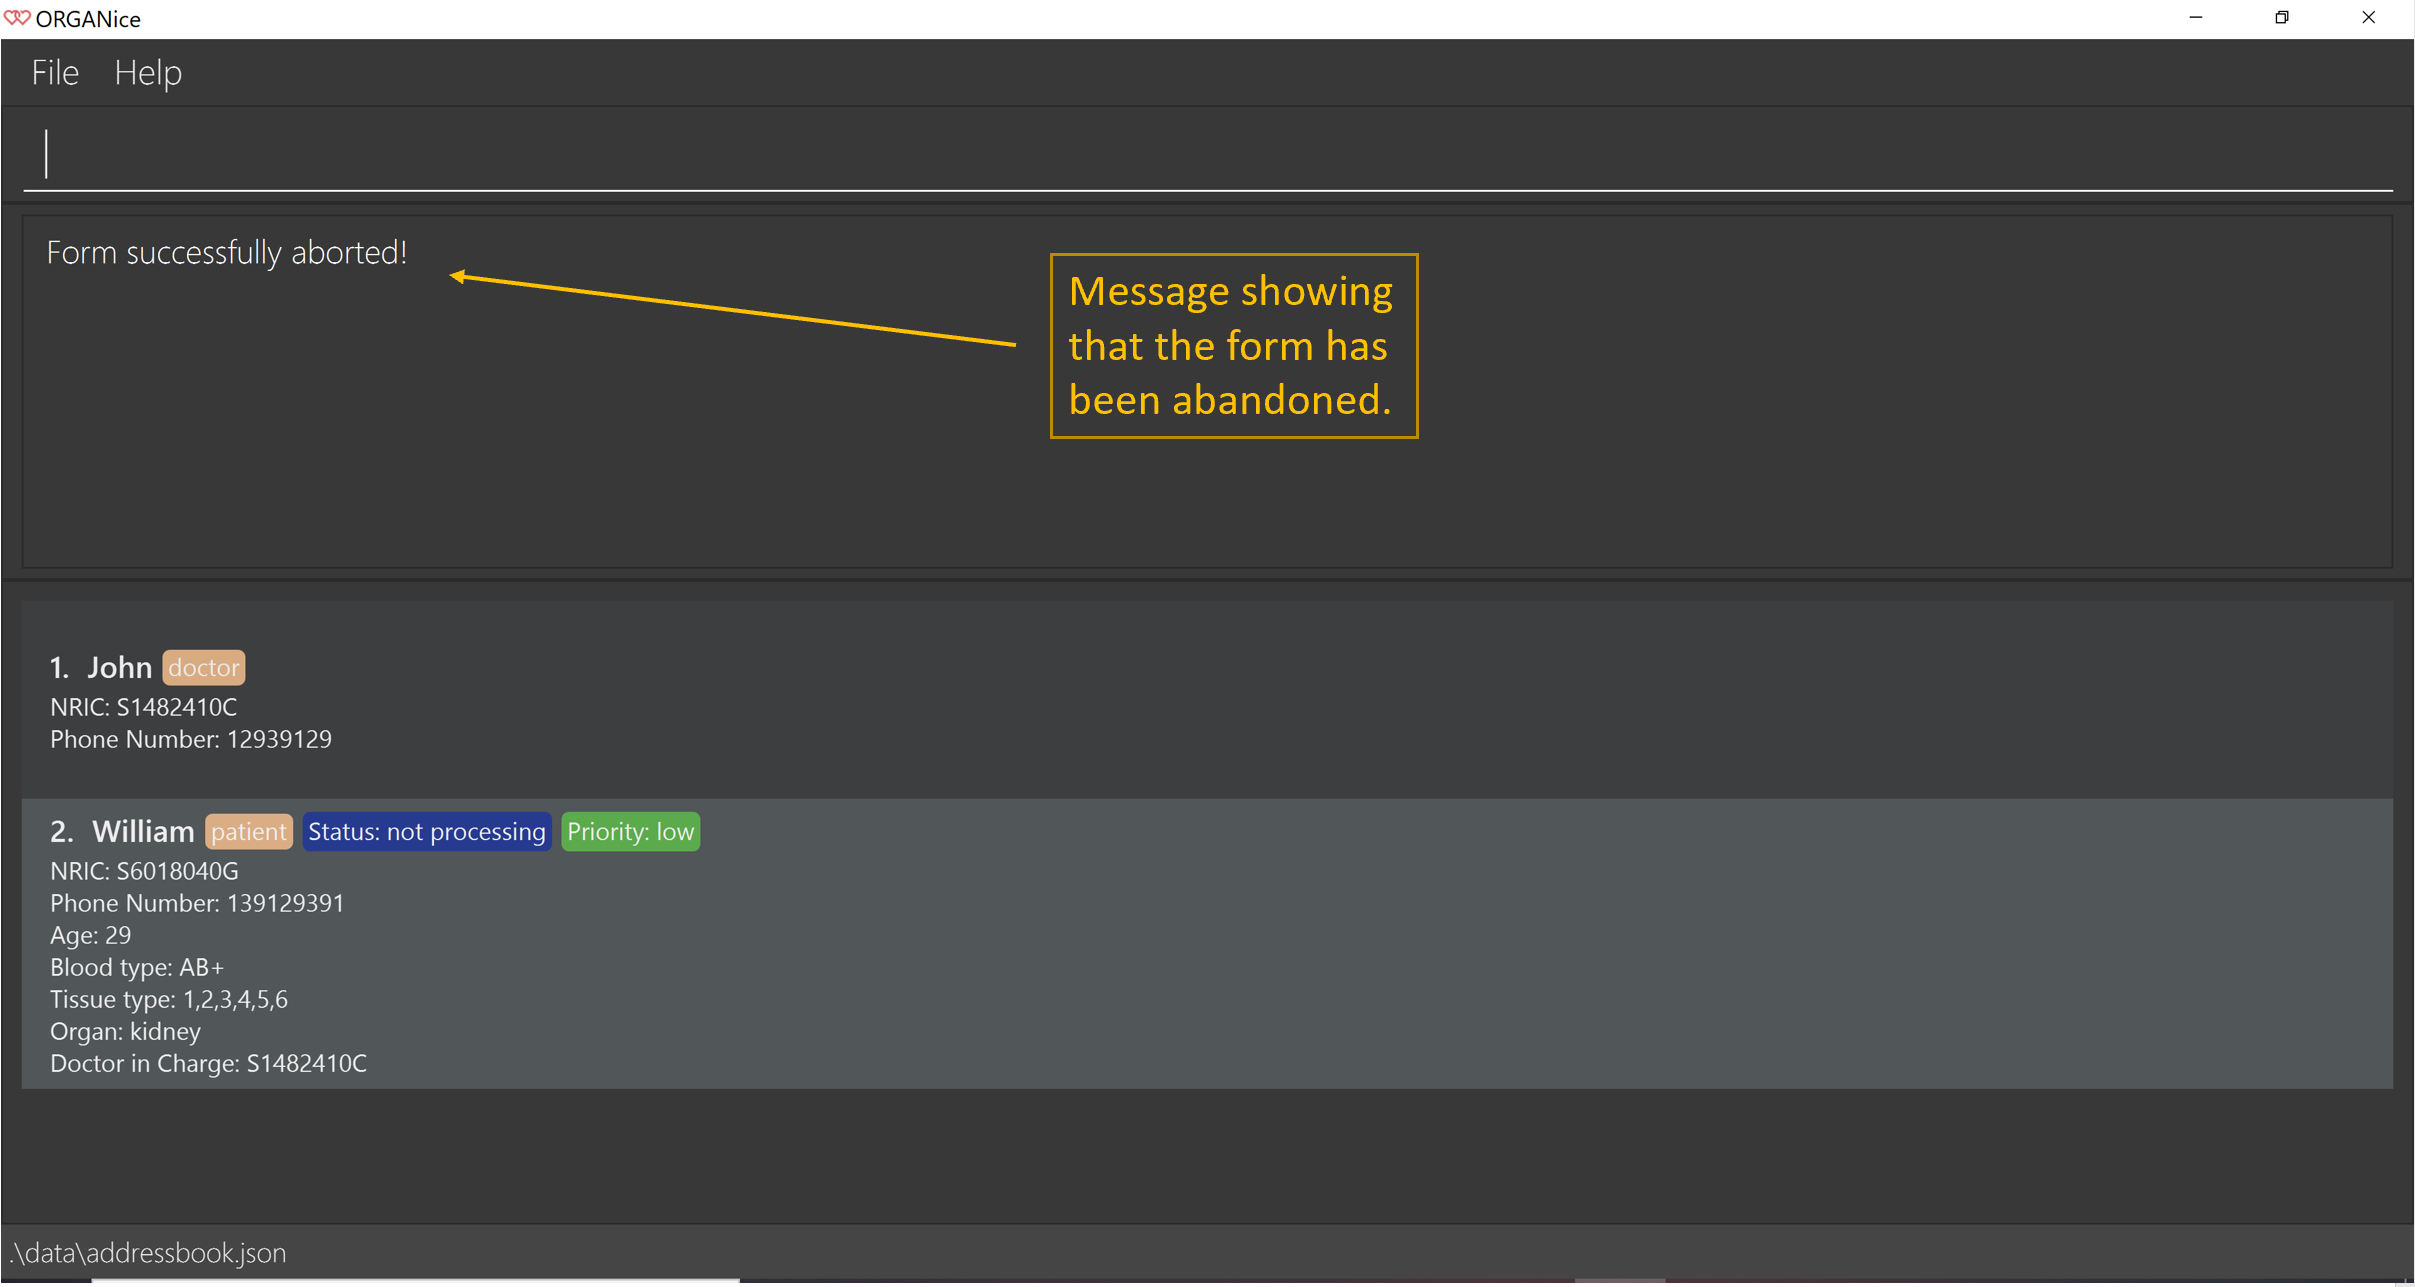
At any point in time, if you decided not to proceed with the addition and typed in /abort, you will be directed into the main page and notified that
you have abandoned the form as seen in Figure 10.
Furthermore, if you made any mistake while you are filling up the form, you can type in /undo to remove the last entry you entered.
For example, if you enter the wrong name and want to undo the action, type /undo in the Command Box and press Enter. Your previous input for the name will be removed from the form as seen in Figure 11
{end of extract}
Contributions to the Developer Guide
Given below are sections I contributed to the Developer Guide. They showcase my ability to write technical documentation and the technical depth of my contributions to the project. |
{start of extract}
Form mode feature
This section explains the implementation of the form mode feature.
Implementation
The form mode mechanism is facilitated by FormUiManager.
It modifies the CommandBox as well as PersonPanelListPlaceholder each time you input a specific attribute.
The following object diagram models the relationship and dependencies between FormUiManager and other objects:
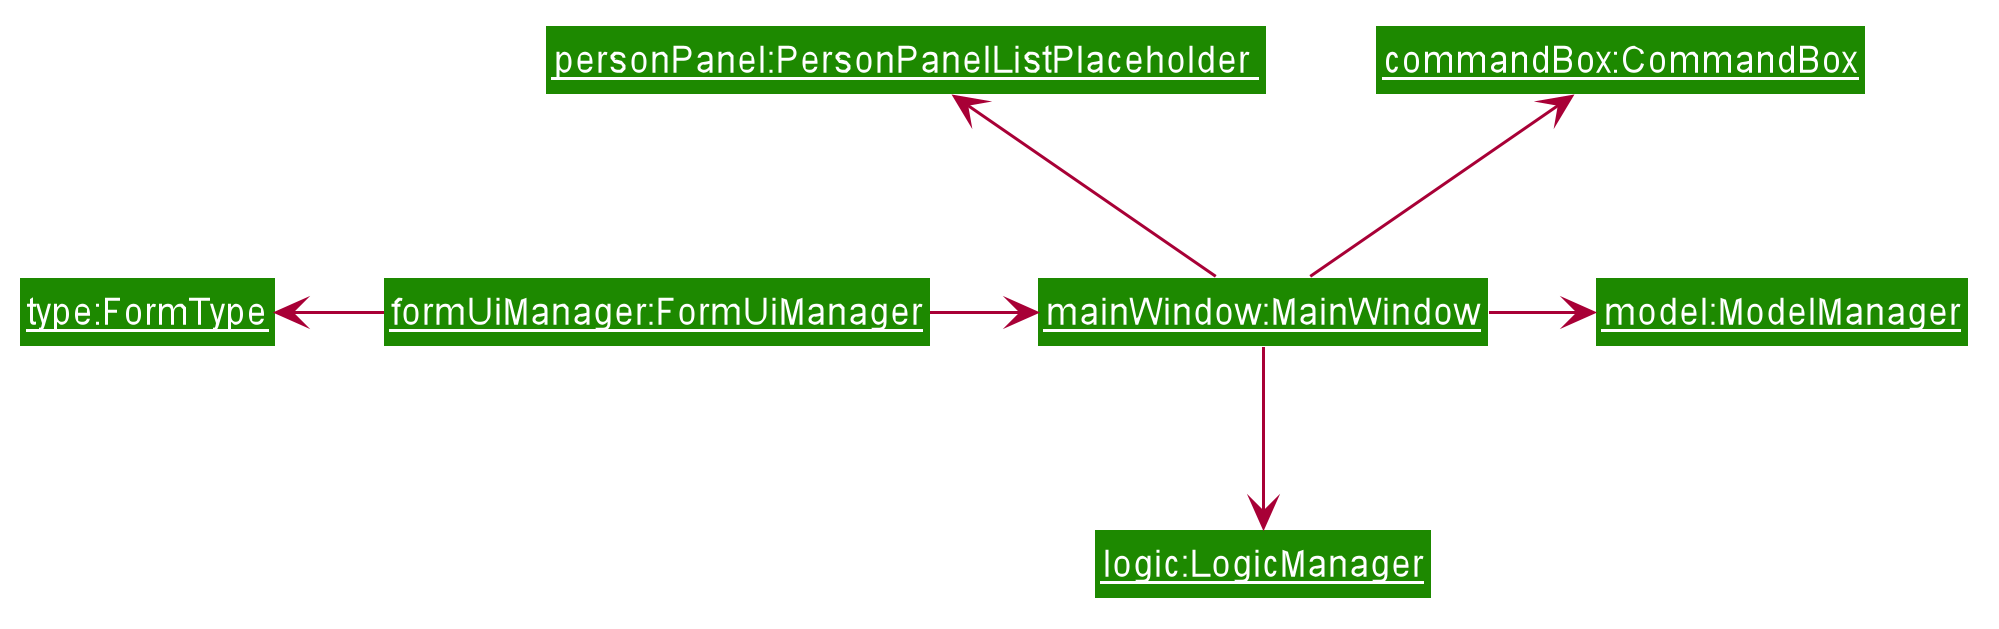
FormUiManager objectFormUiManager will need an object of class Type in order to determine what type of form(patient, doctor, or donor) will be displayed to you.
Additionally, FormUiManager implements the following operations:
-
FormUiManager#getPersonDetails()— ModifiesCommandBoxand prompts the user to input the attributes required. -
FormUiManager#setPersonDetails()— Sets the value for all required attributes of a specific type of person. -
FormUiManager#addDoctorToList()— Adds a doctor to the person list. -
FormUiManager#addPatientToList()— Adds a patient to the person list. -
FormUiManager#addDonorToList()— Adds a donor to the person list.
These operations are exposed in the Logic interface when the specific command is invoked by you.
Given below is an example usage scenario and how the form mode mechanism behaves at each step so that you can better understand how the different classes interact with each other:
Step 1. A user launches the application for the first time.
Step 2. The user executes add t/doctor command to add a doctor in the form mode. The add command calls AddressBookParser#parseCommand() that will return a new AddCommand instance.
Step 3. The LogicManager executes the command and notice that the CommandResult having a boolean value isForm and thus will create a new FormUiManager instance. The code snippet below demonstrates how the FormUiManager is created.
if (commandResult.isForm()) {
    resultDisplayPlaceholder.setMinHeight(100);
    FormAnimation.fadingAnimation(this);
    Type formType = commandResult.getFormType();
    FormUiManager formUiManager = new FormUiManager(this, formType, model, logger);
    personListPanelPlaceholder.getChildren().clear();
    if (formType.isDoctor()) {
        form = new DoctorForm();
        personListPanelPlaceholder.getChildren().add(((DoctorForm) form).getRoot());
    } else if (formType.isDonor()) {
        form = new DonorForm();
        personListPanelPlaceholder.getChildren().add(((DonorForm) form).getRoot());
    } else if (formType.isPatient()) {
        form = new PatientForm(this);
                    personListPanelPlaceholder.getChildren().add(((PatientForm) form).getRoot());
                }
                formUiManager.getPersonDetails();
                return commandResult;
            }
Step 4. The FormUiManager changes the display of the application based on the type of the person specified in Step 1 by modifying the content of the PersonListPanelPlaceholder as well as the CommandExecutor in the CommandBox object by calling FormUiManager#getPersonDetails().
Step 5. The user inputs the attribute that is prompted until all the required attributes are specified.
Step 6. The user confirms the details of the person and FormUiManager#setPersonDetails() will be called and depending on the type of the person specified, calling FormUiManager#addDoctorToList(), or FormUiManager#addPatientToList(), or FormUiManager#addDonorToList() respectively.
Step 7. FormUiManager calls the AddressBookParser#parseCommand() to add the person and save it in the Storage interface.
Given below is the Sequence Diagram for interactions within the Logic component when a user typed in add t/doctor

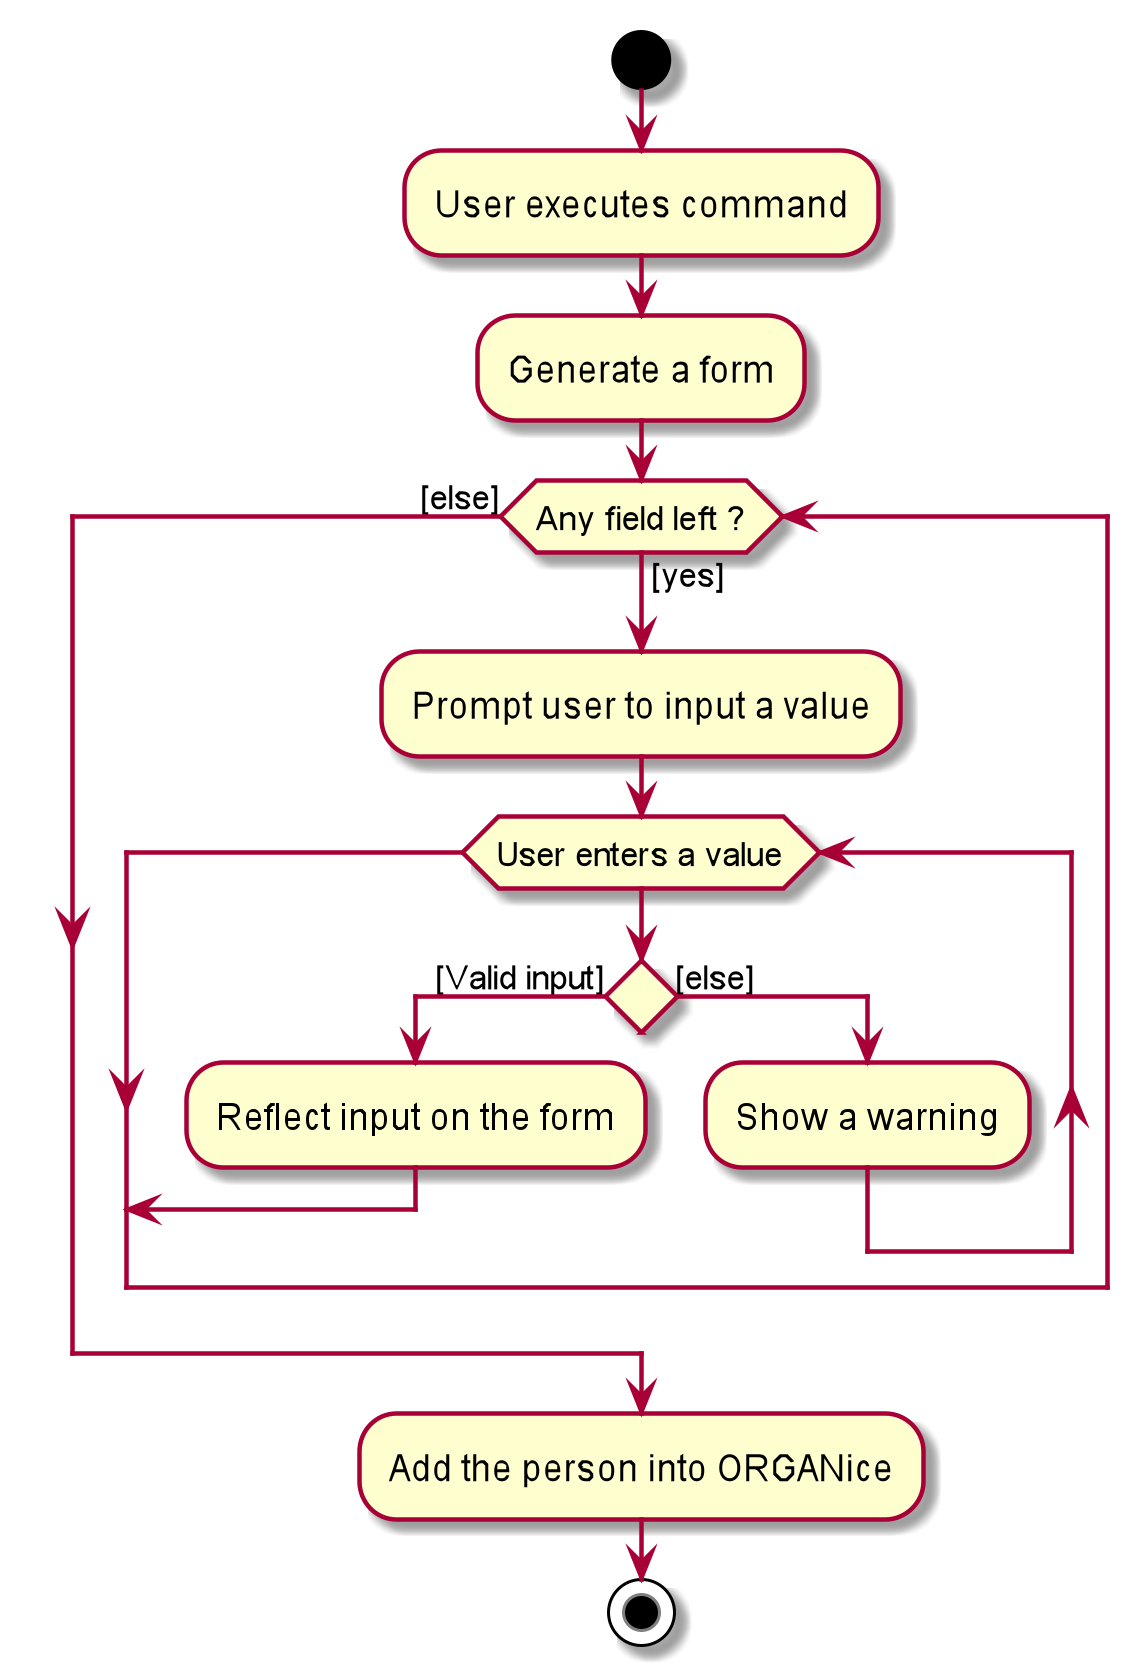
The following activity diagram summarizes what happens when you execute the add t/TYPE command:
Design Considerations
This section will explain the reason for having some aspects.
Aspect: How form mode feature executes
-
Alternative 1 (current choice): Use the same
addcommand to do theFormmode.-
Pros: Easy to implement. This is the reason why this alternative is chosen as it does not take too much time to implement.
-
Cons: May not be the best approach since one command will have two different modes.
-
-
Alternative 2: Use a new command for the
Formmode.-
Pros: Will be less confusing for the user since there is a separate command for
Formmode -
Cons: We must creates a new parser and command classes just to deal with another
addfunctionality.
-
{end of extract}