By: CS2103T-T13-1 Since: Sep 2019 Licence: MIT
1. Introduction
Welcome to ORGANice! ORGANice is an organ transplant manager desktop application specifically designed for hospital administration staff who prefer typing.
Do note the following symbols and formatting used in this document:
| This section contains important information. |
| This section contains a helpful tip! |
find A grey highlight (called a mark-up) indicates that this is a command that can be typed into the command box
and executed by the application.
1.1. Purpose
This guide documents the software design and considerations made during the development of ORGANice.
1.2. Intended audience
This guide is meant for developers who would like to further develop ORGANice.
2. Setting up
To set up the developer tools needed to develop ORGANice, refer to the guide here.
3. Design
This section provides a high-level overview of ORGANice's codebase. It is divided into 6 subsections:
-
Architecture
-
UI component
-
Logic component
-
Model component
-
Storage component
-
Common classes
3.1. Architecture
The Architecture section is meant to explain the high-level design of ORGANice.
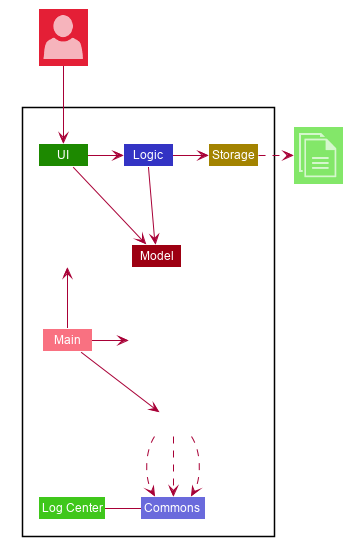
The Architecture Diagram given above depicts the high-level design of the App. Given below is a quick overview of each component.
The .puml files used to create diagrams in this document can be found in the diagrams folder.
Refer to the Using PlantUML guide to learn how to create and edit diagrams.
|
The main folder contains two classes called Main and MainApp.
It is responsible for performing the following tasks:
-
At app launch: Initializes the components in the correct sequence, and connects them up with each other.
-
At shut down: Shuts down the components and invokes cleanup methods where necessary.
Commons represents a collection of classes used by multiple other components. For example,
the LogsCenter class is in the Commons collection because it is used by many classes
to write log messages to the ORGANice's log file.
The rest of ORGANice consists of four components.
Each of the four components
-
Defines its API in an
interfacewith the same name as the Component. -
Exposes its functionality using a
{Component Name}Managerclass.
For example, the Logic component (see the class diagram given below) defines it’s API in the Logic.java interface and exposes its functionality using the LogicManager.java class.
How the architecture components interact with each other
The Sequence Diagram below shows how the components interact with each other for the scenario when a user
issues the command edit S5678908D n/Mr Lim.
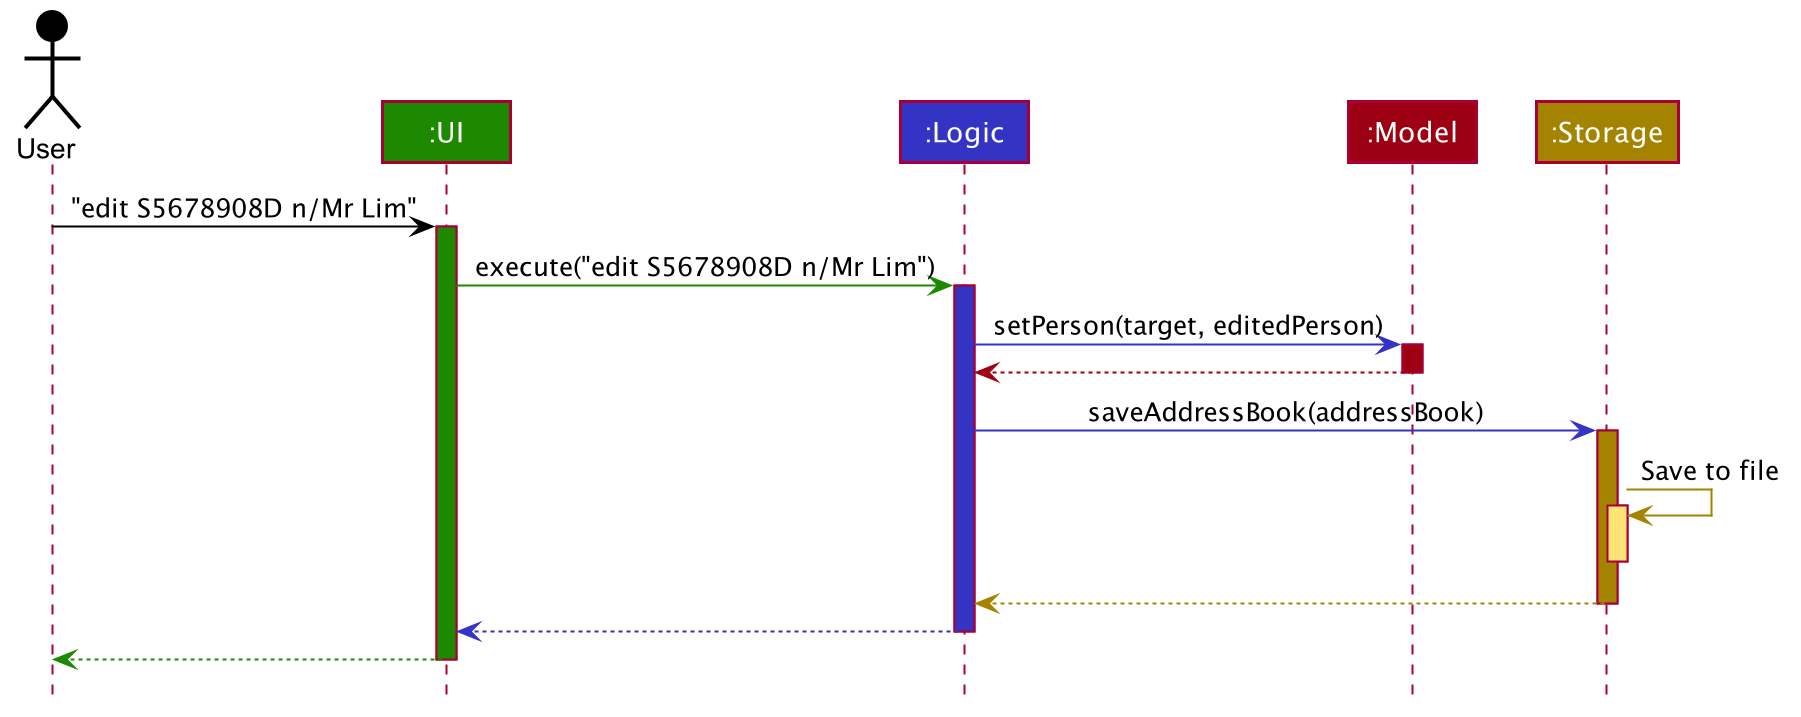
edit S5678908D n/Mr Lim commandThe sections below give more details of each component.
3.2. UI component
This section explains the design of the UI component.
Figure 4 below depicts the classes in the UI component and their relationships with one another.
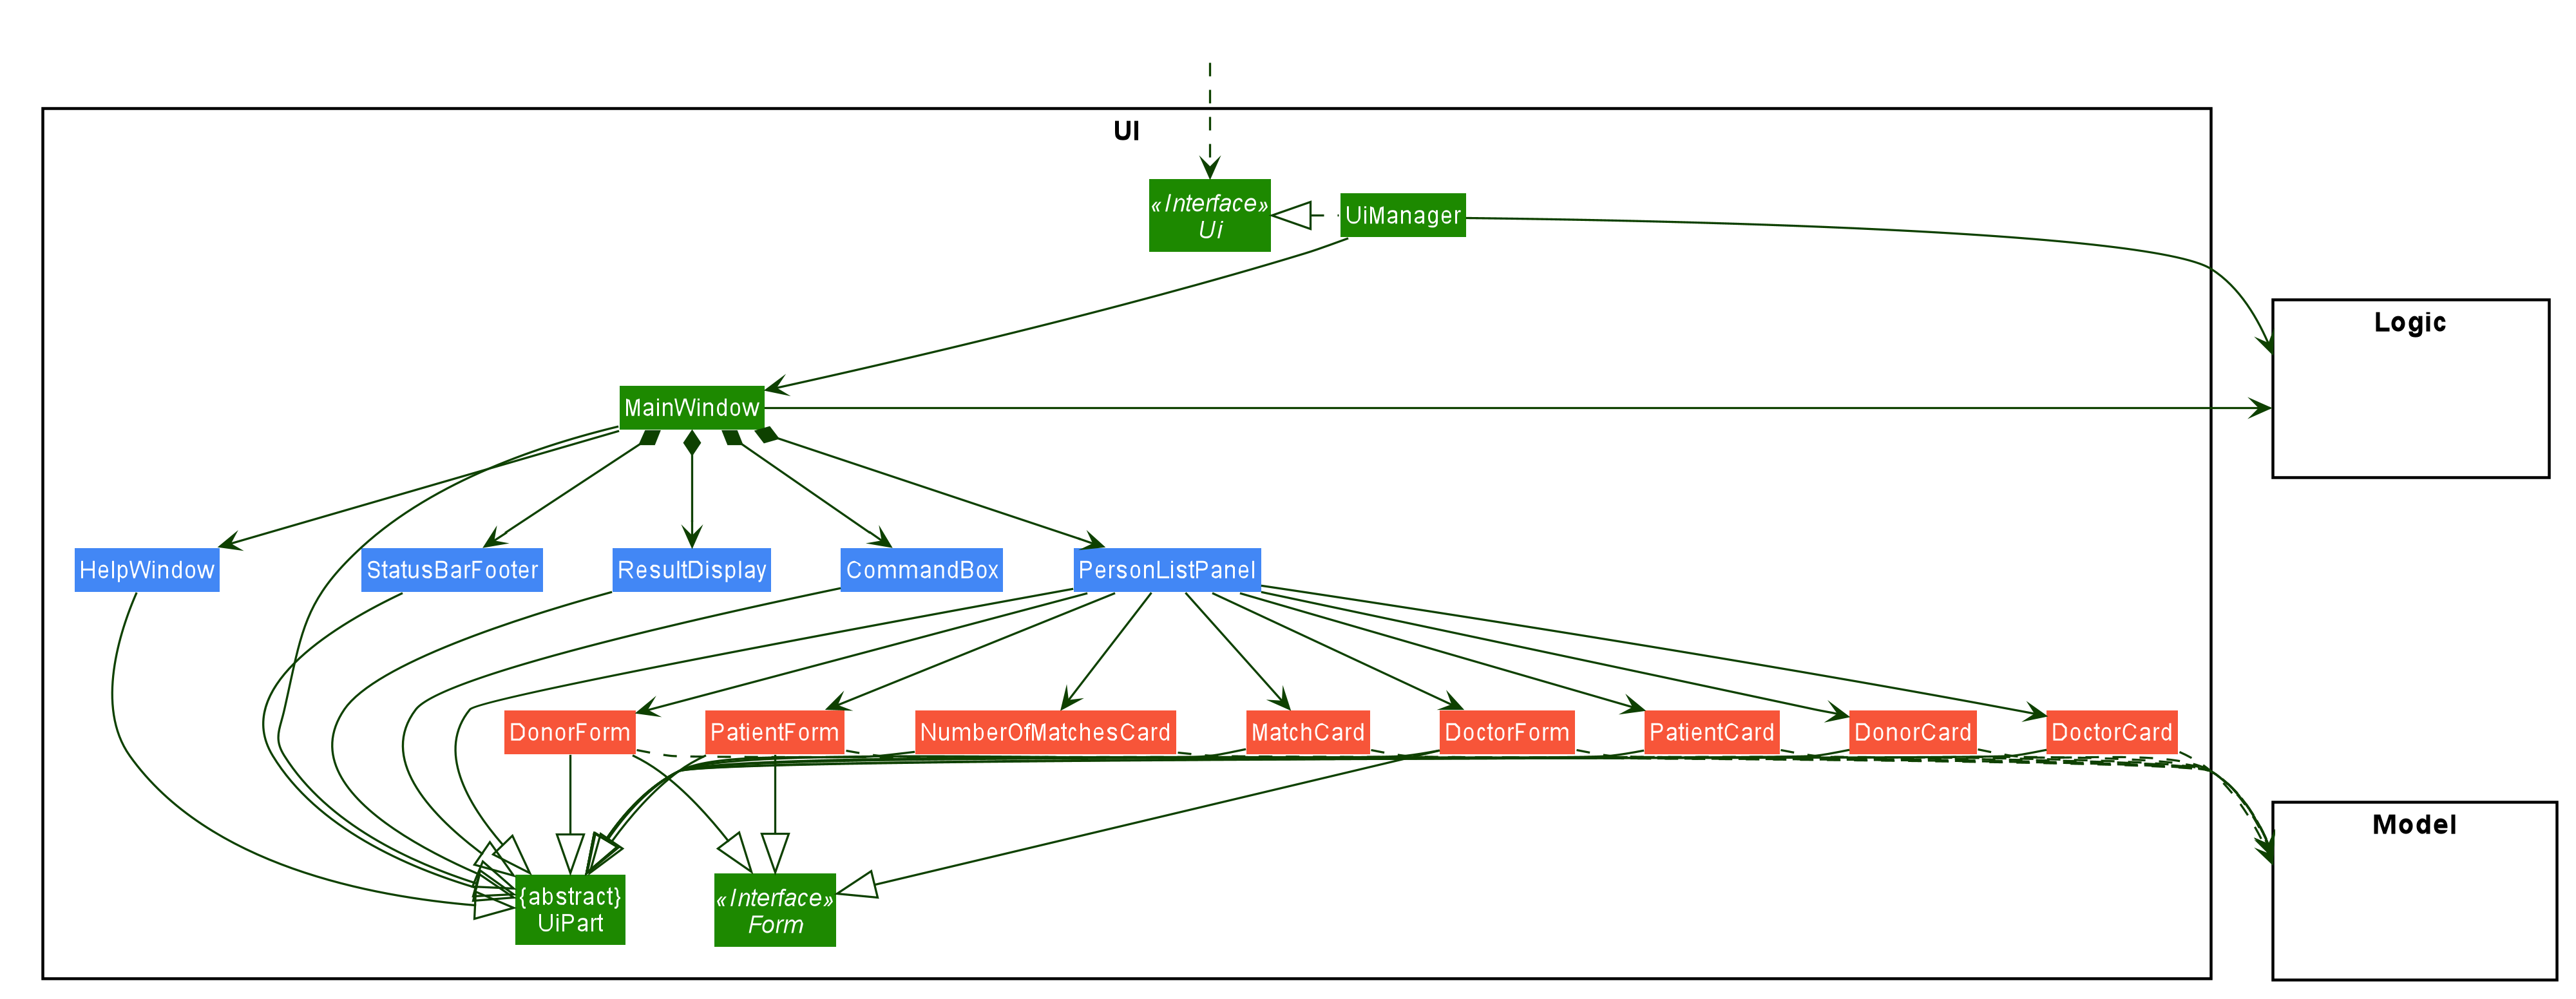
The UI consists of a MainWindow that is made up of parts e.g.CommandBox, ResultDisplay, PersonListPanel, StatusBarFooter etc. All these, including the MainWindow, inherit from the abstract UiPart class.
The UI component uses JavaFx UI framework. The layout of these UI parts are defined in matching .fxml files that are in the src/main/resources/view folder. For example, the layout of the MainWindow is specified in MainWindow.fxml
The UI component,
-
Executes user commands using the
Logiccomponent. -
Listens for changes to
Modeldata so that the UI can be updated with the modified data.
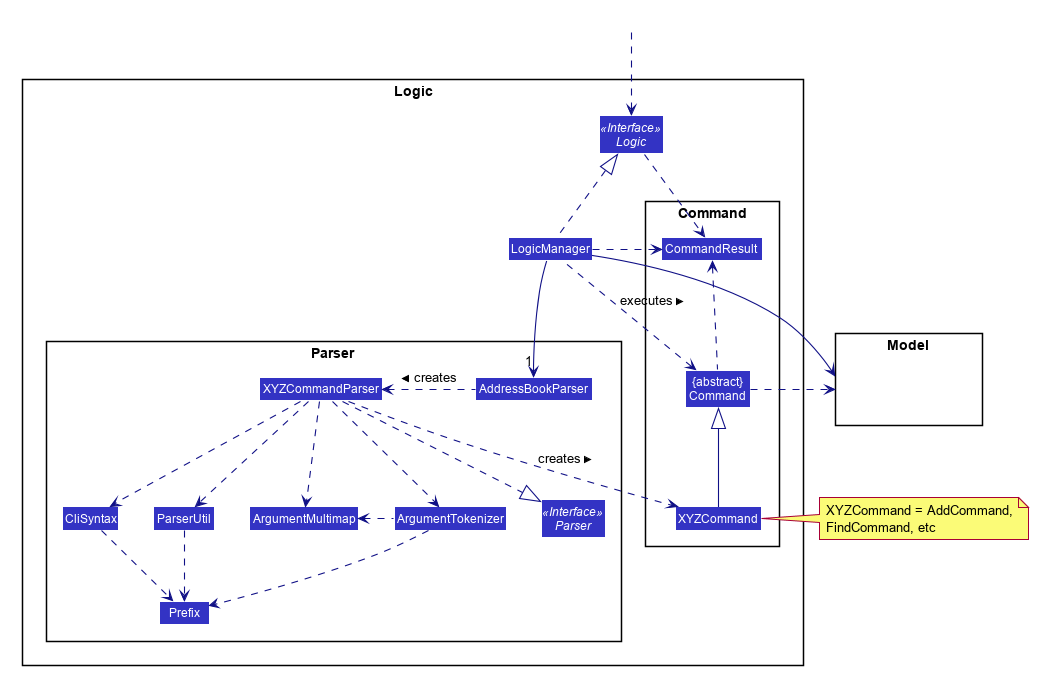
3.3. Logic component
This section explains the design of the Logic component.
Figure 5 below depicts the classes in the Logic component and their relationships with one another.
-
Logicuses theAddressBookParserclass to parse the user command. -
This results in a
Commandobject which is executed by theLogicManager. -
The command execution can affect the
Model(e.g. adding a person). -
The result of the command execution is encapsulated as a
CommandResultobject which is passed back to theUi. -
In addition, the
CommandResultobject can also instruct theUito perform certain actions, such as displaying help to the user.
Given below is the Sequence Diagram for interactions within the Logic component for the execute("edit ic/S5678908D n/Mr Lim") API call.
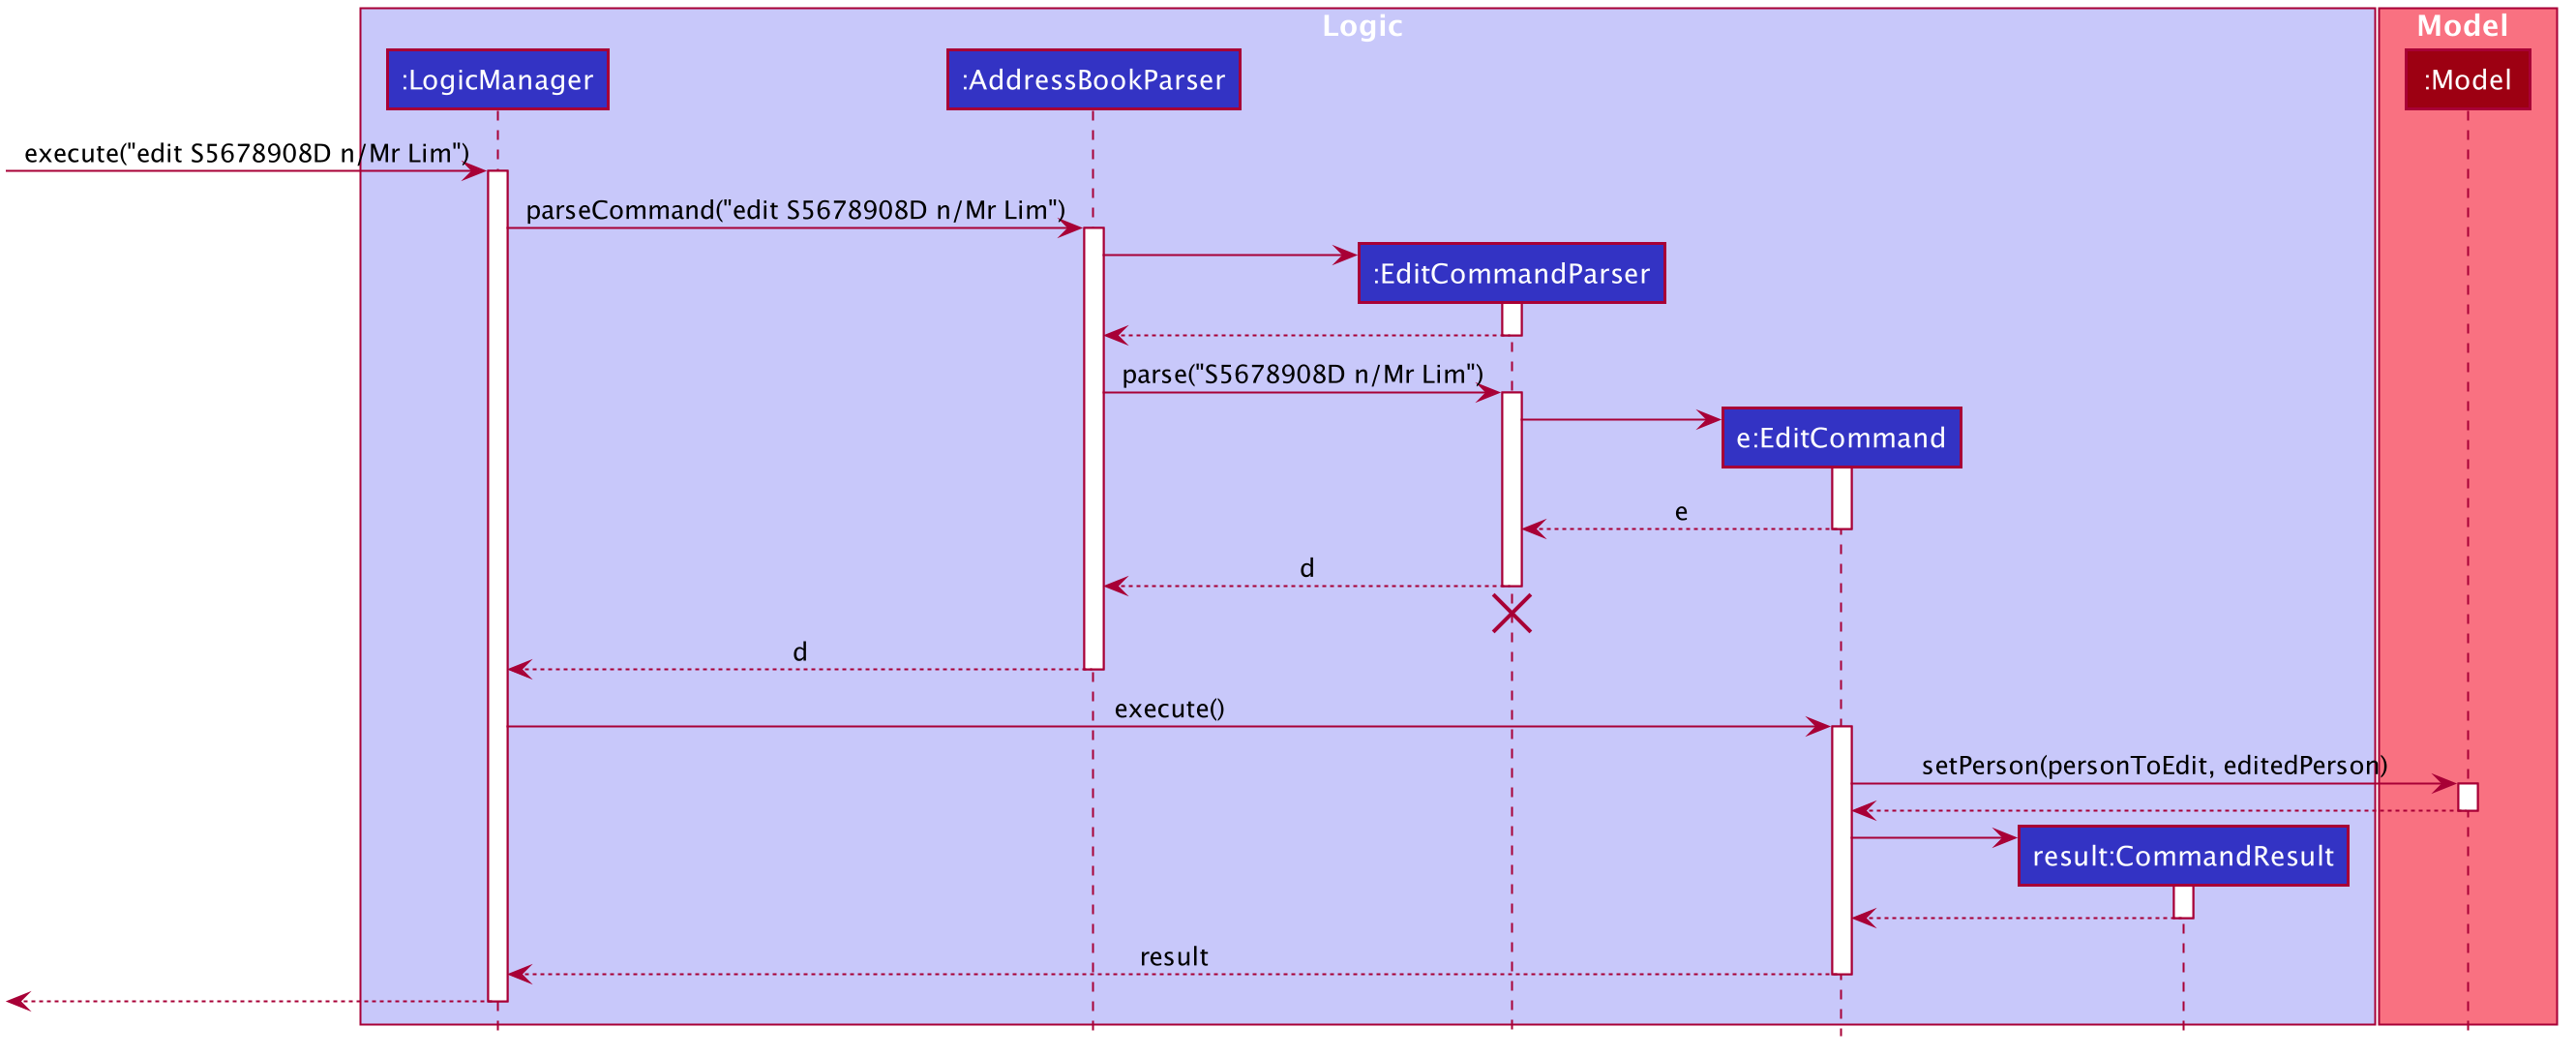
edit S5678908D n/Mr Lim Command
The lifeline for EditCommandParser should end at the destroy marker (X) but due to a limitation of PlantUML, the lifeline reaches the end of diagram.
|
3.4. Model component
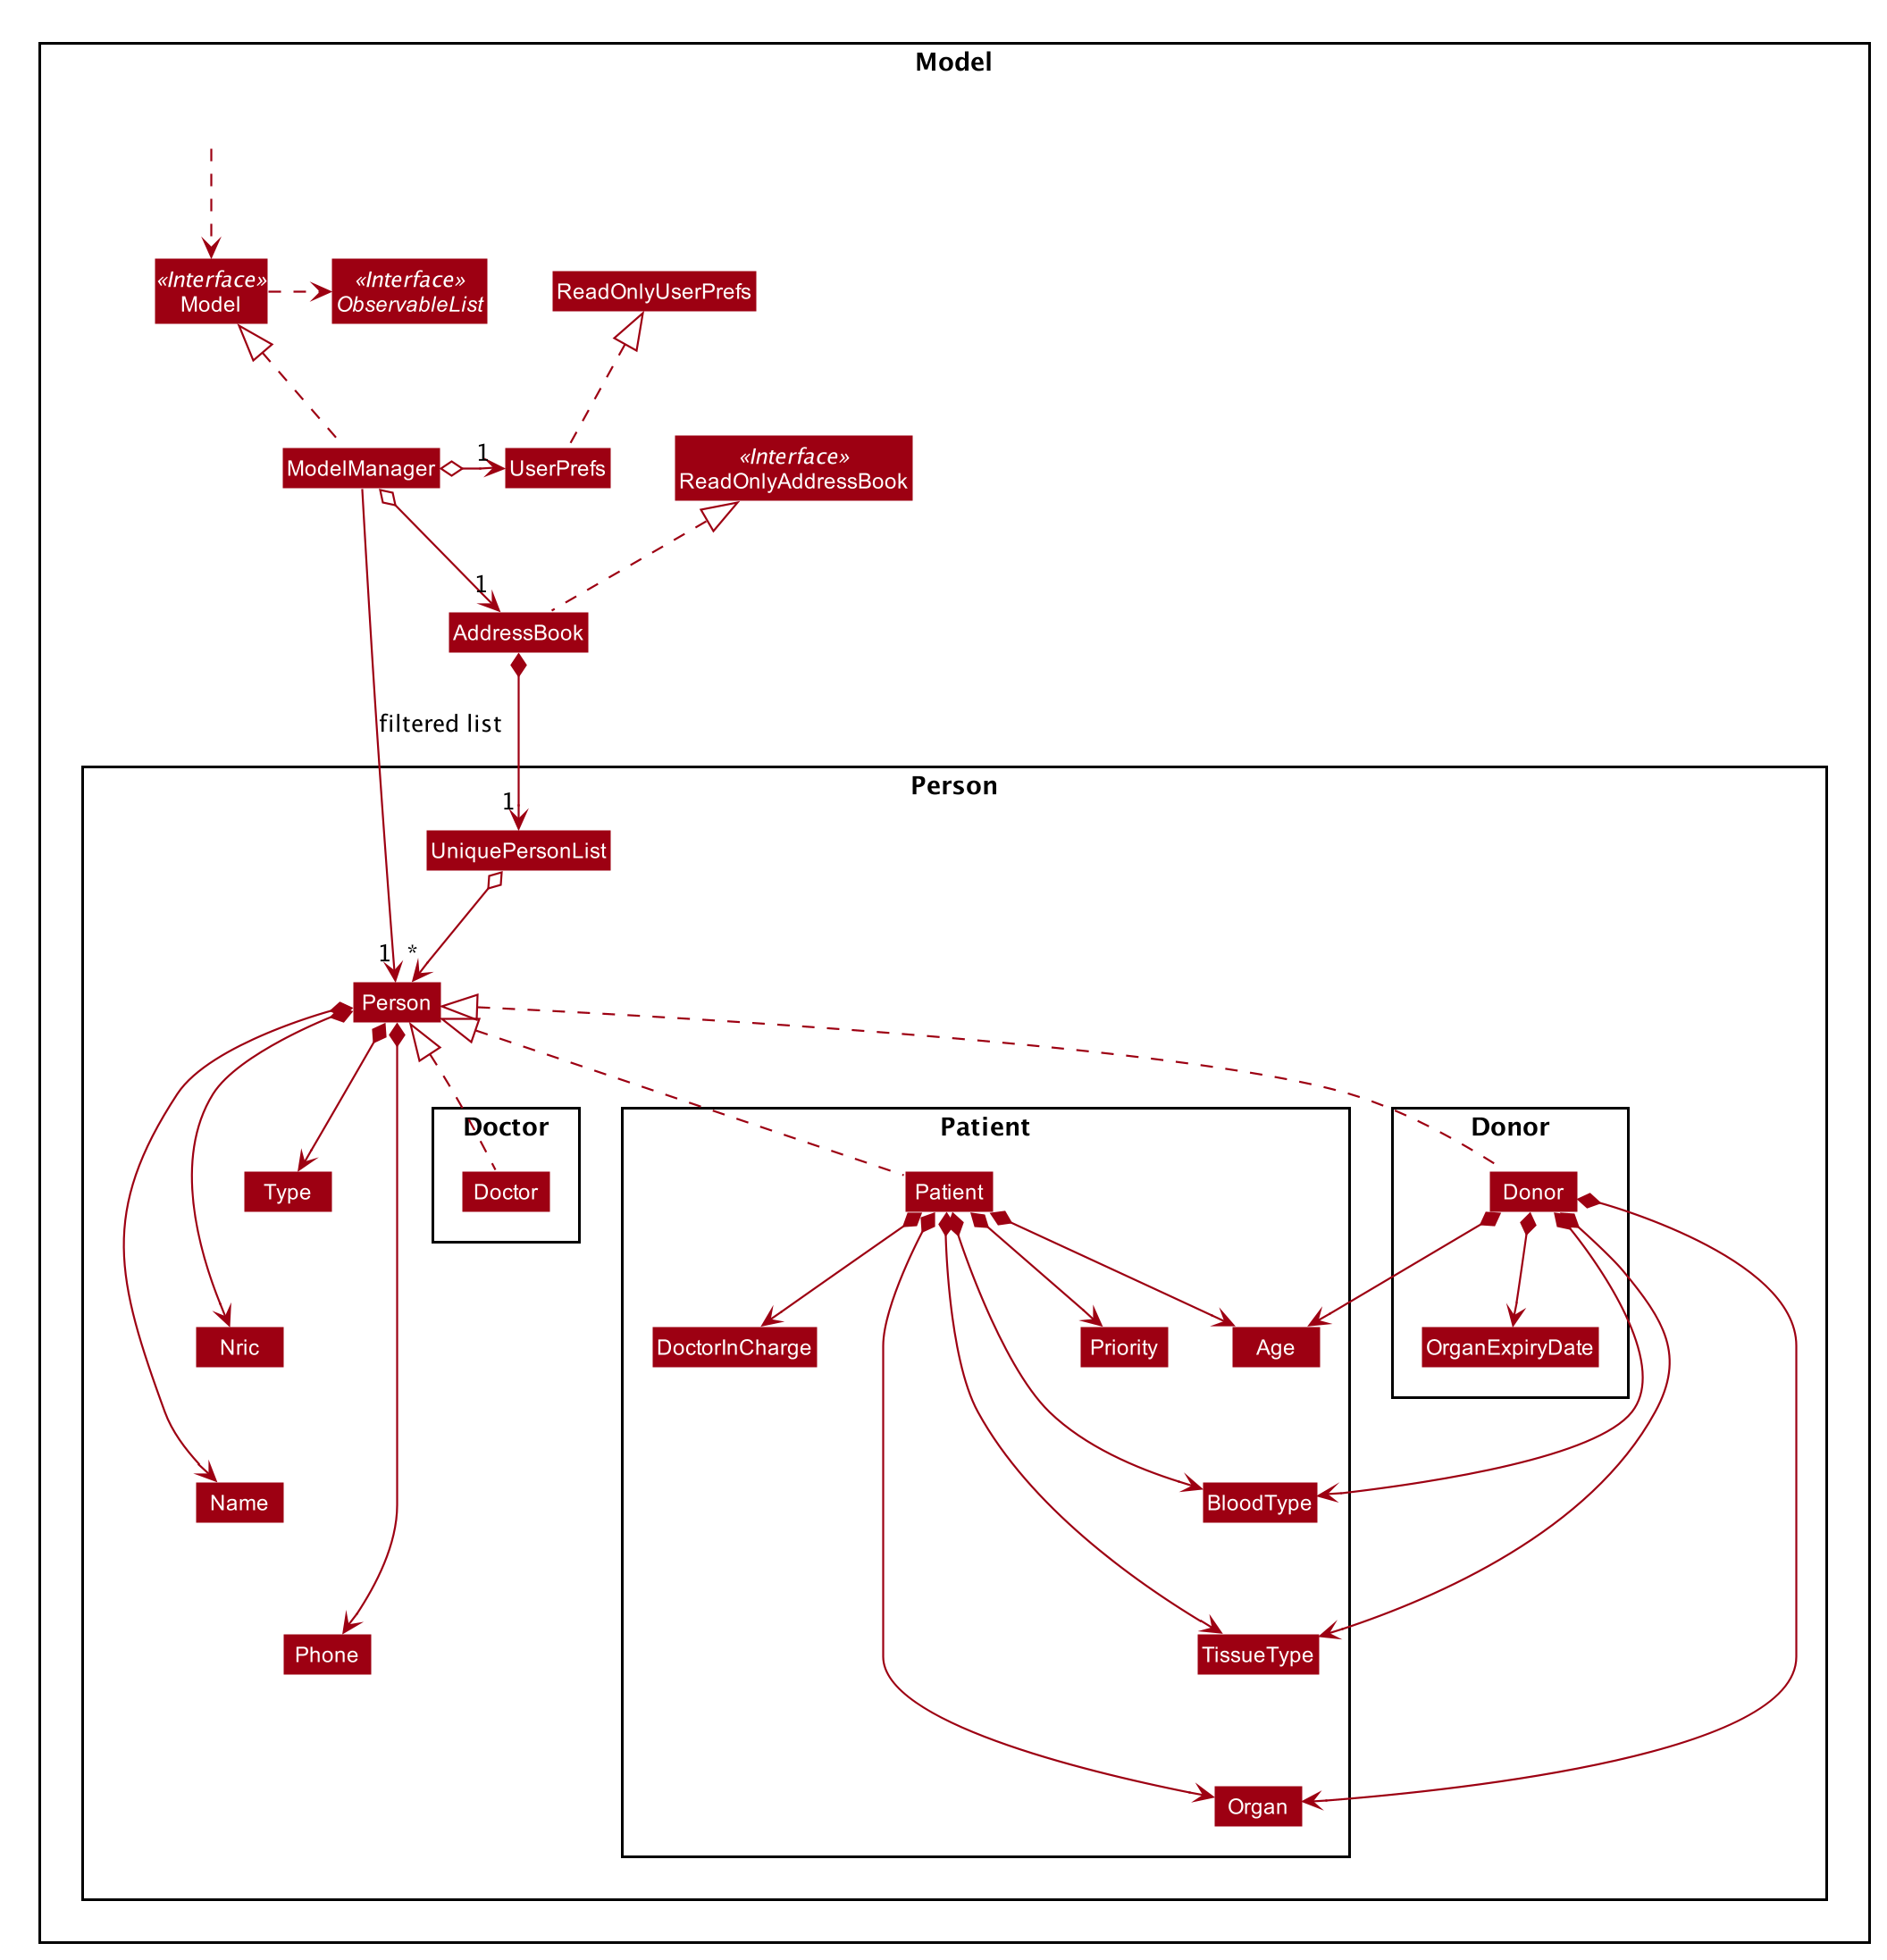
The Model,
-
stores a
UserPrefobject that represents the user’s preferences. -
stores the Address Book data.
-
exposes an unmodifiable
ObservableList<Person>that can be 'observed' e.g. the UI can be bound to this list so that the UI automatically updates when the data in the list change. -
does not depend on any of the other three components.
3.5. Storage component

The Storage component,
-
can save
UserPrefobjects in json format and read it back. -
can save the Address Book data in json format and read it back.
3.6. Common classes
Classes used by multiple components are in the ORGANice.commons package.
4. Implementation
This section describes some noteworthy details on how features in ORGANice are implemented.
4.1. List feature
This section describes how the list feature is implemented.
The list feature is implemented using the ListCommand(Type type). When the list command is executed,
the method ModelManager#updateFilteredPersonList(Predicate<Person> predicate) takes in a predicate
to decide what type of Person to show on the filteredPersons list.
Therefore, in addition to the existing PREDICATE_SHOW_ALL_PERSONS predicate, three other predicates are introduced
in the Model interface to update the list.
The code snippet below shows what these predicates are:
    /** {@code Predicate} that always evaluate to true */
    Predicate<Person> PREDICATE_SHOW_ALL_PERSONS = unused -> true;

    /** {@code Predicate} that always evaluate to true if person is a doctor */
    Predicate<Person> PREDICATE_SHOW_ALL_DOCTORS = person -> person.getType().isDoctor();

    /** {@code Predicate} that always evaluate to true  if person is a donor */
    Predicate<Person> PREDICATE_SHOW_ALL_DONORS = person -> person.getType().isDonor();

    /** {@code Predicate} that always evaluate to true if person is a patient */
    Predicate<Person> PREDICATE_SHOW_ALL_PATIENTS = person -> person.getType().isPatient();
The activity diagram below illustrates what happens when a user uses the list command.
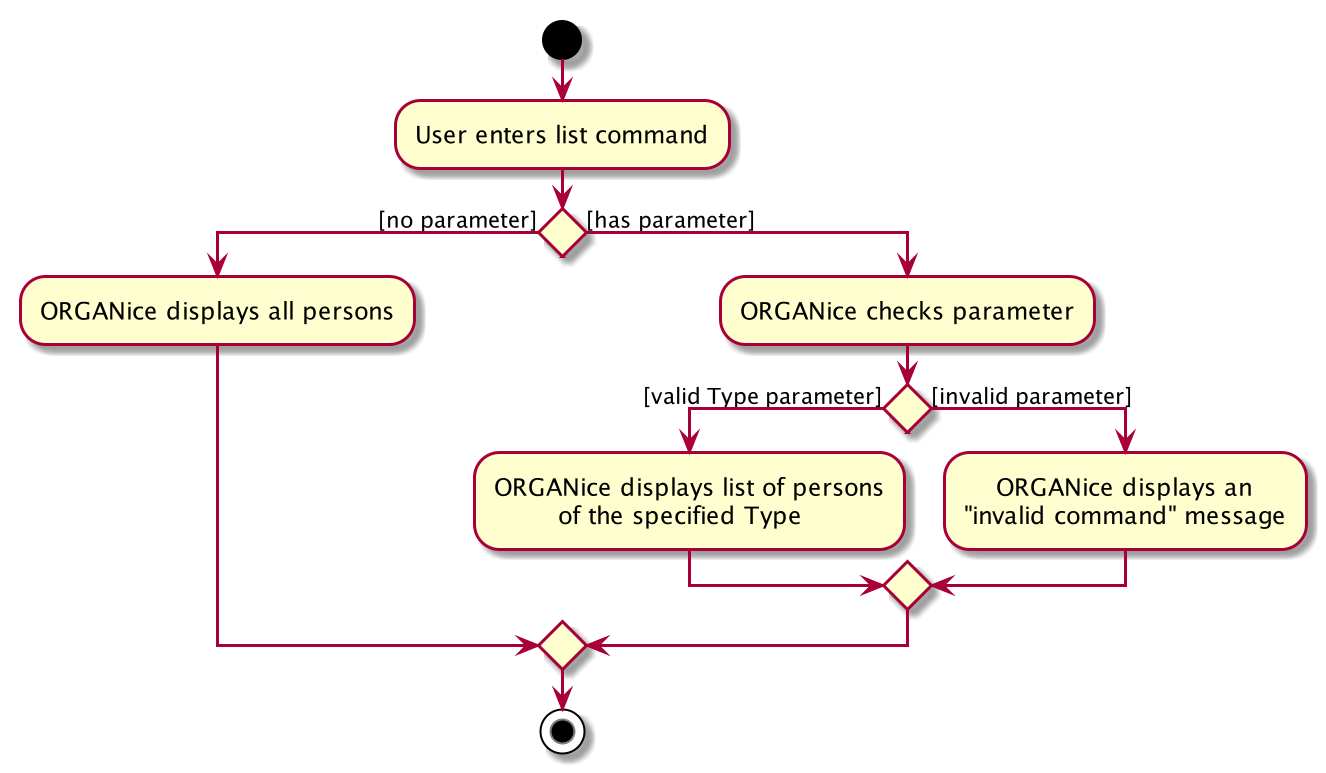
When the user enters a list command, the result differs depending on the parameter of the command.
If there is no parameter after 'list', ORGANice will simply list all existing doctors, patients, and donors on the list.
If there is a parameter, ORGANice will check if it is a valid TYPE parameter and display the correct list of persons
that corresponds to this type.
If the parameter is not valid, an error message will be displayed to indicate that the command is invalid.
4.2. Matching feature
This section explains the current implementation and design considerations of the matching feature.
Matching is facilitated by the MatchCommand class, which extends the Command class.
It implements the MatchCommand#match(Person donor, Patient patient) operation, which checks if the given patient and
donor have compatible blood and tissue types. For the context of this application, a patient and donor
pair with compatible blood and tissue types is considered as a potential match.
The following operations in ModelManager accesses the match method:
-
ModelManager#matchDonors(Patient patient)— Matches all donors in ORGANice with the specified patient. For each donor that potentially matches the patient, aMatchedDonorobject is created to store the compatibility rate of the donor with the patient. -
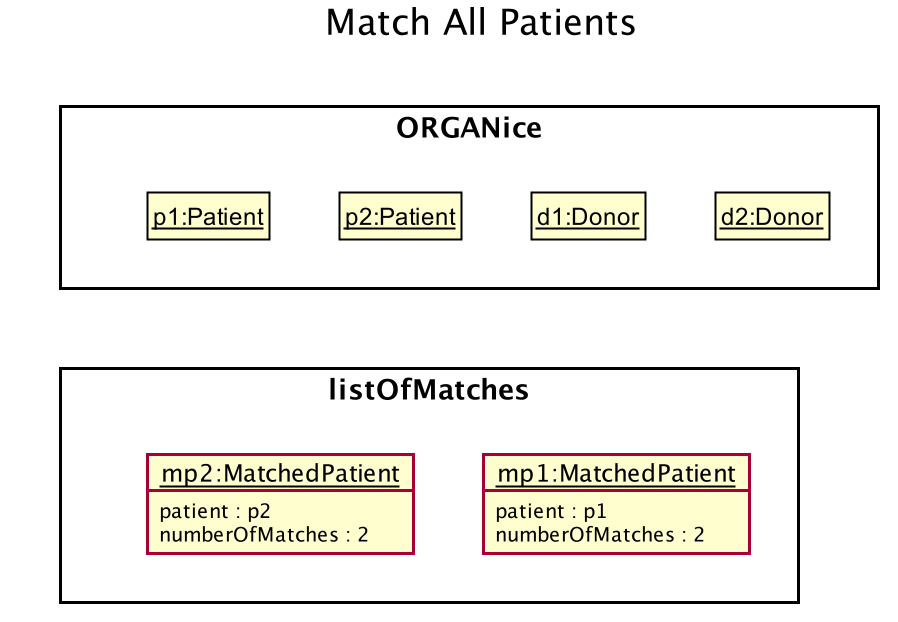
ModelManager#matchPatients()— Matches all donors with all patients. For every patient in ORGANice, aMatchedPatientobject is created to store the number of donors that are potential matches with that patient.
MatchedDonor and MatchedPatient objects are stored in an ObservableList called
listOfMatches. Contents of listOfMatches are copied to displayedPersons, which is another
ObservableList that can be accessed by Logic and is displayed by the UI
component.
Each time a user invokes the match feature, the contents of listOfMatches are deleted.
New MatchedPatient and MatchedDonor objects are created and stored in the list again.
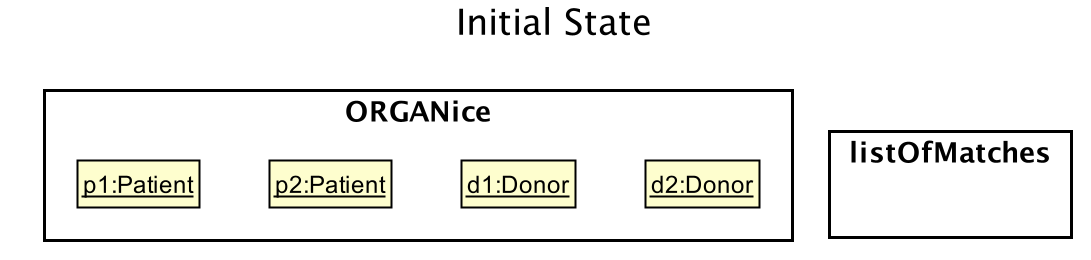
Given below is an example usage scenario and how the match feature works at each step:
Step 1. The user opens up the application with an existing list of patients and donors.
As seen in the diagram below, there are 2 Patient and 2 Donor objects in ORGANice,
and no objects in listOfMatches.
Step 2. The user types in the command match ic/all. Each patient will be matched with
all donors via the MatchCommand#match operation. A MatchedPatient object is created
for each patient, which stores the number of potential donors the patient has. The figure below
illustrates this with the addition of mp1 and mp2, which are MatchedPatient objects of
p1 and p2 respectively.
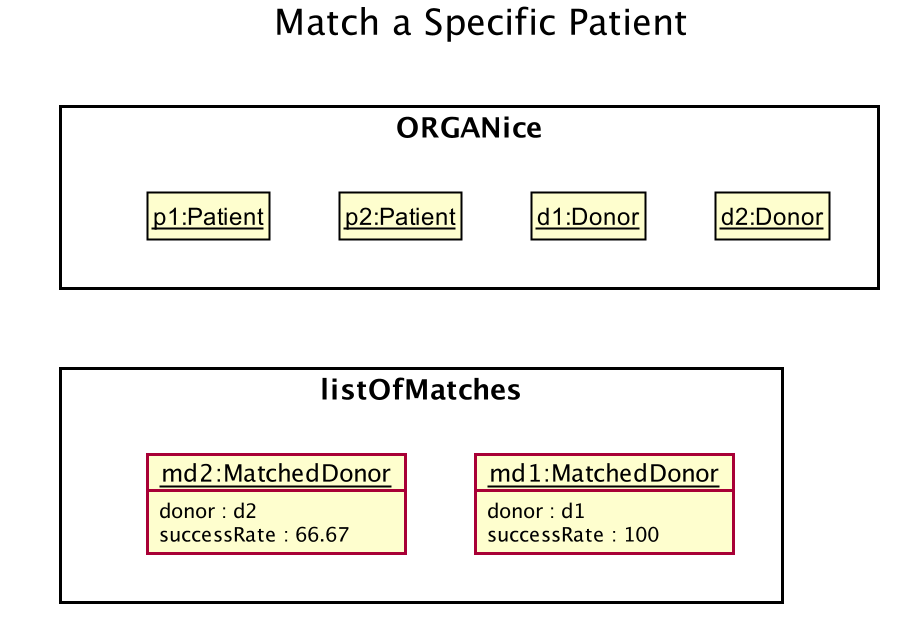
Step 3. The user types in the command match ic/PATIENT NRIC, where PATIENT NRIC is the NRIC of a patient in
ORGANice.
Existing objects in the listOfMatches are removed.
For each potential donor of the specified patient, a MatchedDonor`object is created,
accompanied with the compatibility rate.
As seen in the figure below, `mp1 and mp2 are removed from listOfMatches.
MatchedDonor objects md1 and md2 are created to represent d1 and d2 respectively.
All MatchedDonor objects are then added to the listOfMatches.
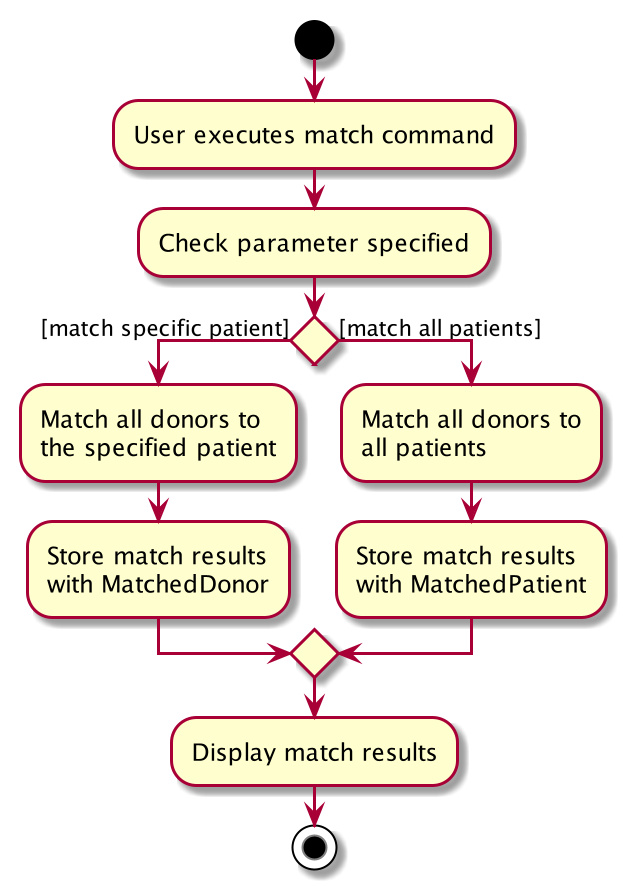
The following activity diagram summarises what happens when a user executes the match feature:
4.2.1. Design considerations
This section will explain some aspects that were considered when designing the match feature.
Aspect 1: Storage of match results
This section explores several choices of storing match results of patients and donors.
-
Choice 1 (current choice): Delete
MatchedPatientandMatchedDonorobjects created in previousMatchCommandexecutions when there is a newMatchCommandexecuted.-
Pros: No need to write extra code to store match results in the hard disk. Previous match results are overriden with new results from the latest match command. A scenario in which this would be important is if a user matches a patient again after editing the patient’s information. The matching would be based on the updated patient’s information.
-
Cons: Redundant matching occurs in a scenario where the user executes a match command with the same parameters twice.
-
-
Choice 2: For each patient, keep a list of match results. After every
MatchCommandis executed, save the match results to the hard disk.-
Pros: A history of match results is stored, thus reducing redundant matching.
-
Cons: More code to needs to be written to store match results to the hard disk.
-
4.2.2. Aspect 2: Display of match results
This section explains some considerations for displaying match results,
which are stored in MatchedPatient and MatchedDonor objects.
-
Choice 1 (current choice):: Display
MatchedDonorandMatchedPatientobjects inPersonListPanel-
Pros: Easy to implement because additional code is added to
PersonListPanel, which is a UI component already existing in AddressBook 3. The constructor ofPersonListPaneltakes in anObservableList<Person>object and creates a list ofPersonListViewCellobjects to be displayed. -
Cons: The
MatchedDonorandMatchedPatientclasses need to inherit from thePersonclass, even though they represent match results, not people.
-
-
Choice 2: Create a new list panel called
MatchListPanel, which displays objects of theMatchclass.MatchedDonorandMatchedPatientclasses extend from theMatchclass.-
Pros:
MatchedDonorandMatchedPatientclasses do not inherit unwanted methods fromPersonclass. TheMatchclass can contain methods more specific to matching. -
Cons: There would be two types of list panels. Upon executing each command, the correct list panel must be selected and displayed.
-
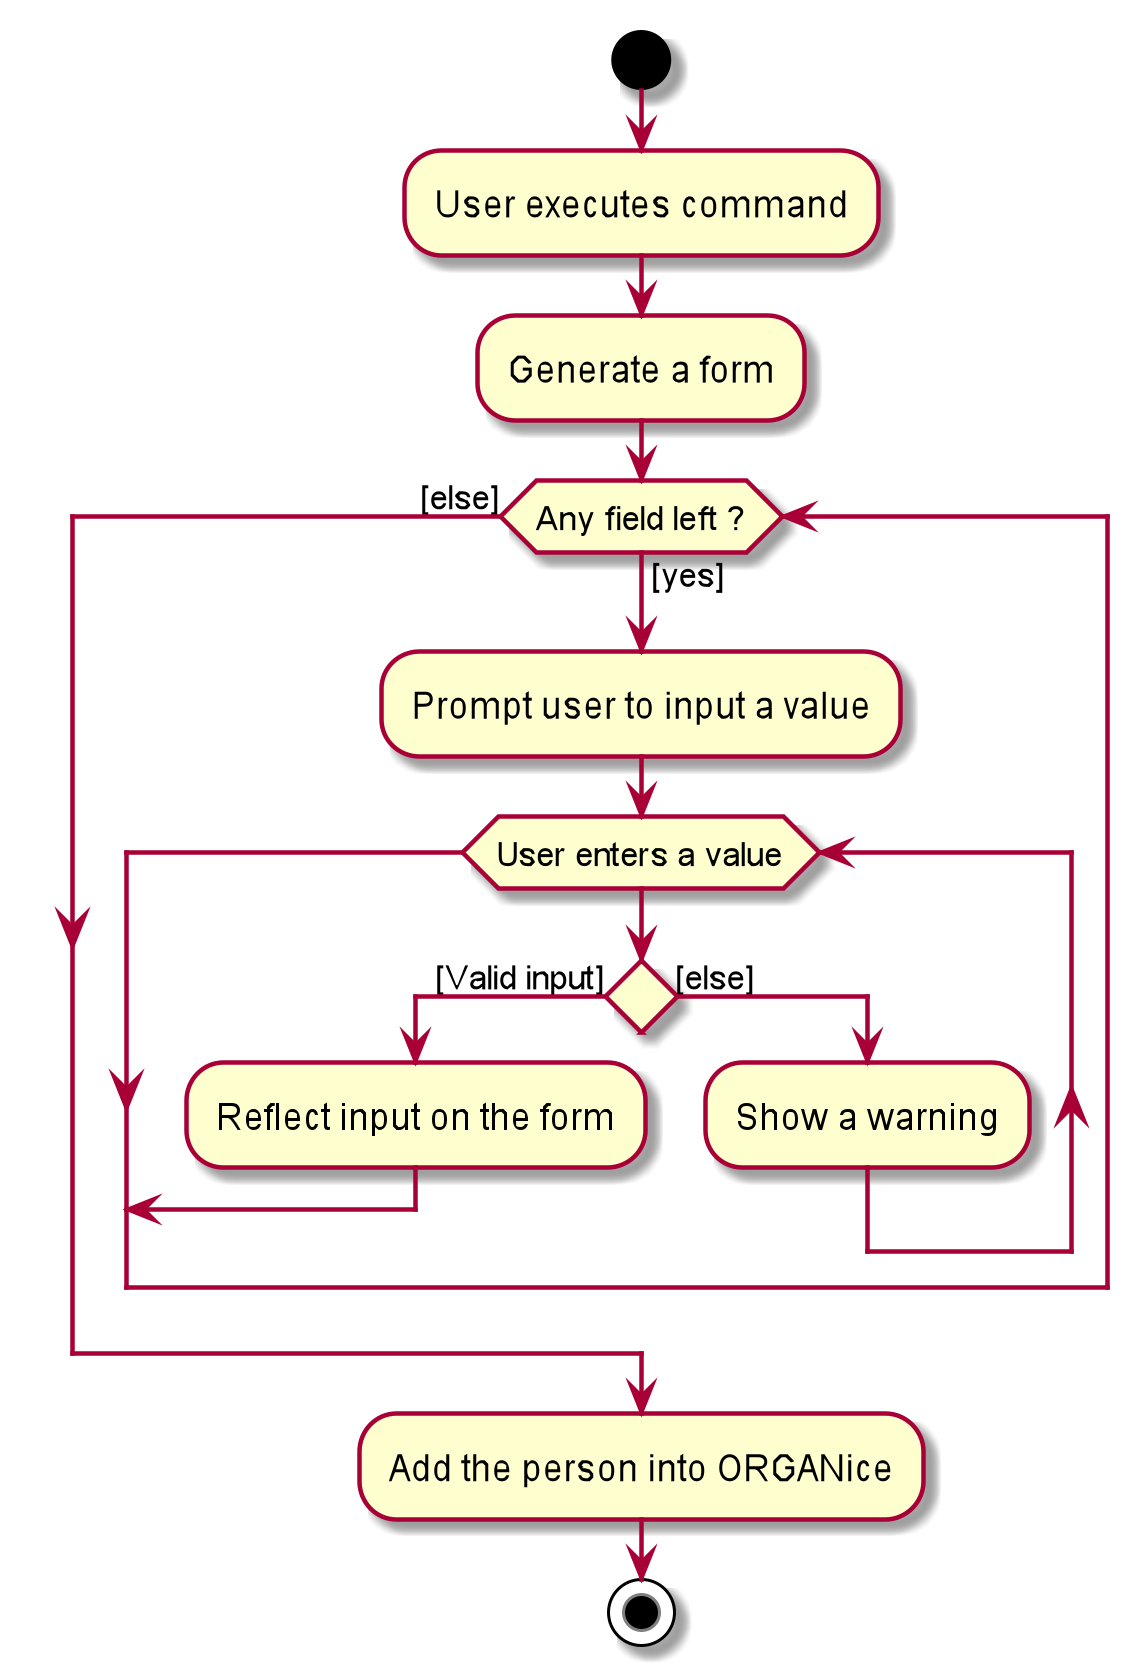
4.3. Form mode feature
This section explains the implementation of the form mode feature.
4.3.1. Implementation
The form mode mechanism is facilitated by FormUiManager.
It modifies the CommandBox as well as PersonPanelListPlaceholder each time you input a specific attribute.
The following object diagram models the relationship and dependencies between FormUiManager and other objects:
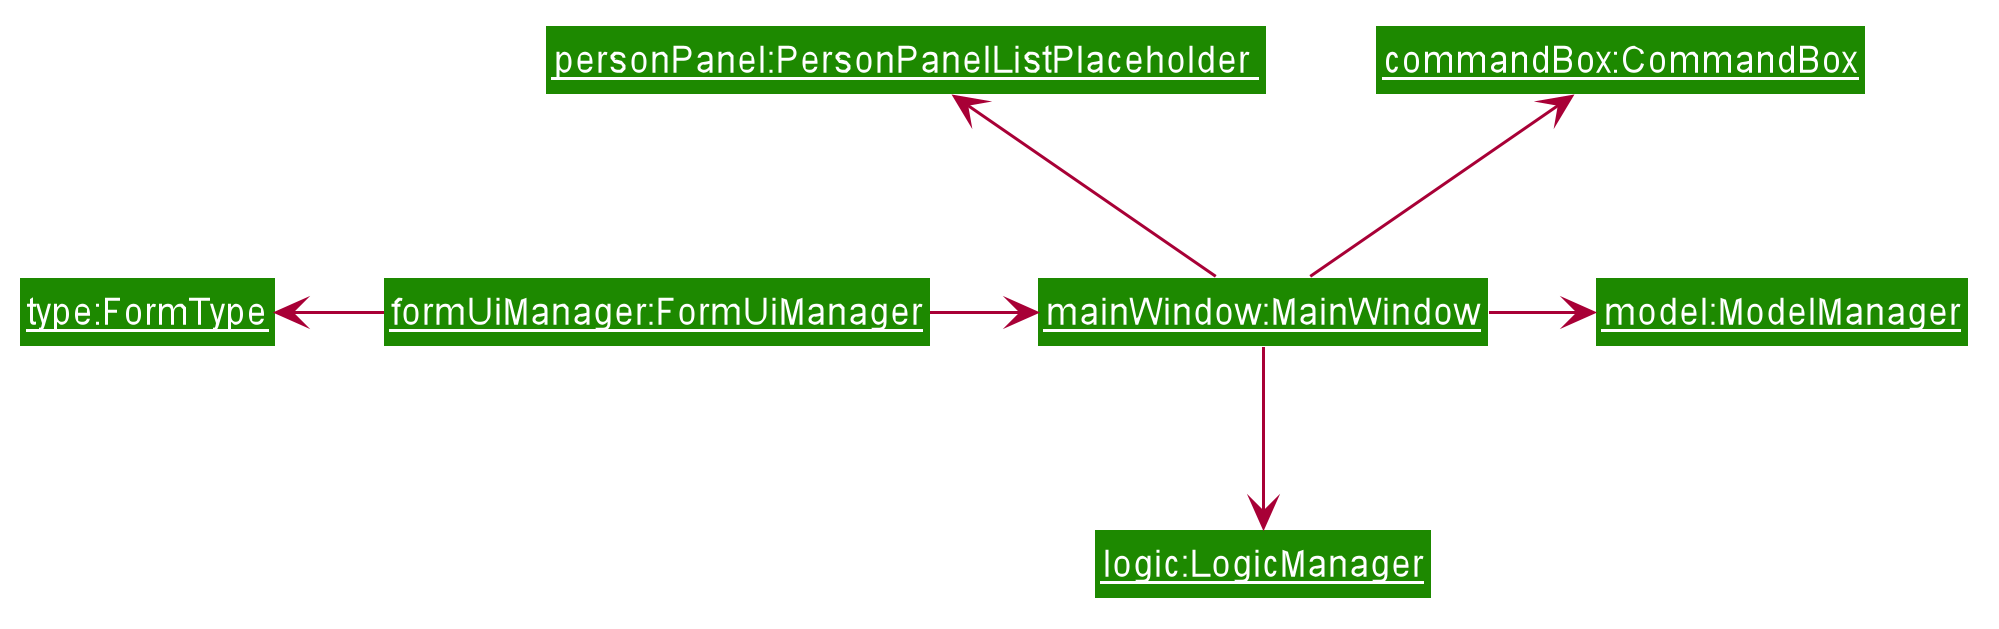
FormUiManager objectFormUiManager will need an object of class Type in order to determine what type of form(patient, doctor, or donor) will be displayed to you.
Additionally, FormUiManager implements the following operations:
-
FormUiManager#getPersonDetails()— ModifiesCommandBoxand prompts the user to input the attributes required. -
FormUiManager#setPersonDetails()— Sets the value for all required attributes of a specific type of person. -
FormUiManager#addDoctorToList()— Adds a doctor to the person list. -
FormUiManager#addPatientToList()— Adds a patient to the person list. -
FormUiManager#addDonorToList()— Adds a donor to the person list.
These operations are exposed in the Logic interface when the specific command is invoked by you.
Given below is an example usage scenario and how the form mode mechanism behaves at each step so that you can better understand how the different classes interact with each other:
Step 1. A user launches the application for the first time.
Step 2. The user executes add t/doctor command to add a doctor in the form mode. The add command calls AddressBookParser#parseCommand() that will return a new AddCommand instance.
Step 3. The LogicManager executes the command and notice that the CommandResult having a boolean value isForm and thus will create a new FormUiManager instance. The code snippet below demonstrates how the FormUiManager is created.
if (commandResult.isForm()) {
    resultDisplayPlaceholder.setMinHeight(100);
    FormAnimation.fadingAnimation(this);
    Type formType = commandResult.getFormType();
    FormUiManager formUiManager = new FormUiManager(this, formType, model, logger);
    personListPanelPlaceholder.getChildren().clear();
    if (formType.isDoctor()) {
        form = new DoctorForm();
        personListPanelPlaceholder.getChildren().add(((DoctorForm) form).getRoot());
    } else if (formType.isDonor()) {
        form = new DonorForm();
        personListPanelPlaceholder.getChildren().add(((DonorForm) form).getRoot());
    } else if (formType.isPatient()) {
        form = new PatientForm(this);
                    personListPanelPlaceholder.getChildren().add(((PatientForm) form).getRoot());
                }
                formUiManager.getPersonDetails();
                return commandResult;
            }
Step 4. The FormUiManager changes the display of the application based on the type of the person specified in Step 1 by modifying the content of the PersonListPanelPlaceholder as well as the CommandExecutor in the CommandBox object by calling FormUiManager#getPersonDetails().
Step 5. The user inputs the attribute that is prompted until all the required attributes are specified.
Step 6. The user confirms the details of the person and FormUiManager#setPersonDetails() will be called and depending on the type of the person specified, calling FormUiManager#addDoctorToList(), or FormUiManager#addPatientToList(), or FormUiManager#addDonorToList() respectively.
Step 7. FormUiManager calls the AddressBookParser#parseCommand() to add the person and save it in the Storage interface.
Given below is the Sequence Diagram for interactions within the Logic component when a user typed in add t/doctor

The following activity diagram summarizes what happens when you execute the add t/TYPE command:
4.3.2. Design Considerations
This section will explain the reason for having some aspects.
Aspect: How form mode feature executes
-
Alternative 1 (current choice): Use the same
addcommand to do theFormmode.-
Pros: Easy to implement. This is the reason why this alternative is chosen as it does not take too much time to implement.
-
Cons: May not be the best approach since one command will have two different modes.
-
-
Alternative 2: Use a new command for the
Formmode.-
Pros: Will be less confusing for the user since there is a separate command for
Formmode -
Cons: We must creates a new parser and command classes just to deal with another
addfunctionality.
-
4.4. Sort feature
This section describes how the sort feature is implemented.
Sorting is done by using Comparators in the Logic component and makes use of the SortCommand.
This command only works after a MatchCommand is called by the user, because it takes in listOfMatches returned
from calling a MatchCommand. Importantly, this listOfMatches is an ObservableList, which cannot be modified.
Therefore, it makes use of SortedList to wrap around the ObservableList so that the list can be modified by sorting.
Thus far, the sort command can only take in one String parameter, but more methods can be added in the future for more sorting options.
Three methods of sorting are implemented to sort based on the following categories:
-
Sorting based on donor’s organ expiry date with
sort expiry -
Sorting based on priority with
sort priority -
Sorting based on compatibility rate of the match with
sort rate
These three methods' implementation will be further elaborated upon below.
4.4.1. Sort by Expiry
Sorting by Expiry sorts a list of MatchedDonor with the ModelManager#sortByOrganExpiryDate() method.
In this method, the ExpiryComparator is used to compare two matched donors' organ expiry dates, and this requires
the OrganExpiryDate of the donors to be parsed into a data format that can be compared.
4.4.2. Sort by Compatibility Rate
Sorting by Compatibility Rate sorts a list of MatchedPatient using the ModelManager#sortBySuccessRate() method.
The CompatibilityRateComparator is created to compare two matched patients' rate of compatibility for the match.
Given below is a Sequence Diagram to show the interactions with the Logic component when executing the execute(sort rate) method,
assuming the user has entered a valid match ic/NRIC command before this.
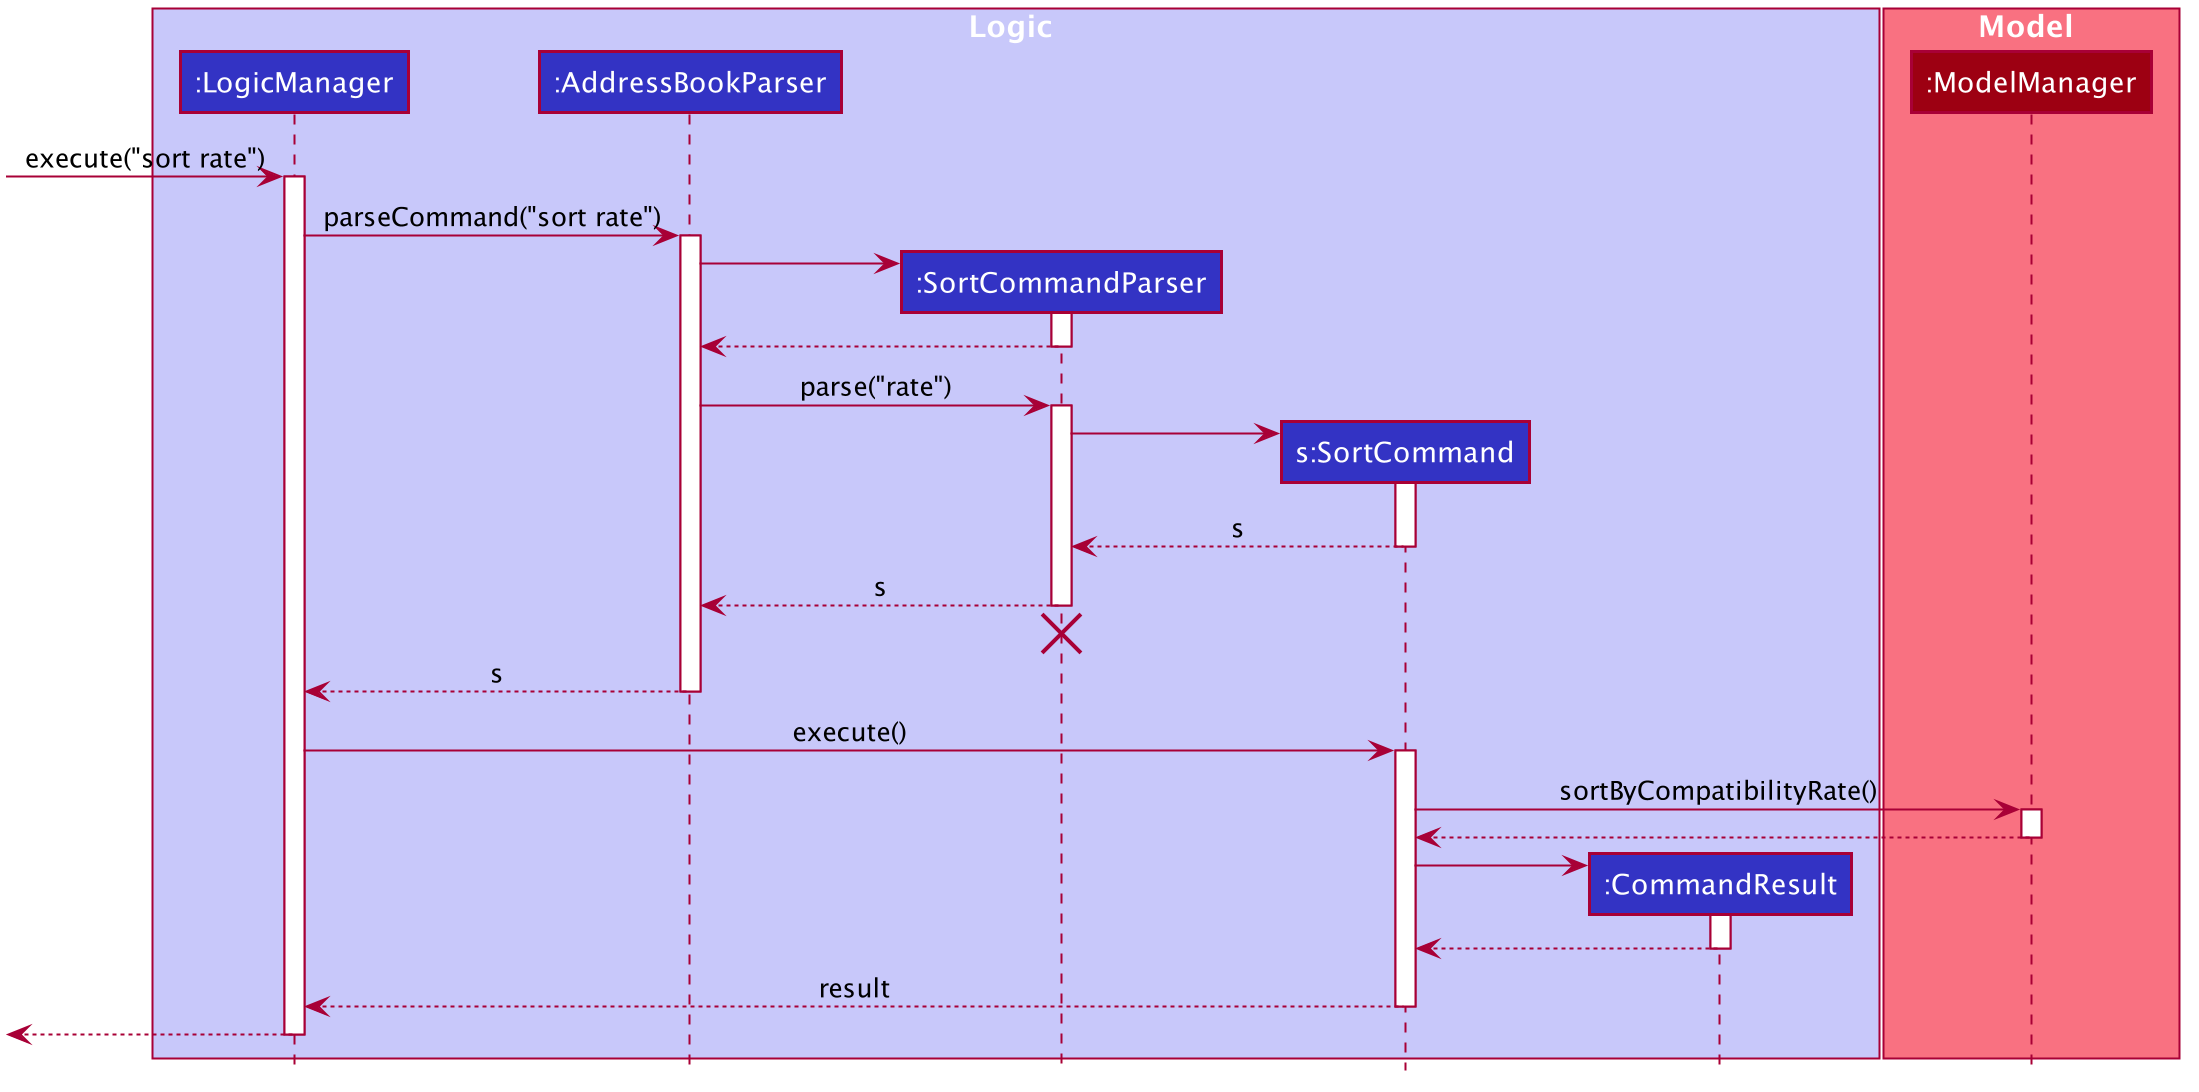
sort rate commandAfter the command is given by the user, it would be parsed by the AddressBookParser.
The SortCommandParser then parses the parameter rate and a SortCommand is created.
The LogicManager will then execute the command and call the sortByCompatibilityRate() method from the ModelManager.
The list of MatchedPatient will then be sorted based on their match’s compatibility rate.
4.4.3. Sort by Priority
Sorting by Expiry sorts a list of MatchedPatient using the ModelManager#sortByPriority() method.
In this method, there are two other comparators created in addition to the Priority Comparator,
namely the NameComparator and the NumOfMatchesComparator. These two comparators serve as tie-breakers in cases where
patients have the same priority. In other words, for patients of the same priority, those with more matched donors will be displayed first.
If these two factors are the same for a group of patients, they will be displayed according to their names in alphabetical order.
Under the sortByPriority() method, the order of applying the comparators to the list of patients
is, firstly, the 'NameComparator', followed by NumOfMatchesComparator, and lastly, the PriorityComparator.
This means that the patients are first sorted by names in alphabetical order, followed by the number of matched donors they have
in descending order (highest to lowest), and then their priority level in descending order (from high, to medium, to low).
All three comparators makes use of the compareTo method under the Comparable class, which can sort in lexical order for String,
and numeric order for Sorting integers.
In particular, the PriorityComparator makes use of the compareTo method implemented in the Priority class.
A code snippet of this method is shown below.
@Override
public int compareTo(Priority priority) {
Integer thisPriorityNumber = 0;
Integer otherPriorityNumber = 0;

        if (this.isHighPriority()) {
            thisPriorityNumber = 3;
        } else if (this.isMediumPriority()) {
            thisPriorityNumber = 2;
        } else if (this.isLowPriority()) {
            thisPriorityNumber = 1;
        }
        if (priority.isHighPriority()) {
            otherPriorityNumber = 3;
        } else if (priority.isMediumPriority()) {
            otherPriorityNumber = 2;
        } else if (priority.isLowPriority()) {
            otherPriorityNumber = 1;
        }
        return thisPriorityNumber.compareTo(otherPriorityNumber);
    }
This implementation is the result of using String to represent the different priorities in the Priority class.
Therefore, they are converted into Integer for easier comparison. An alternative solution would be to make use of
Enum class to define each priority so that this compareTo method implementation can be simplified.
4.4.4. Design considerations
This section will explain two aspects considered in designing the sort feature.
Aspect: Method of storing the sorted result
-
Alternative 1 (current choice): Use
SortedList.-
Pros: Fast iteration time of O(n * log n), which is important for ORGANice to load and display the sorted result, and more harmonious with current implementations (able to wrap
ObservableListand sort the content). -
Cons: Not the most efficient algorithm for insertions or deletions, but ORGANice does not require them.
-
-
Alternative 2: Use
ArrayList.-
Pros: Fast index-based access and works on any
Collectionclass. -
Cons: Slower than
SortedListas it takes O(n) time to iterate and display the results.
-
Aspect: Method of sorting
-
Alternative 1 (current choice): Use
ComparatorandComparable.-
Pros: Simpler implementation as able to make use of existing methods in ORGANice such as
setComparator. -
Cons: More coding involved.
-
-
Alternative 2: Use
Collections.sort().-
Pros: Has a time complexity of O(n*log(n)) which is relatively fast.
-
Cons: Cannot make use of existing methods in ORGANice that work for Comparator.
-
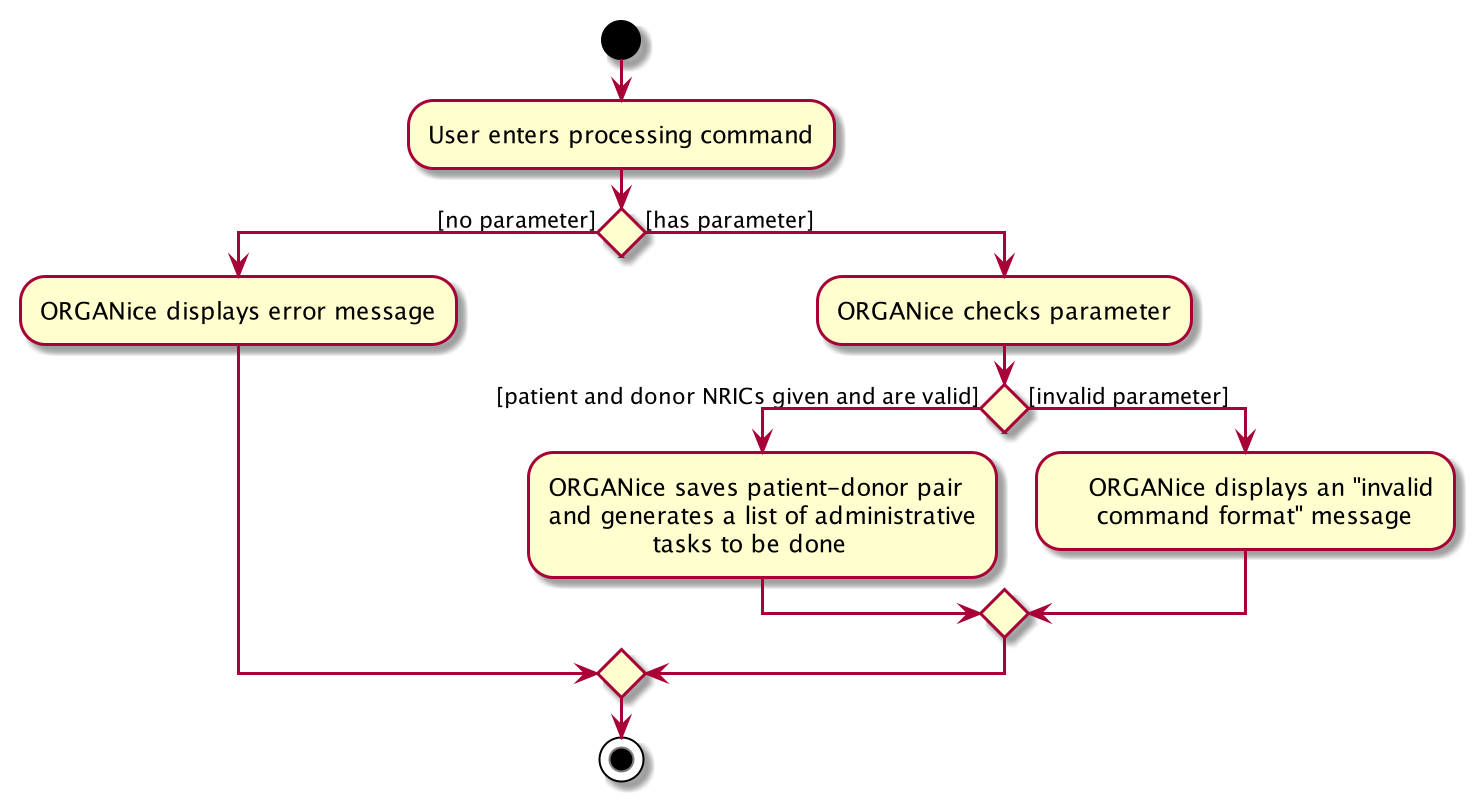
4.5. Processing feature
This section describes how the processing feature is implemented.
Processing is facilitated by the ProcessingCommand class, which extends the Command class.
Processing is done by accessing Patient and Donor in ModelManager,
then creating a ProcessingList which acts like ArrayList to store the tasks which needs to be done.
It implements the ProcessingCommand#isValidDonorPatientPair(Nric firstNric, Nric secondNric, Model model) boolean operation.
This method will first determine which Nric belongs to a patient and which Nric belongs to a donor
since the input allows user to give two Nric in no particular order.
It will also get the Donor and Patient objects with the NRIC given.
Then, it will check if the donor have a ProcessingList generated before.
If the donor have an empty ProcessingList, it means that the donor is newly processed.
Hence, it will mean that the donor may be able to pair with the given patient.
If the donor already have a ProcessingList, it means that the donor is already being processed with a patient.
Then, this method will check if the patient given by the user is the same patient being processed together with this donor.
This is done by checking the Patient attribute that is tagged to the ProcessingList of the donor.
Finally, the method will check if the patient and donor given by the user is valid by checking if
they are able to be matched or not and if they exist in ORGANice.
A code snippet of the method is shown below: This code aims to get the Donor and Patient from the given Nrics given by the user.
This method is necessary since user is able to give the Nrics input in no particular order.
if (model.hasDonor(firstNric)) {
    donorNric = firstNric;
    donor = model.getDonor(donorNric);

    patientNric = secondNric;
    patient = model.getPatient(patientNric);
} else {
    patientNric = firstNric;
    patient = model.getPatient(patientNric);

    donorNric = secondNric;
    donor = model.getDonor(donorNric);
}
Status class is also created and it is one of the attributes of Patient and Donor.
However, this cannot be edited or added by users.
The status of the 'Patient' and 'Donor' will change when Processing command is executed on that pair of patient and donor.
-
When a new
PatientorDonorobject is created, theStatusof the new object will be set tonot processing. -
When the
Processingcommand is being executed,Statusof thePatientand theDonorwill be changed toprocessing, provided that thePatientandDonorare valid. -
When the
Donecommand is being executed,Statusof thePatientand theDonorwill be changed todone, provided that thePatientandDonorare valid.
If the donor and patient have never been processed before, a default ProcessingList will be generated and it will belong to the patient and donor pair uniquely.
If the user makes any changes to the ProcessingList, the list will be saved to the donor as one of its attribute which takes in a parameter of the patient’s NRIC.
When the user executes the processing feature, the method, ProcessingCommand#isValidDonorPatientPair(Nric firstNric, Nric secondNric, Model model) will be called
to determine if the user give a valid patient and donor input.
It will then check if there is a need to generate a new default task list or the donor already have a list tagged to itself.
Then, the Status of the patient and donor will be set to processing.
It will then display the list out.
Following is an activity diagram to show the processing feature.
4.5.1. Design considerations
This section will explain the reason for having some aspects.
Aspect: Method of storing the ProcessingList
-
Alternative 1 (current choice): Use a new class,
TaskListthat works like ArrayList.-
Pros: Able to implement more specific methods for the ProcessingList.
-
Cons: More methods and test cases needed which are harder to implement.
-
-
Alternative 2: Use ArrayList to store the tasks.
-
Pros: Easy to implement as the default methods are already created.
-
Cons: Future extension on this will be difficult as the
ProcessingListis unique to this feature.
-
Aspect: Using specific prefixes for Nric inputs
-
Alternative 1 (current choice): Nrics of patient and donor can be inputted in no particular order.
-
Pros: More user friendly as users do not need to make sure the Nric must be in correct order. (For example, patient’s Nric must come before donor’s Nric)
-
Cons: It is harder to implement and more exceptions need to be taken care of.
-
-
Alternative 2: Using specific prefixes for Nric input to differentiate the Nrics of donor and patient.
-
Pros: It is easier to implement as
icP/PATIENT NRICandicD/DONOR NRICwill be easier to parse to the Command method. -
Cons: It is less user friendly as users need to remember more prefixes for this entire application.
-
4.6. ProcessingMarkDone feature
This section describes how the processingMarkDone feature is implemented.
ProcessingMarkDone is facilitated by the ProcessingMarkDoneCommand class, which extends the Command class.
ProcessingMarkDone is done by accessing Patient and Donor in ModelManager,
then, it will get the ProcessingList from the Donor and then marking a task as done.
It implements the ProcessingMarkDoneCommand#isValidDonorPatientPair(Nric firstNric, Nric secondNric, Model model) boolean operation.
This method works similar to ProcessingCommand#isValidDonorPatientPair(Nric firstNric, Nric secondNric, Model model) method but with a slight difference.
This method just need to check the Status of the Donor and Patient object and make sure it is processing.
However, this method still need to determine which Nric belongs to a patient and which Nric belongs to a donor
since the input allows user to give two Nric in no particular order.
A code snippet of the method is shown below: This part of the method is different from the ProcessingCommand#isValidDonorPatientPair(Nric firstNric, Nric secondNric, Model model) method.
if (model.hasPatient(patientNric) && model.hasDonor(donorNric)
        && patient.getStatus().isProcessing() && donor.getStatus().isProcessing()
        && match(donor, patient)) {
    return true;
} else {
    return false;
}
When the user execute the processingMarkDone feature, the method, ProcessingMarkDoneCommand#isValidDonorPatientPair(Nric firstNric, Nric secondNric, Model model) will be called
to determine if the user give a valid patient and donor input.
It will also check if the task number given is valid.
Then, it will call Donor#markTaskAsDone(int taskNumber) to mark the task on the ProcessingList of that donor.
It will then display the list out.
Following is an object diagram to show the processingMarkDone feature
TODO diagram
4.7. Done feature
This section describes how the done feature is implemented.
Done is facilitated by the DoneCommand class, which extends the Command class.
Done is executed by accessing Patient and Donor in ModelManager,
then determine if the patient and donor can match each other or not.
It implements the DoneCommand#isPass(String result) boolean operation.
This method checks whether the result of the cross-matching test.
If the patient and donor did a cross-matching test and the result of the test is a fail,
then the patient and donor needs to be sent back to find new matches and they
should not be able to match each other anymore.
Donor will have an ArrayList patientsMatchedBefore which stores all the patients' Nric which fails to match with it.
Then, the patient and donor will have their Status set to not processing so that they can find another match and be considered in future matching results.
If the patient and donor did a cross-matching test and the result of the test is a pass, then the patient and donor can be removed from ORGANice already.
Following is an object diagram to show the processingMarkDone feature
TODO diagram
4.7.1. Design considerations
This section will explain the reason for having an aspect.
Aspect:
-
Alternative 1 (current choice): To remove the patient and donor details if they pass the cross-matching test.
-
Pros: It is easier to implement given the short amount of time we have to complete this project.
-
Cons: It will be harder for users to do data analysis regarding the past successful matches.
-
-
Alternative 2: Archive the details of patient and donor.
-
Pros: The data can be accessed for analysis.
-
Cons: It is harder to implement and space taken may increase exponentially.
-
4.8. Finding feature
This section explains the implementation of the find persons by attributes feature.
4.8.1. Current Implementation
The find feature is facilitated by PersonContainsPrefixesPredicate and FindCommand.
PersonContainsPrefixesPredicate
PersonContainsPrefixesPredicate implements Predicate and is used to test whether a person’s attributes
match exactly with at least one of the input keywords in each attribute category.
FindCommand
FindCommand extends Command with a predicate that is used to determine whether a given
person should be displayed. It implements Command#execute(Model model) which replaces the
predicate of the current model.filteredPersons with the input predicate of ExactFindCommand.
This triggers a change in the displayed persons to the list of filtered persons.
Execution Behaviour
The behaviour of FindCommand is consistent with that of other commands as described in Section 3.3, “Logic component”.
Therefore, this section will gloss over higher-level details and instead zoom-in to the behaviour of
FindCommand#execute.
FindCommand Execution
Given below is a step by step description of the behaviour of FindCommand#execute:
Step 1: The full list of all persons in ORGANice is retrieved and stored as allPersons.
Step 2: A list of exact matches is obtained by filtering allPersons using
PersonContainsPrefixesPredicate.
Step 3: A list containing all persons except exact matches is obtained and fuzzy matching is performed on it.
Step 4: Fuzzy matching uses StringUtil#calculateLevenshteinDistance to filter out possible matches. The matches
are then sorted in ascending order of similarity to input keywords.
Step 5: #setDisplayedPersonList is called.
The following sequence diagram illustrates steps 1 to 5:
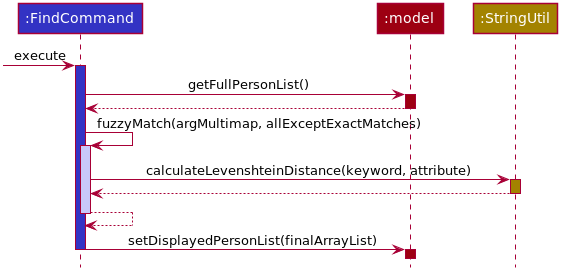
The above diagram heavily simplifies the execution of #fuzzyMatch as it is further explained in the
section below.
|
Fuzzy Matching
FindCommand#execute performs fuzzy matching between input keywords and person attributes to detect possible
matches. This behaviour is facilitated by
FindCommand#fuzzyMatch(ArgumentMultimap argMultimap, List<Person> inputList). The behaviour of
#fuzzyMatch is detailed in the below activity diagram:

As seen from the above diagram, #fuzzyMatch traverses the inputList of persons and tags each person with a
calculated minimum combinedLevenshteinDistance(LD). In the event that no keywords are present, all persons are
tagged with an LD higher than the acceptable threshold. Once all persons have been tagged, those persons whose LD
exceeds the threshold are removed from the list. The final list is then sorted in ascending order of LD.
4.8.2. Design Considerations
This section will explain the main aspect considered in designing the find by prefix feature.
Aspect: Method of calculating similarity of keywords
-
Alternative 1 (current choice): Calculate Levenshtein Distance.
-
Pros: Able to detect most typos effectively.
-
Cons: Creation of requisite
costMatrixis computationally expensive and may affect performance for long keywords.
-
-
Alternative 2: Use Natural Language Processing Libraries.
-
Pros: Will be able to detect typos more effectively.
-
Cons: Will take up more system resources.
-
4.9. Logging
We are using java.util.logging package for logging. The LogsCenter class is used to manage the logging levels and logging destinations.
-
The logging level can be controlled using the
logLevelsetting in the configuration file (See Section 4.10, “Configuration”) -
The
Loggerfor a class can be obtained usingLogsCenter.getLogger(Class)which will log messages according to the specified logging level -
Currently log messages are output through:
Consoleand to a.logfile.
Logging Levels
-
SEVERE: Critical problem detected which may possibly cause the termination of the application -
WARNING: Can continue, but with caution -
INFO: Information showing the noteworthy actions by the App -
FINE: Details that is not usually noteworthy but may be useful in debugging e.g. print the actual list instead of just its size
4.10. Configuration
Certain properties of the application can be controlled (e.g user prefs file location, logging level) through the configuration file (default: config.json).
5. Documentation
Refer to the guide here.
6. Testing
Refer to the guide here.
7. Dev Ops
Refer to the guide here.
Appendix A: Product Scope
Target user profile:
-
hospital administrative staff who need to find matches between patients and organ donors
-
prefer desktop apps over other types
-
can type fast
-
prefers typing over mouse input
-
is reasonably comfortable using CLI apps
Value proposition: find matches between a patient and potential organ donors faster than a typical mouse/GUI driven app
Appendix B: User Stories
Priorities: High (must have) - * * *, Medium (nice to have) - * *, Low (unlikely to have) - *
| Priority | As a … | I want to … | So that I can… |
|---|---|---|---|
|
new user |
see usage instructions |
refer to instructions when I forget how to use the App |
|
user |
add a new patient/donor/doctor |
|
|
user |
delete a patient/donor/doctor |
remove entries that I no longer need |
|
user |
find a patient/donor/doctor using certain keywords |
locate details of persons without having to go through the entire list |
|
user |
find potential donors for a patient |
help the patient find a donor as fast as possible |
|
user |
process a patient and a donor |
prepare them for the surgery process |
|
user |
see list of a particular patient’s potential donors |
know list of potential donors for a particular patient |
|
user |
see list of all patients/donors/doctors |
|
|
careless user |
edit a patient/donor/doctor |
|
|
user |
mark a match as done |
know that a particular match has undergone a surgery |
|
user |
sort the potential donors of a patient by compatibility rate |
match a patient with the most compatible donor |
|
user |
sort the potential donors of a patient by organ expiry date |
ensure that organs are used before they expire |
|
user |
sort the patients by priority |
find out which patients I should prioritize |
`* * ` |
user |
add multiple data using external file |
reduce the time to add in a data into the system |
`* * ` |
user |
find a patient/donor/doctor with incomplete keywords |
reduce the time to type in the whole keyword |
{More to be added}
Appendix C: Use Cases
(For all use cases below, the System is the ORGANice and the Actor is the user, unless specified otherwise)
Use case: Add patient/donor/doctor in a form mode
MSS:
-
User requests to add a patient/doctor/donor in a form mode.
-
ORGANice shows a form depending on the type of person specified by the User.
-
OGRANice prompts the User to type in the required attributes one at a time.
-
User inputs in the attribute of the person prompted by ORGANice.
Steps 3-4 are repeated until the user has inputted all the required attributes for a specific type of person.
-
ORGANice prompts the User to confirm the attributes of the person.
-
User confirms the attributes specified.
-
ORGANice adds the person to the list.
Use case ends.
Extensions:
4a. The attribute that the User tries to input is not valid.
-
4a1. ORGANice shows a warning to the User and specifies the pattern of a valid input.
-
4a2. User inputs a new value for the attribute.
-
Steps 4a1-4a2 are repeated until the input data is valid for the current attribute prompted by ORGANice.
-
Use case resumes from step 3 if there are more attributes to fill in, if not it will resumes from step 5.
*a. At any time, User chooses to abort the form.
-
*a1. ORGANice nullifies the form.
-
Use case ends.
C.1. Use case: Match a patient and a donor
MSS
-
User requests to list potential donors for a particular patient
-
ORGANice shows a list of potential donors for the patient
-
User requests to process the patient with a specified donor
-
ORGANice matches the patient and the specified donor
Use case ends.
Extensions
-
2a. The list is empty.
Use case ends.
C.2. Use case: Sort list according to priority/rate/expiry
MSS
-
User requests to sort the list of donors of a particular patient.
-
ORGANice sorts the list of donors according to the parameters.
Use case ends.
Extensions
-
1a. ORGANice detects invalid parameter(s).
-
1a1. ORGANice prompts for valid parameter(s).
-
1a2. User enters correct parameter(s).
Steps 1a1-1a2 are repeated until the data entered are correct.
Use case resumes at step 2.
-
C.3. Use case: List all patients/donors/doctors
MSS
-
User requests to list patients/donors/doctors.
-
ORGANice shows the list of patients/donors/doctors.
Use case ends.
Extensions
-
1a. ORGANice detects an invalid parameter.
-
1a1. ORGANice returns error message.
Use case ends.
-
Appendix D: Non Functional Requirements
-
Should work on any mainstream OS as long as it has Java
11or above installed. -
Should be able to hold up to 1000 persons without a noticeable sluggishness in performance for typical usage.
-
A user with above average typing speed for regular English text (i.e. not code, not system admin commands) should be able to accomplish most of the tasks faster using commands than using the mouse.
-
The system should be usable by a novice.
-
The source code should be open source.
-
The user interface should be intuitive enough for users who are not IT-savvy.
{More to be added}
Appendix F: Instructions for Manual Testing
Given below are instructions to test the app manually.
| These instructions only provide a starting point for testers to work on; testers are expected to do more exploratory testing. |
F.1. Launch and Shutdown
-
Initial launch
-
Download the jar file and copy into an empty folder
-
Double-click the jar file
Expected: Shows the GUI with a set of sample contacts. The window size may not be optimum.
-
-
Saving window preferences
-
Resize the window to an optimum size. Move the window to a different location. Close the window.
-
Re-launch the app by double-clicking the jar file.
Expected: The most recent window size and location is retained.
-
{ more test cases … }
F.2. Deleting a person
-
Deleting a person while all persons are listed
-
Prerequisites: List all persons using the
listcommand. Multiple persons in the list. -
Test case:
delete 1
Expected: First contact is deleted from the list. Details of the deleted contact shown in the status message. Timestamp in the status bar is updated. -
Test case:
delete 0
Expected: No person is deleted. Error details shown in the status message. Status bar remains the same. -
Other incorrect delete commands to try:
delete,delete x(where x is larger than the list size) {give more}
Expected: Similar to previous.
-
{ more test cases … }
F.3. Saving data
-
Dealing with missing/corrupted data files
-
{explain how to simulate a missing/corrupted file and the expected behavior}
-
{ more test cases … }