By: CS2103T-T13-1 Since: Sep 2019 Licence: MIT
- 1. Introduction
- 2. Quick Start
- 3. Components of ORGANice
- 4. List of Attributes
- 5. Features
- 5.1. Viewing help:
help - 5.2. Adding a person:
add - 5.3. Listing persons:
list - 5.4. Editing a person’s attribute:
edit - 5.5. Finding persons by attributes:
find - 5.6. Detecting matches:
match - 5.7. Sorting matches:
sort - 5.8. Processing potential matches:
processing - 5.9. Checking the task list:
processingMarkDone - 5.10. Mark as done:
done - 5.11. Deleting a person :
delete - 5.12. Clearing all entries :
clear - 5.13. Exiting the program :
exit - 5.14. Saving the data
- 5.1. Viewing help:
- 6. Future improvements
- 7. FAQ
- 8. Command Summary
- 9. Glossary
1. Introduction
This user guide explains how to use ORGANice to manage organ transplants. ORGANice is a desktop application for hospital administration staff who prefer to use Command Line Interface applications to manage organ transplants.
With ORGANice, you can easily do the following:
-
organise information about patients, doctors, and donors
-
find matches between organ donors and patients
If you are a hospital administrator and would like to use ORGANice, check out Section 2, “Quick Start” to get started.
2. Quick Start
Below is a list of things to do to use ORGANice:
-
Ensure you have Java
11or above installed in your computer.
If not, install it here. -
Download the latest
organice.jarhere. -
Copy the JAR file to the folder you want to use as the home folder for your application.
-
Double-click the JAR file to start the application. The application should appear in a few seconds. Figure 1 shows how the application looks like after starting it.
If what you are seeing on your screen looks like what is shown in Figure 1, congratulations! You have successfully started the application. From this point on, do note the following symbols and formatting used in this document:
| This section contains important information. |
| This section contains a helpful tip! |
find A grey highlight (called a mark-up) indicates that this is a command that can be typed into the command box
and executed by the application.
Now that you have have succeeded, lets move on to learn more about the various components in this application.
3. Components of ORGANice
This section aims to introduce you to the various components of ORGANice. We will be using Figure 2, which has all the components of ORGANice labelled.
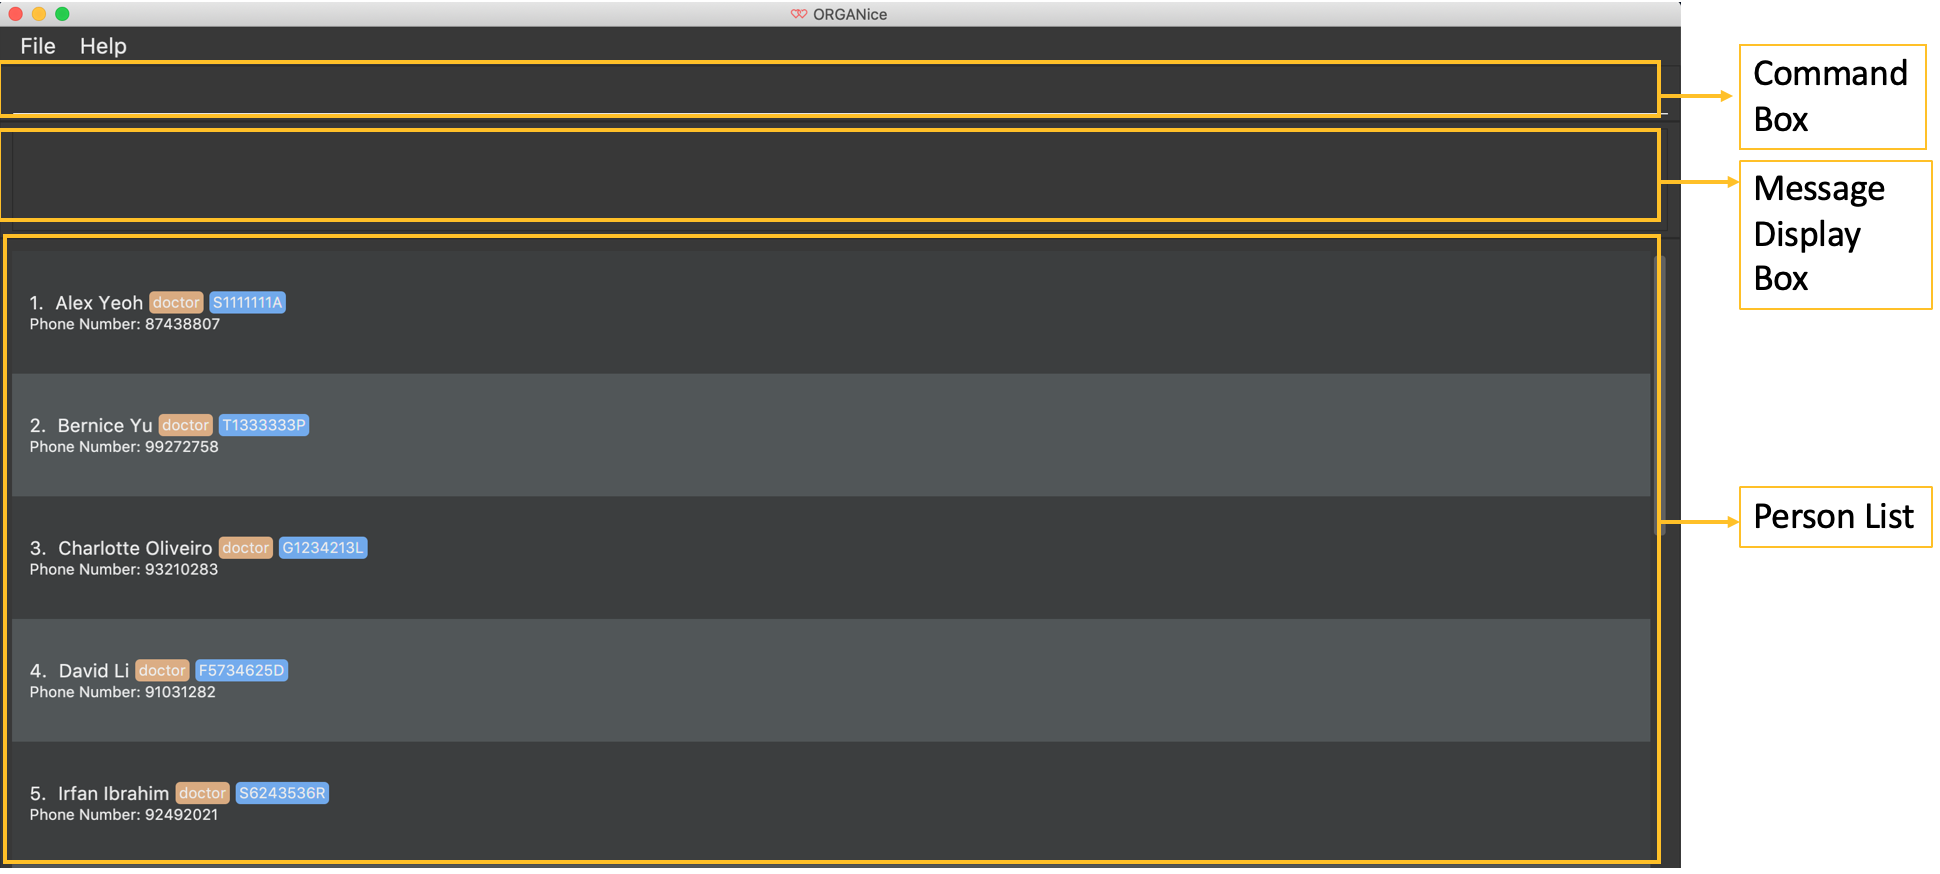
The following list explains each component and the function of that component:
-
Component: Command Box
-
Function of component: the Command Box is a text box for you to type in commands. Commands are instructions to ORGANice to perform a feature.
-
-
Component: Message Display Box
-
Function of component: the Message Display Box displays messages after executing commands. These messages aim to let you know if you have succeeded or failed in executing a command.
-
-
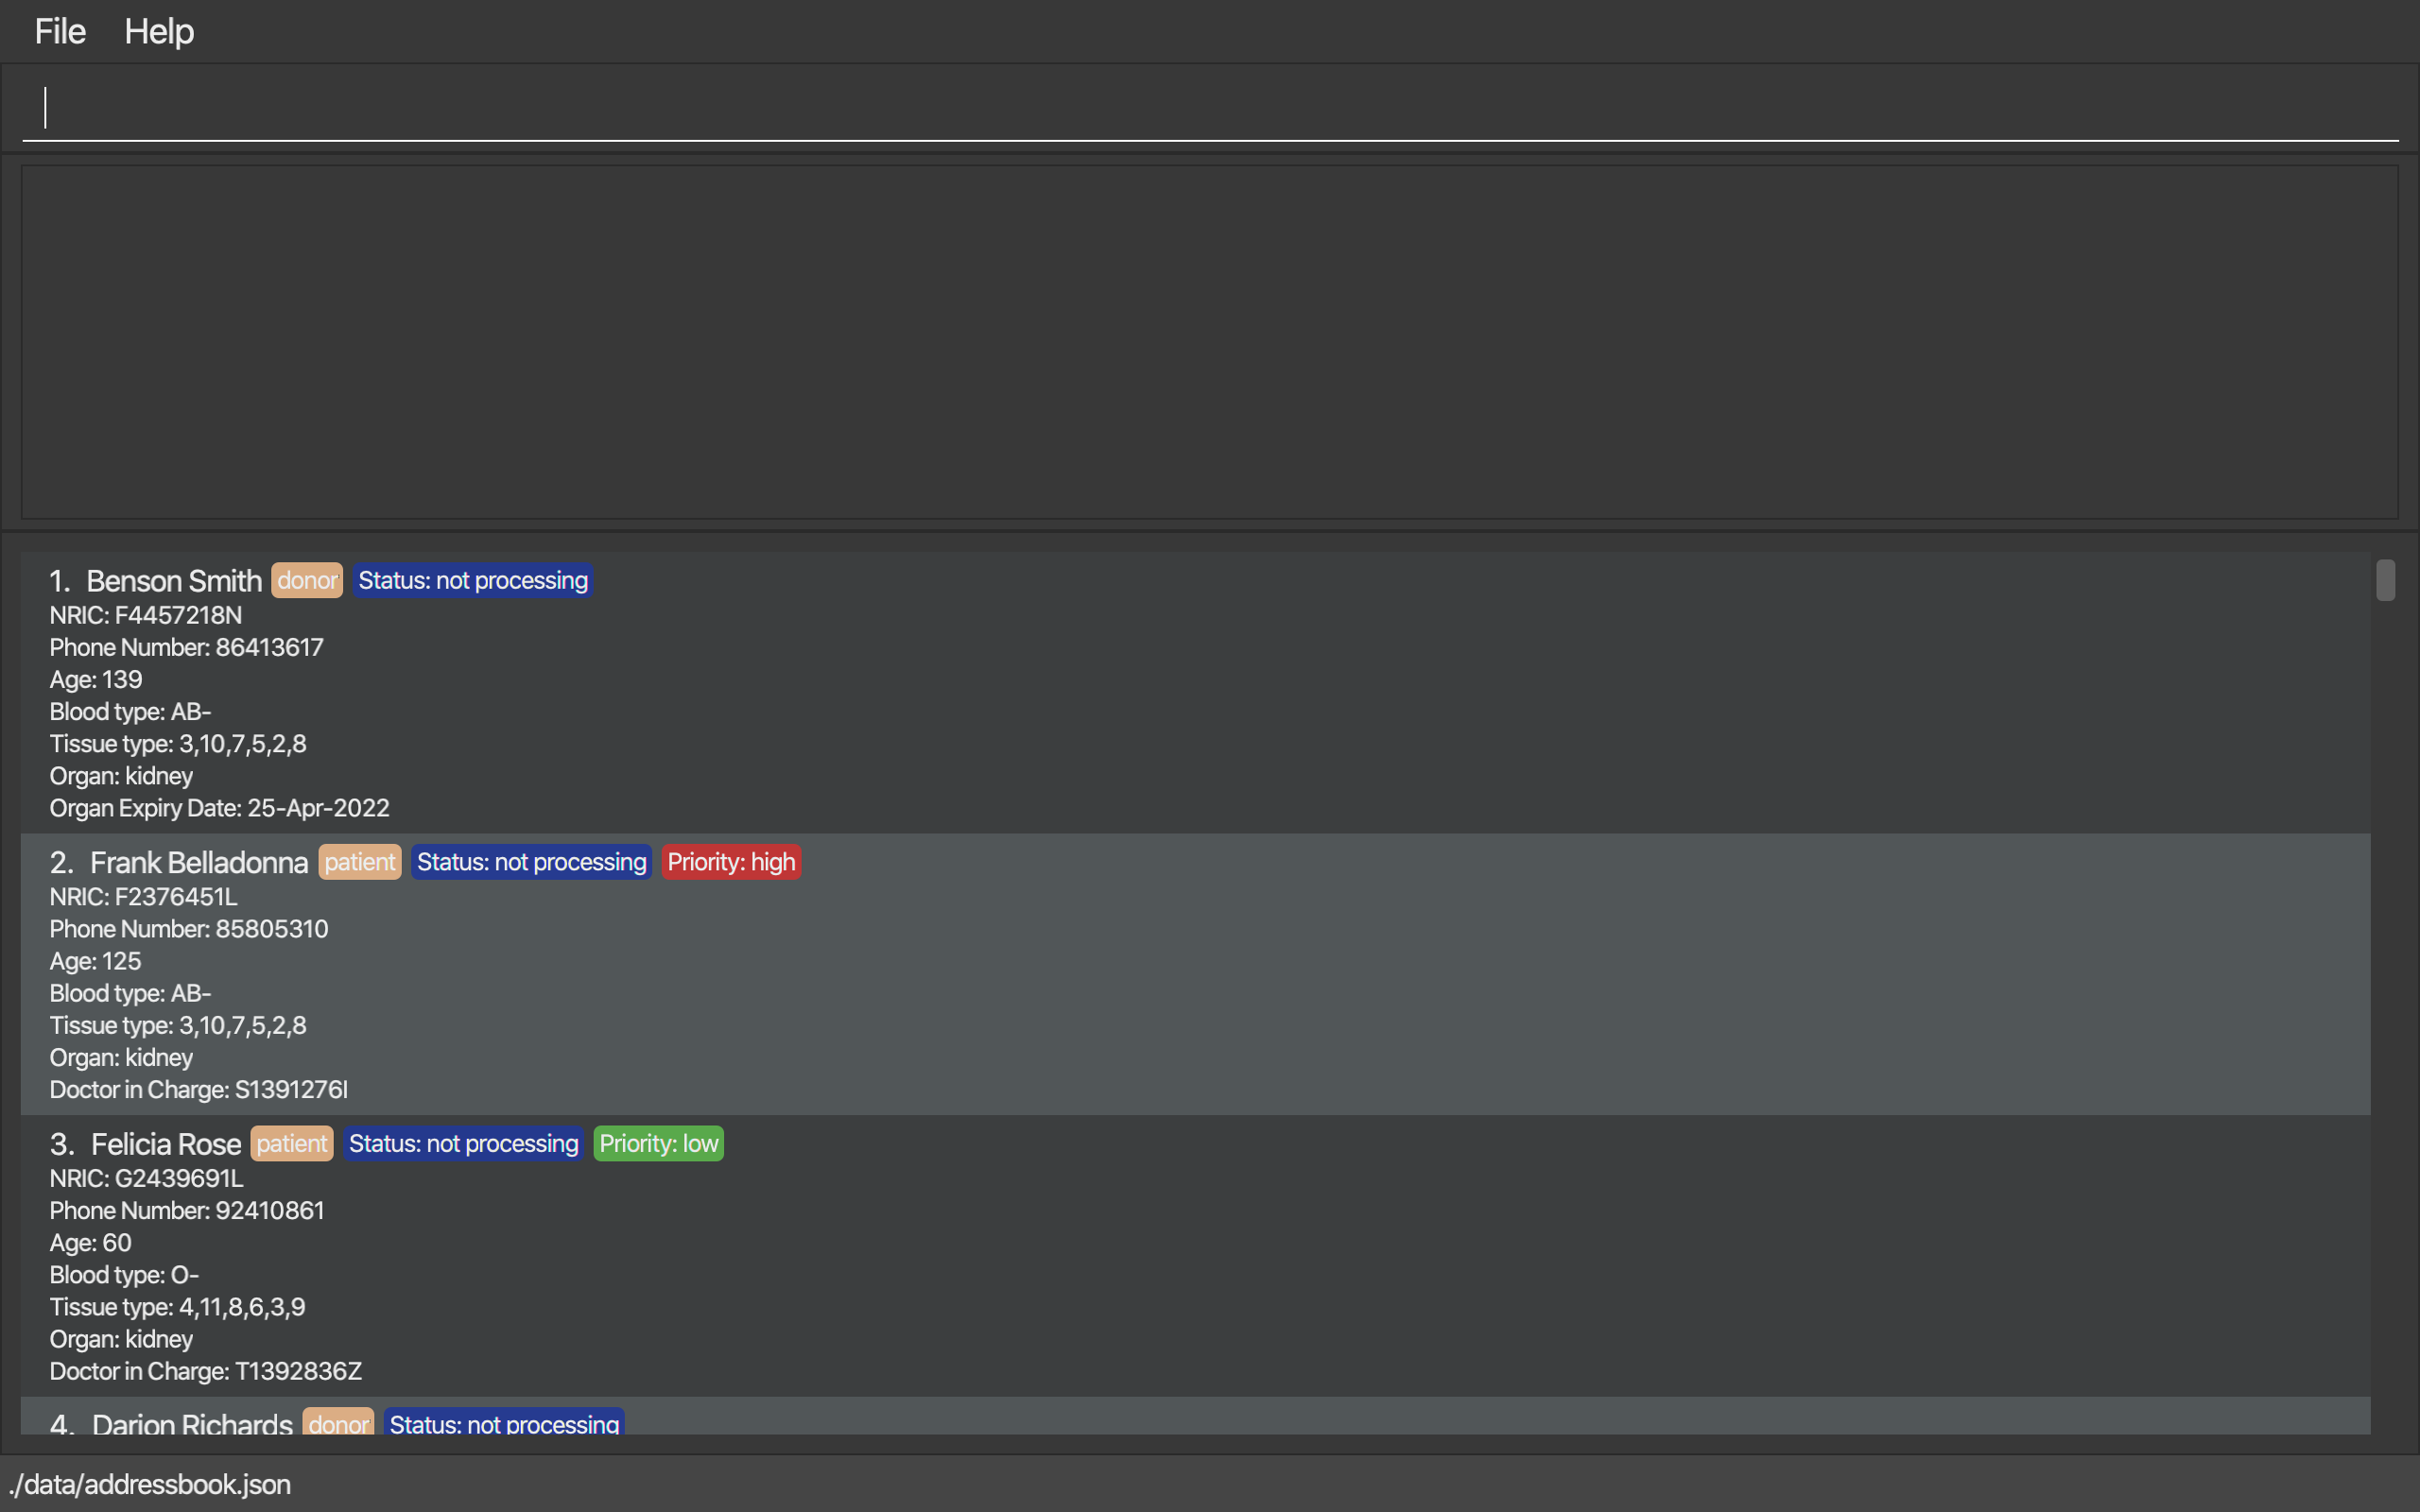
Component: Person List
-
Function of component: the Person List is a display of people’s information stored in ORGANice. You can scroll down this list to see more people in this application.
-
Now that you know the components of ORGANice, let’s move on to Section 4, “List of Attributes” to understand what kind of information can be stored in ORGANice.
4. List of Attributes
In ORGANice, a person’s data is represented by attributes. Attributes
refer to personal particulars such as name, type of person and blood type.
The following list shows the list of attributes that can be specified for a person and the criteria for valid inputs:
List of Attributes:
-
n/NAME: the name of the person
-
Applicable to: patients, doctors, donors
-
Valid input: alphabets
-
-
t/TYPE: the type of person
-
Applicable to: patients, doctors, donors
-
Valid input: patient/donor/doctor
-
-
o/ORGAN: the type of organs
-
Applicable to: patients, donors
-
Valid input: kidney
-
-
b/BLOODTYPE - the blood type of the person
-
Applicable to: patients and donors
-
Valid input: A+/B+/AB+/O+/A-/B-/AB-/O-
-
-
p/PHONE - contact number of a person
-
Applicable to: patients, doctors, donors
-
Valid input: 8 digit number sequence, starting with 6, 8 or 9
-
-
ic/NRIC - NRIC number of a person
-
Applicable to: patients, doctors and donors
-
Valid input: any sequence of alphabets and numbers that fulfill these criteria:
-
starts with a capital S, F, T, or G
-
followed by a 7 digit number sequence
-
ends with a capital letter
-
-
-
pr/PRIORITY - priority of the patient, the value of which is determined by a doctor
-
Applicable to: patients
-
Valid input: high/medium/low
-
-
a/AGE - age of a person
-
Applicable to: patients and donors
-
Valid input: a number from 0 (inclusive) to 150 (inclusive)
-
-
d/DOCTOR - doctor in charge of a patient
-
Applicable to: patients
-
Valid input: NRIC of the doctor
-
-
tt/TISSUE TYPE - the type of tissues
-
Applicable to: patients and donors
-
Valid input: a string of 6 unique numbers (from 1 - 12), separated by commas. Note that the order of the tissue types does not matter. For example, tt/1,2,3,4,5,6 and tt/6,5,3,4,2,1 are treated as the same input because they contain the same 6 unique numbers.
-
-
exp/EXPIRY - expiry date of a donor’s organ
-
Applicable to: donors
-
Valid input: a valid date in DD-MMM-YYYY format
-
5. Features
This section will introduce you to the list of features and commands in this application.
Each feature is triggered by a command with a specific format.
The list below explains how the format of the commands should be interpreted:
Command Format
-
The first word in a command is the command word. The rest of the words are parameters, which are either compulsory or optional.
e.g. in a commandadd n/NAME p/PHONE,addis the command word whilen/NAME p/PHONEare parameters. -
Words in bold are the parameters to be supplied by the user
e.g. inadd n/NAME,NAMEis a parameter which can be used asadd n/John Doe. -
Parameters can be in any order
e.g. if the command specifiesn/NAME p/PHONE,p/PHONE n/NAMEis also acceptable.
5.1. Viewing help: help
There may be times where you need more information on how ORGANice works. To access the user guide of ORGANice, you can do the following:
Simply type help in the Command Box and press Enter. You will see a link given in a pop-up "Help" window.
You may click on the Copy URL button and paste it in a browser to see our user guide for more information on how to use ORGANice.
To exit the window, click the x button found near the top of the window to close it and return to the default display.
5.2. Adding a person: add
This command allows you to add a patient, doctor, or donor to ORGANice with the attributes given, depending on what is specified.
There are two methods to add a person:
-
Method 1: Normal Add
-
Method 2: Form mode
To understand how to add a person via the 'Normal Add' method, go to Section 5.2.1, “Adding as per normal”. To understand how to add a person via the 'Form mode' method, go to Section 5.2.2, “Form mode”.
Note that when you add a person, ORGANice will detect if the person you are trying to add has the same NRIC as another person in ORGANice. When this happens, ORGANice will not allow you to add that person. An error message will be displayed, prompting you to change the NRIC of the person you are trying to add.
5.2.1. Adding as per normal
This method of adding refers to specifying all the attributes in the command. To add, type in the commands of the following format to add a person:
Format for adding patients: add t/patient n/NAME o/ORGAN b/BLOOD TYPE tt/TISSUE TYPE
p/PHONE pr/PRIORITY ic/NRIC d/DOCTOR a/AGE
Format for adding donors: add t/donor n/NAME o/ORGAN b/BLOOD TYPE tt/TISSUE TYPE
p/PHONE ic/NRIC exp/EXPIRY a/AGE
Format for adding doctors: add t/doctor n/NAME ic/NRIC p/PHONE
You may view the List of Attributes in the beginning of Section 5, “Features” to find out the meaning of each attribute.
Examples:
-
add t/patient n/John Doe o/kidney b/A+ tt/1,2,3,4,5,6 p/98765432 pr/high ic/S9988330G d/S2235456D a/29 -
add t/donor n/Betsy Kim o/kidney b/AB- tt/2,5,7,8,9,10 p/99998888 ic/S2345678H exp/23-Nov-2020 a/21 -
add t/doctor n/Lim Chu Kang p/91054444 ic/S5678908D
5.2.2. Form mode
In this mode, instead of typing a long command at one go, you can add a person’s attribute one by one. After entering an attribute, the system will prompt you to input another attribute.
To add a person in this mode, enter the following command of the format: add t/TYPE
ORGANice will prompt you to type in each attribute, one by one until all the fields are filled. Here are some special commands that might be useful when you are in the process of filling up the form:
-
/abort- The command to abandon the current form that you are currently filling. -
/undo- The command to undo the last entry that you entered, which is useful when you want to undo any changes made. -
/done- The command to indicate that you are done with filling all the required attributes and want to add the person into the application. -
/exit- The command to exit the application.
Note that /exit, /abort, and /undo commands can be used at any point in time, while /done command can only be used once all the required attributes have been filled.
These are the important commands for this feature, so now let’s take a look at an example on how you can use this feature.
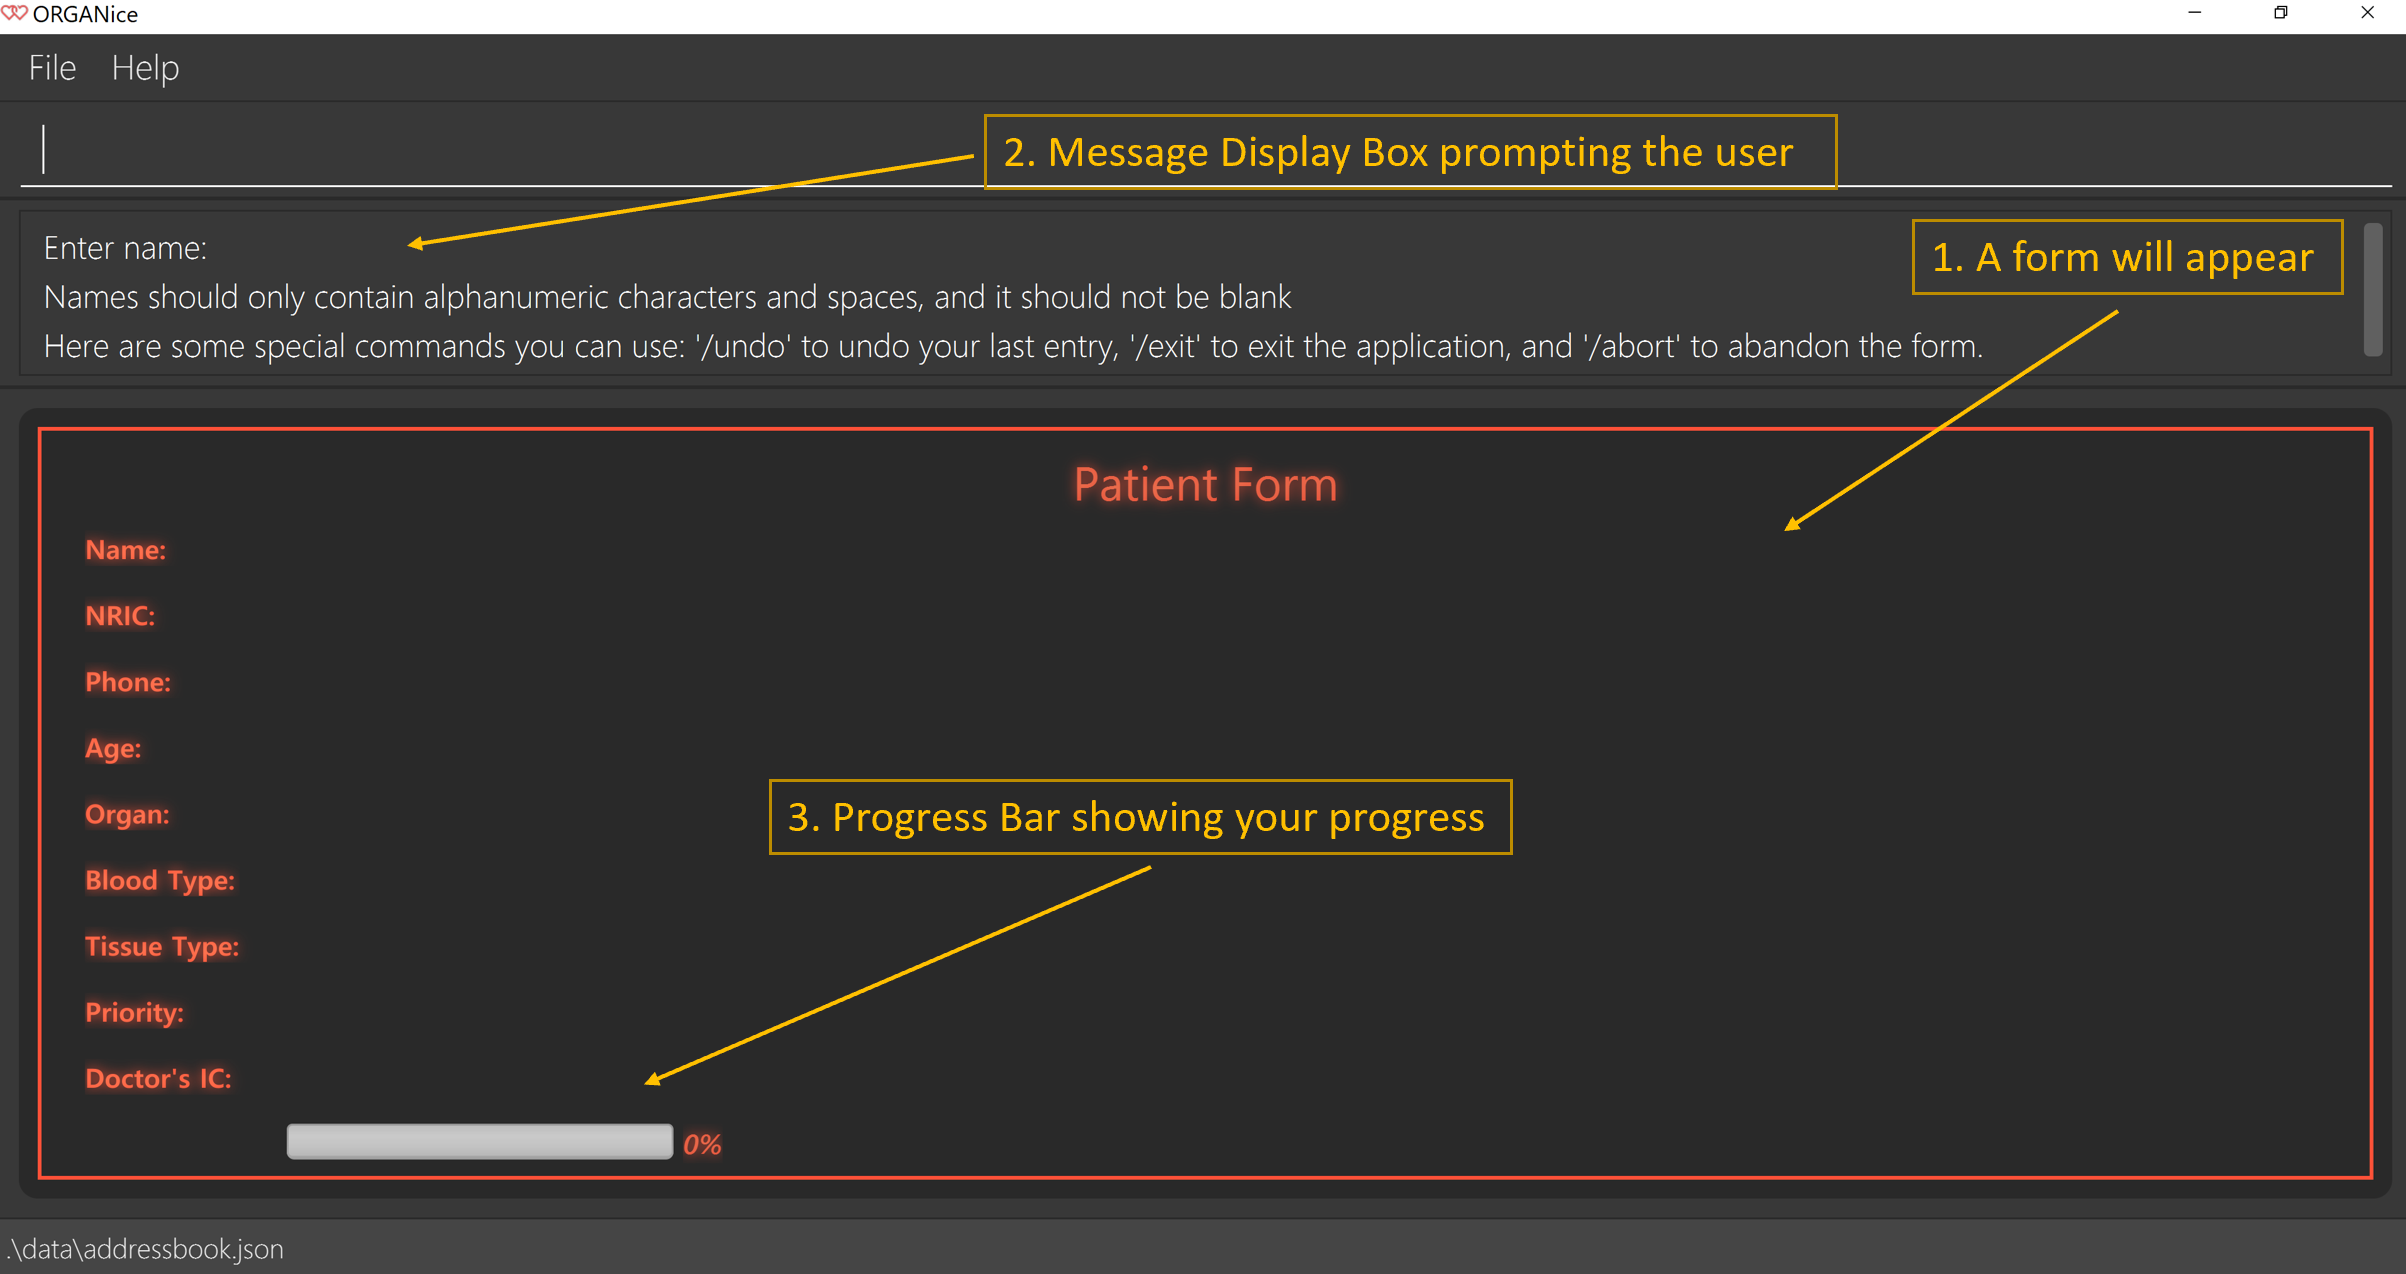
Let’s say you want to add a patient to the application. You should type add t/patient in the Command Box. Three changes will occur on your screen:
-
A form will appear in the space where the Person List used to occupy.
-
The Message Display Box will display a message that prompts you to enter the patient’s name.
-
There is a Progress Bar detailing your progress in filling up the form.
Refer to the Figure 4 to see how the resulting screen will look like.
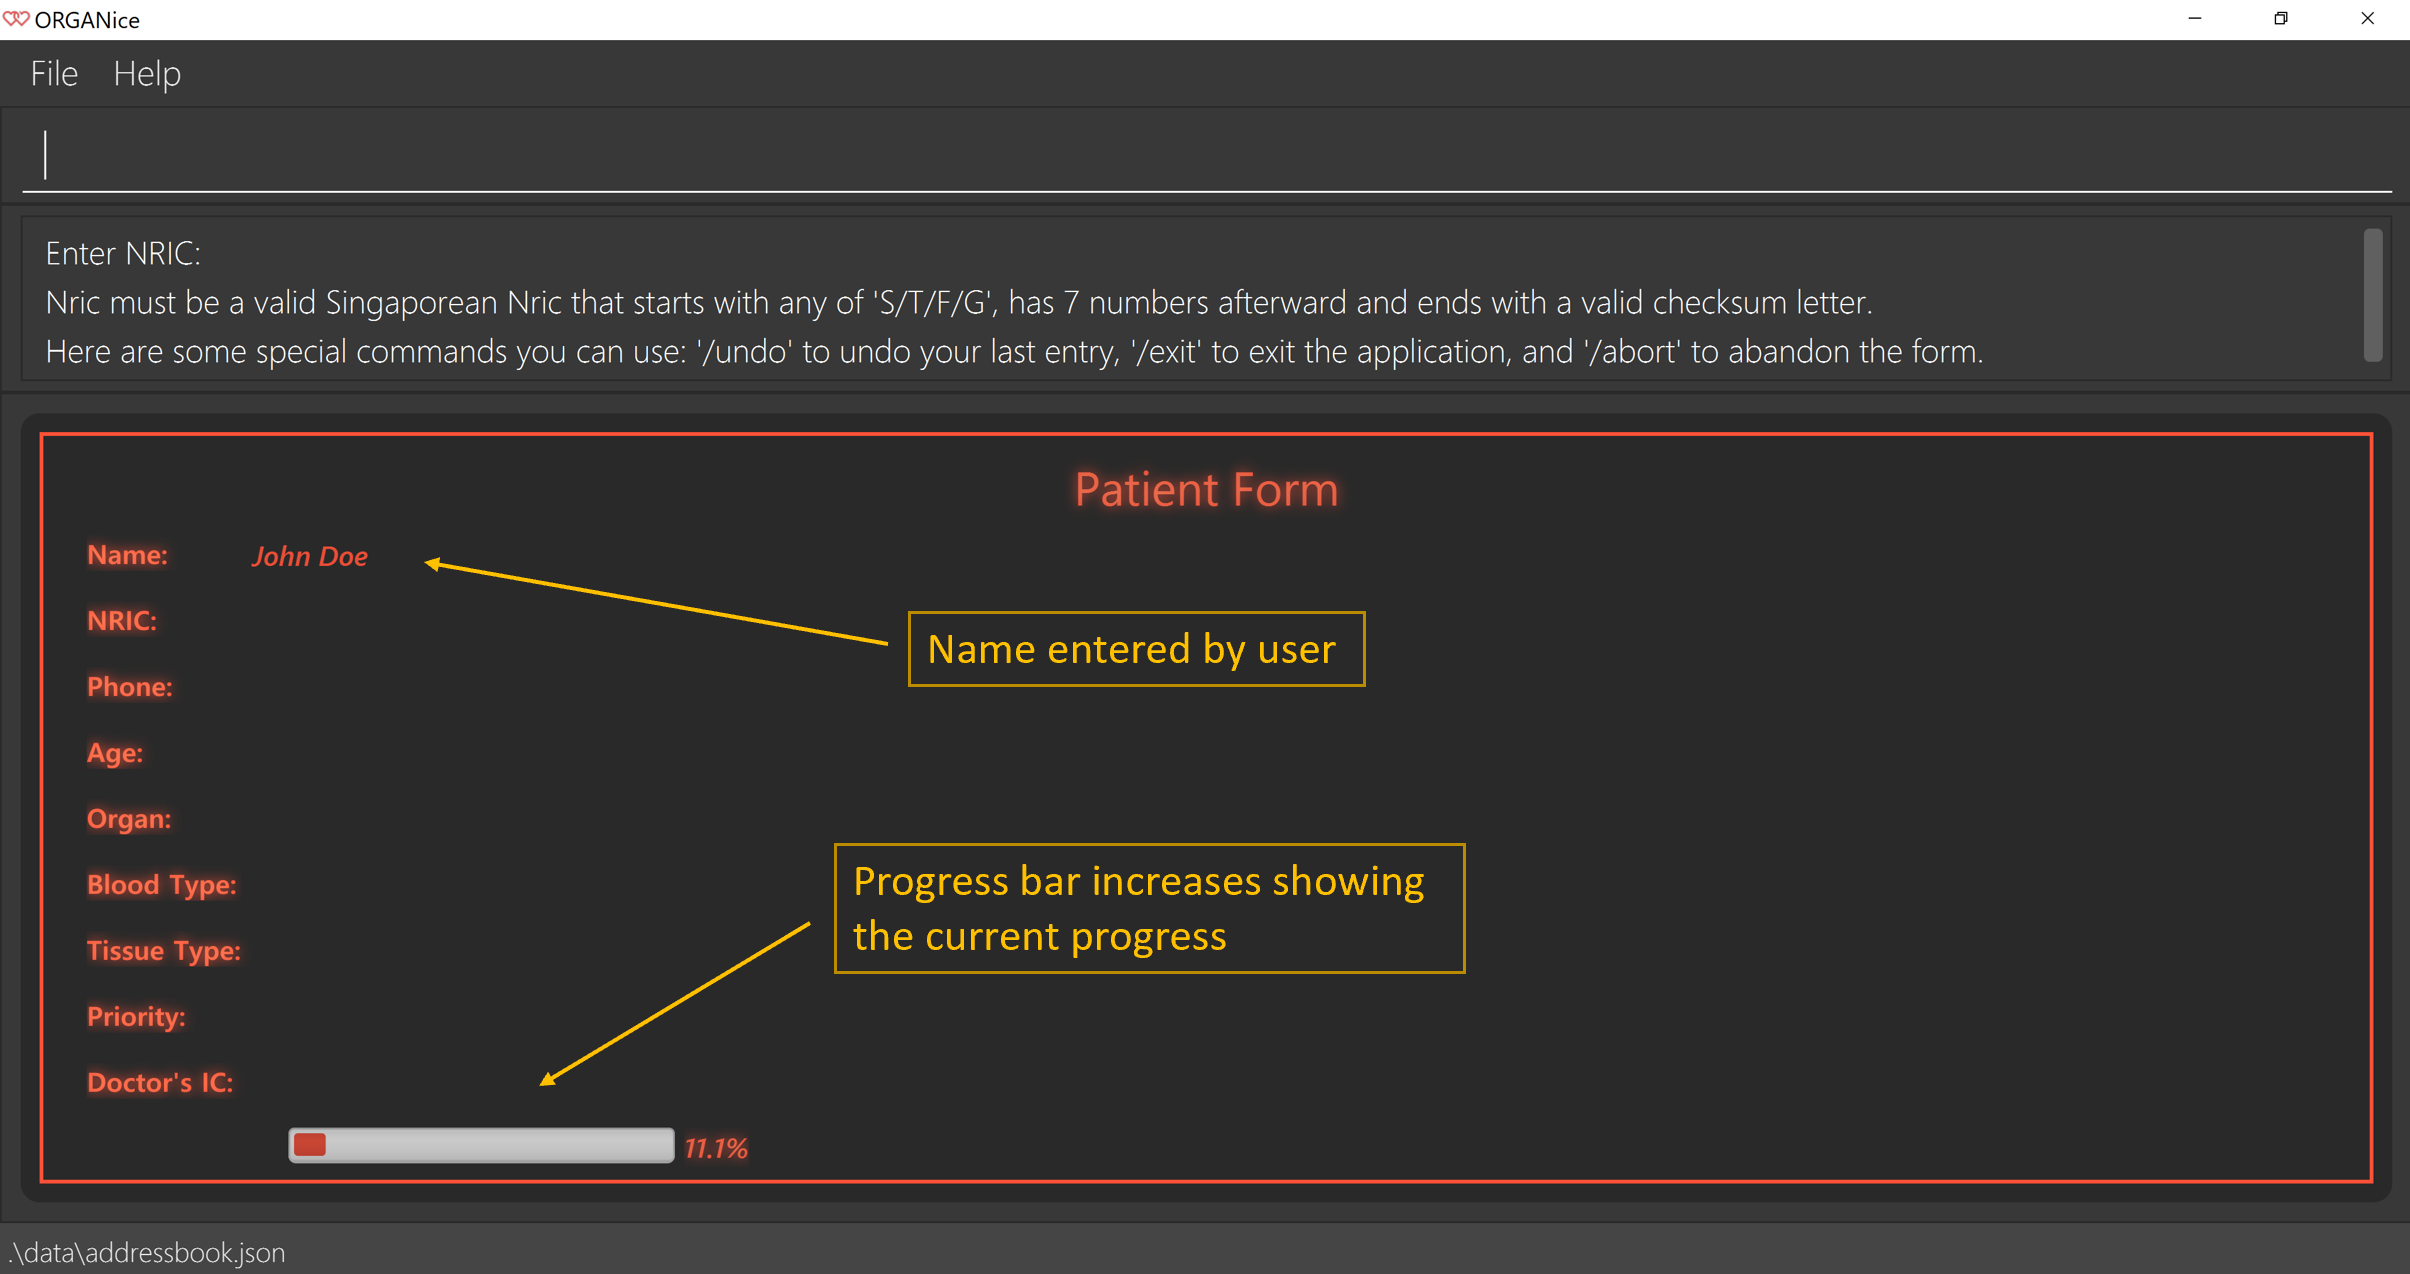
If you want to add a patient named "John Doe", type John Doe and then press Enter.
After entering the name, the patient’s name will be displayed on the form and the progress bar will increase as seen in Figure 5.
Each time you type an input, ORGANice will check if it is a valid input. If the input is valid, it will be reflected on the form. If not, ORGANice will display a warning message stating the criteria for a valid input of that attribute.
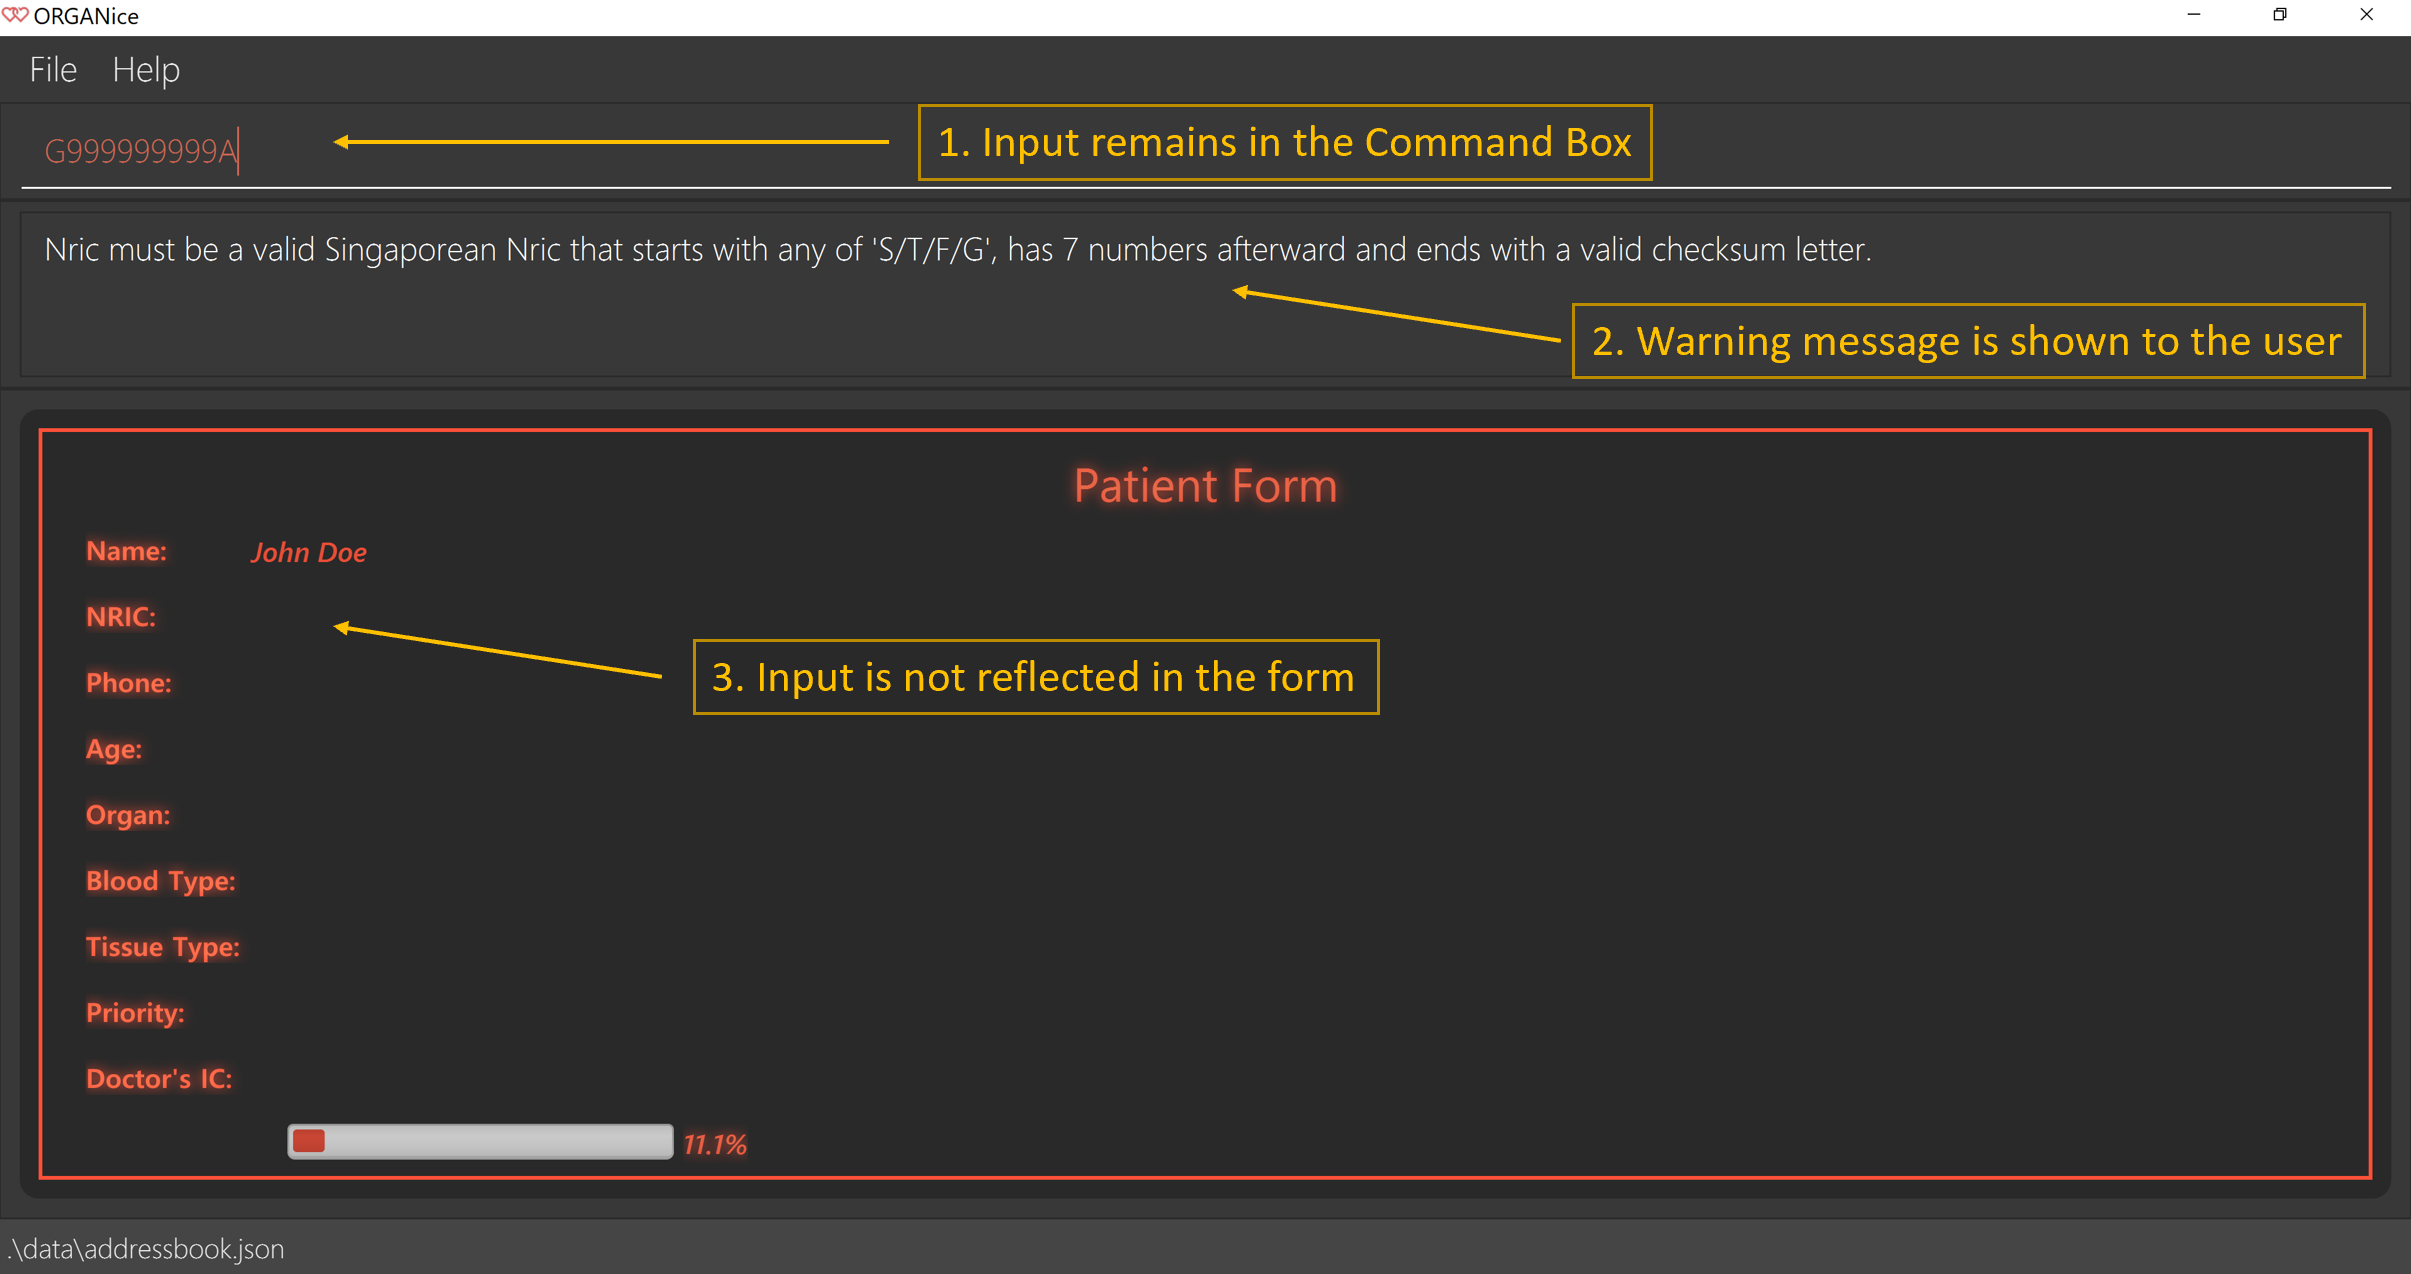
Say you typed in "G999999999A" and pressed Enter when ORGANice prompts you to type in the NRIC of the patient. Three changes occur to ORGANice, which can be seen in the Figure 6:
-
Your input will remain in the Command Box, but the colour of the input text turns to red.
-
A warning message is displayed in the Message Display Box. This warning message details the criteria for a valid NRIC input. This error message is specific to the attribute type. For example if you typed in an invalid NRIC, an error message detailing the criteria for a valid NRIC will be displayed.
-
Your input will not be reflected in the form.
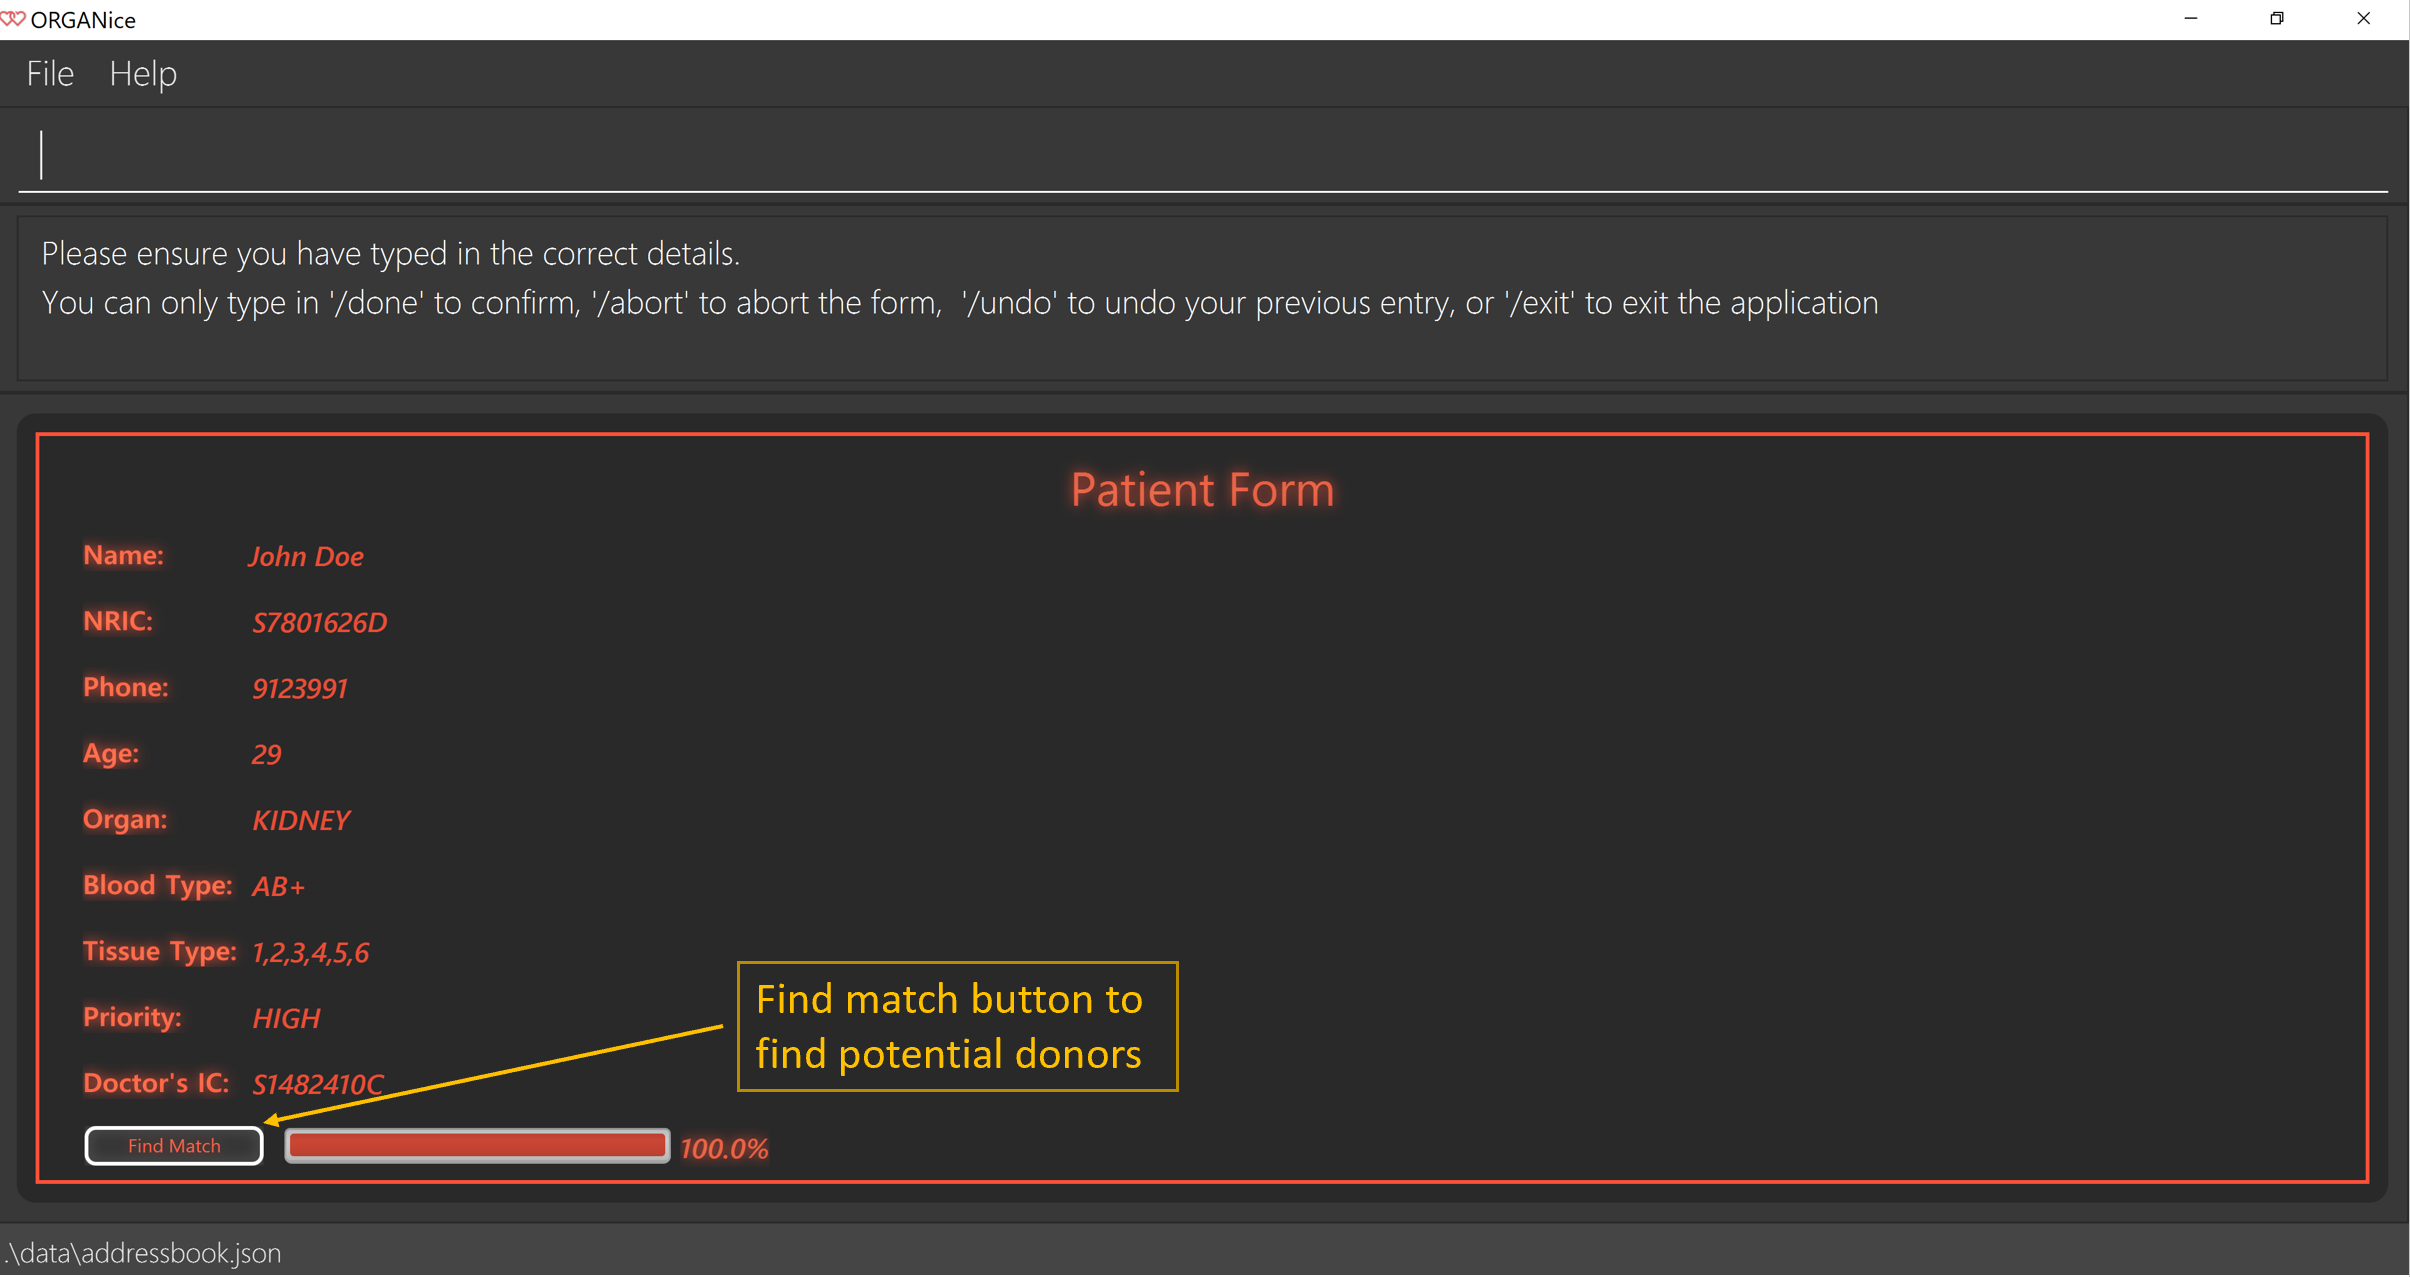
After all of the attributes have been specified, you can type in:
-
/doneto add the person to the ORGANice list of persons -
Click the
Find Matchbutton to directly add the person and find the potential donors at the same time. Note that theFind Matchbutton will only appear on thePatientform. Note that this action is only applicable if you are adding a patient.
The Figure 7 will show how the form will look like after you have entered all the required attributes.
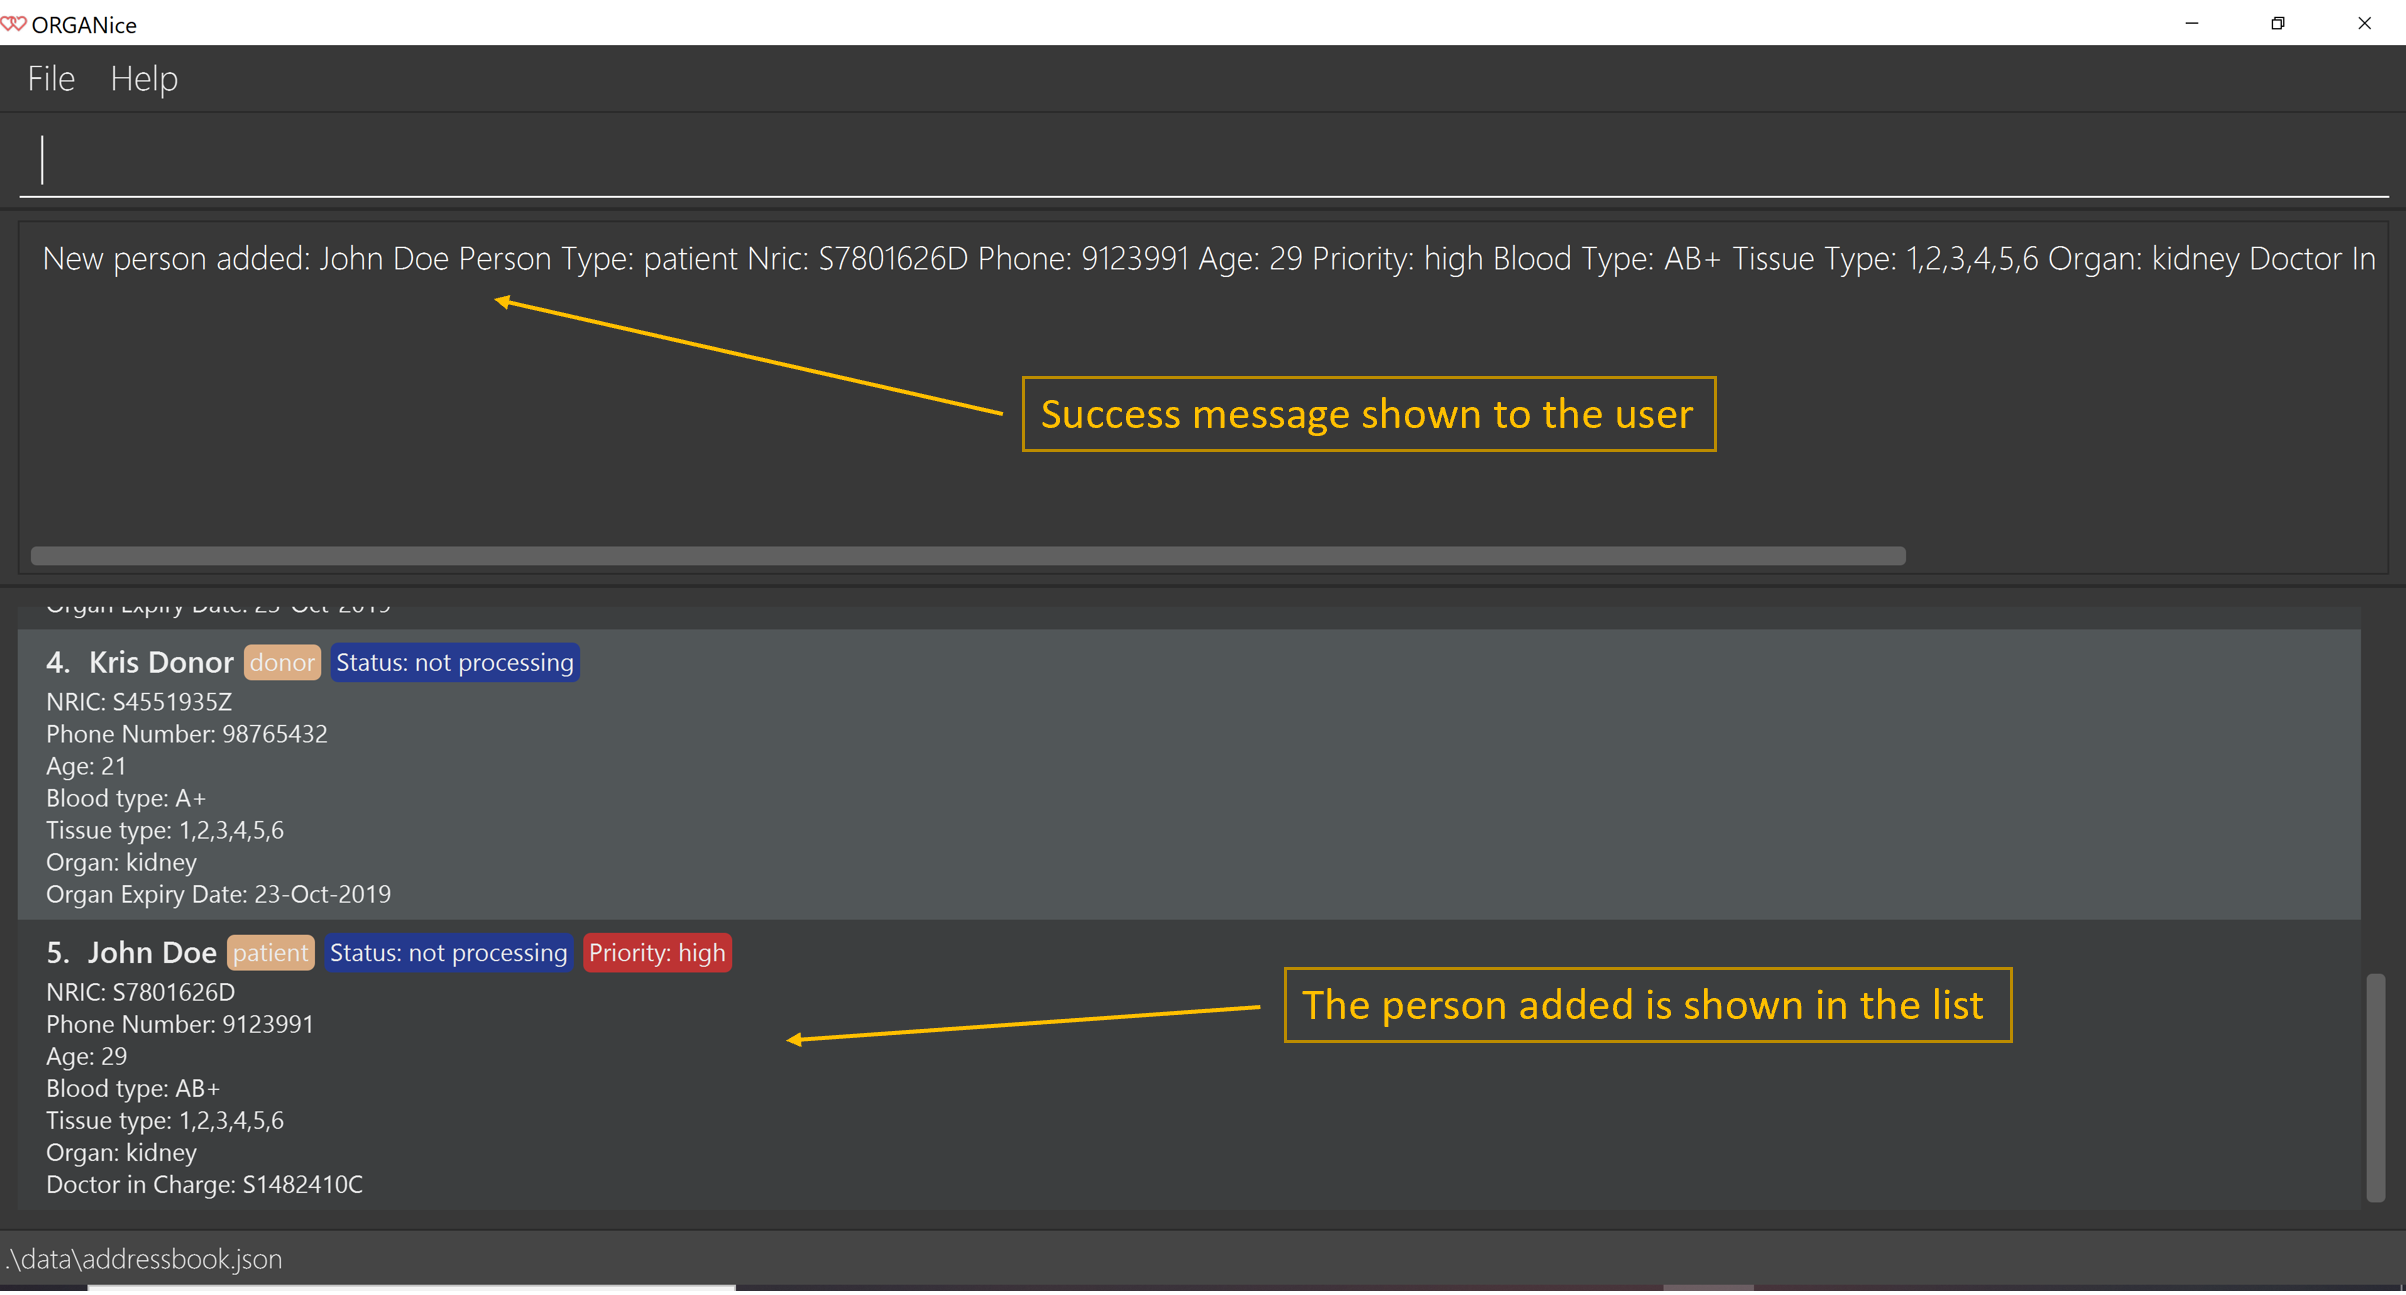
When you type in /done, the Person List will return to its original state of displaying people in ORGANice.
The Message Display Box will show a success message, indicating that you have successfully added a new person to the Person List as seen in Figure 8.
The 'Find Match' button will appear when all attributes are filled. After you clicked this button, ORGANice will add the patient to the list and it will execute the 'match' command.
ORGANice will then return back to its original state(exits from the form mode) and shows the list of potential donors for the patient you have just added as seen in Figure 10. Note that this button only appeared if you are adding a patient.
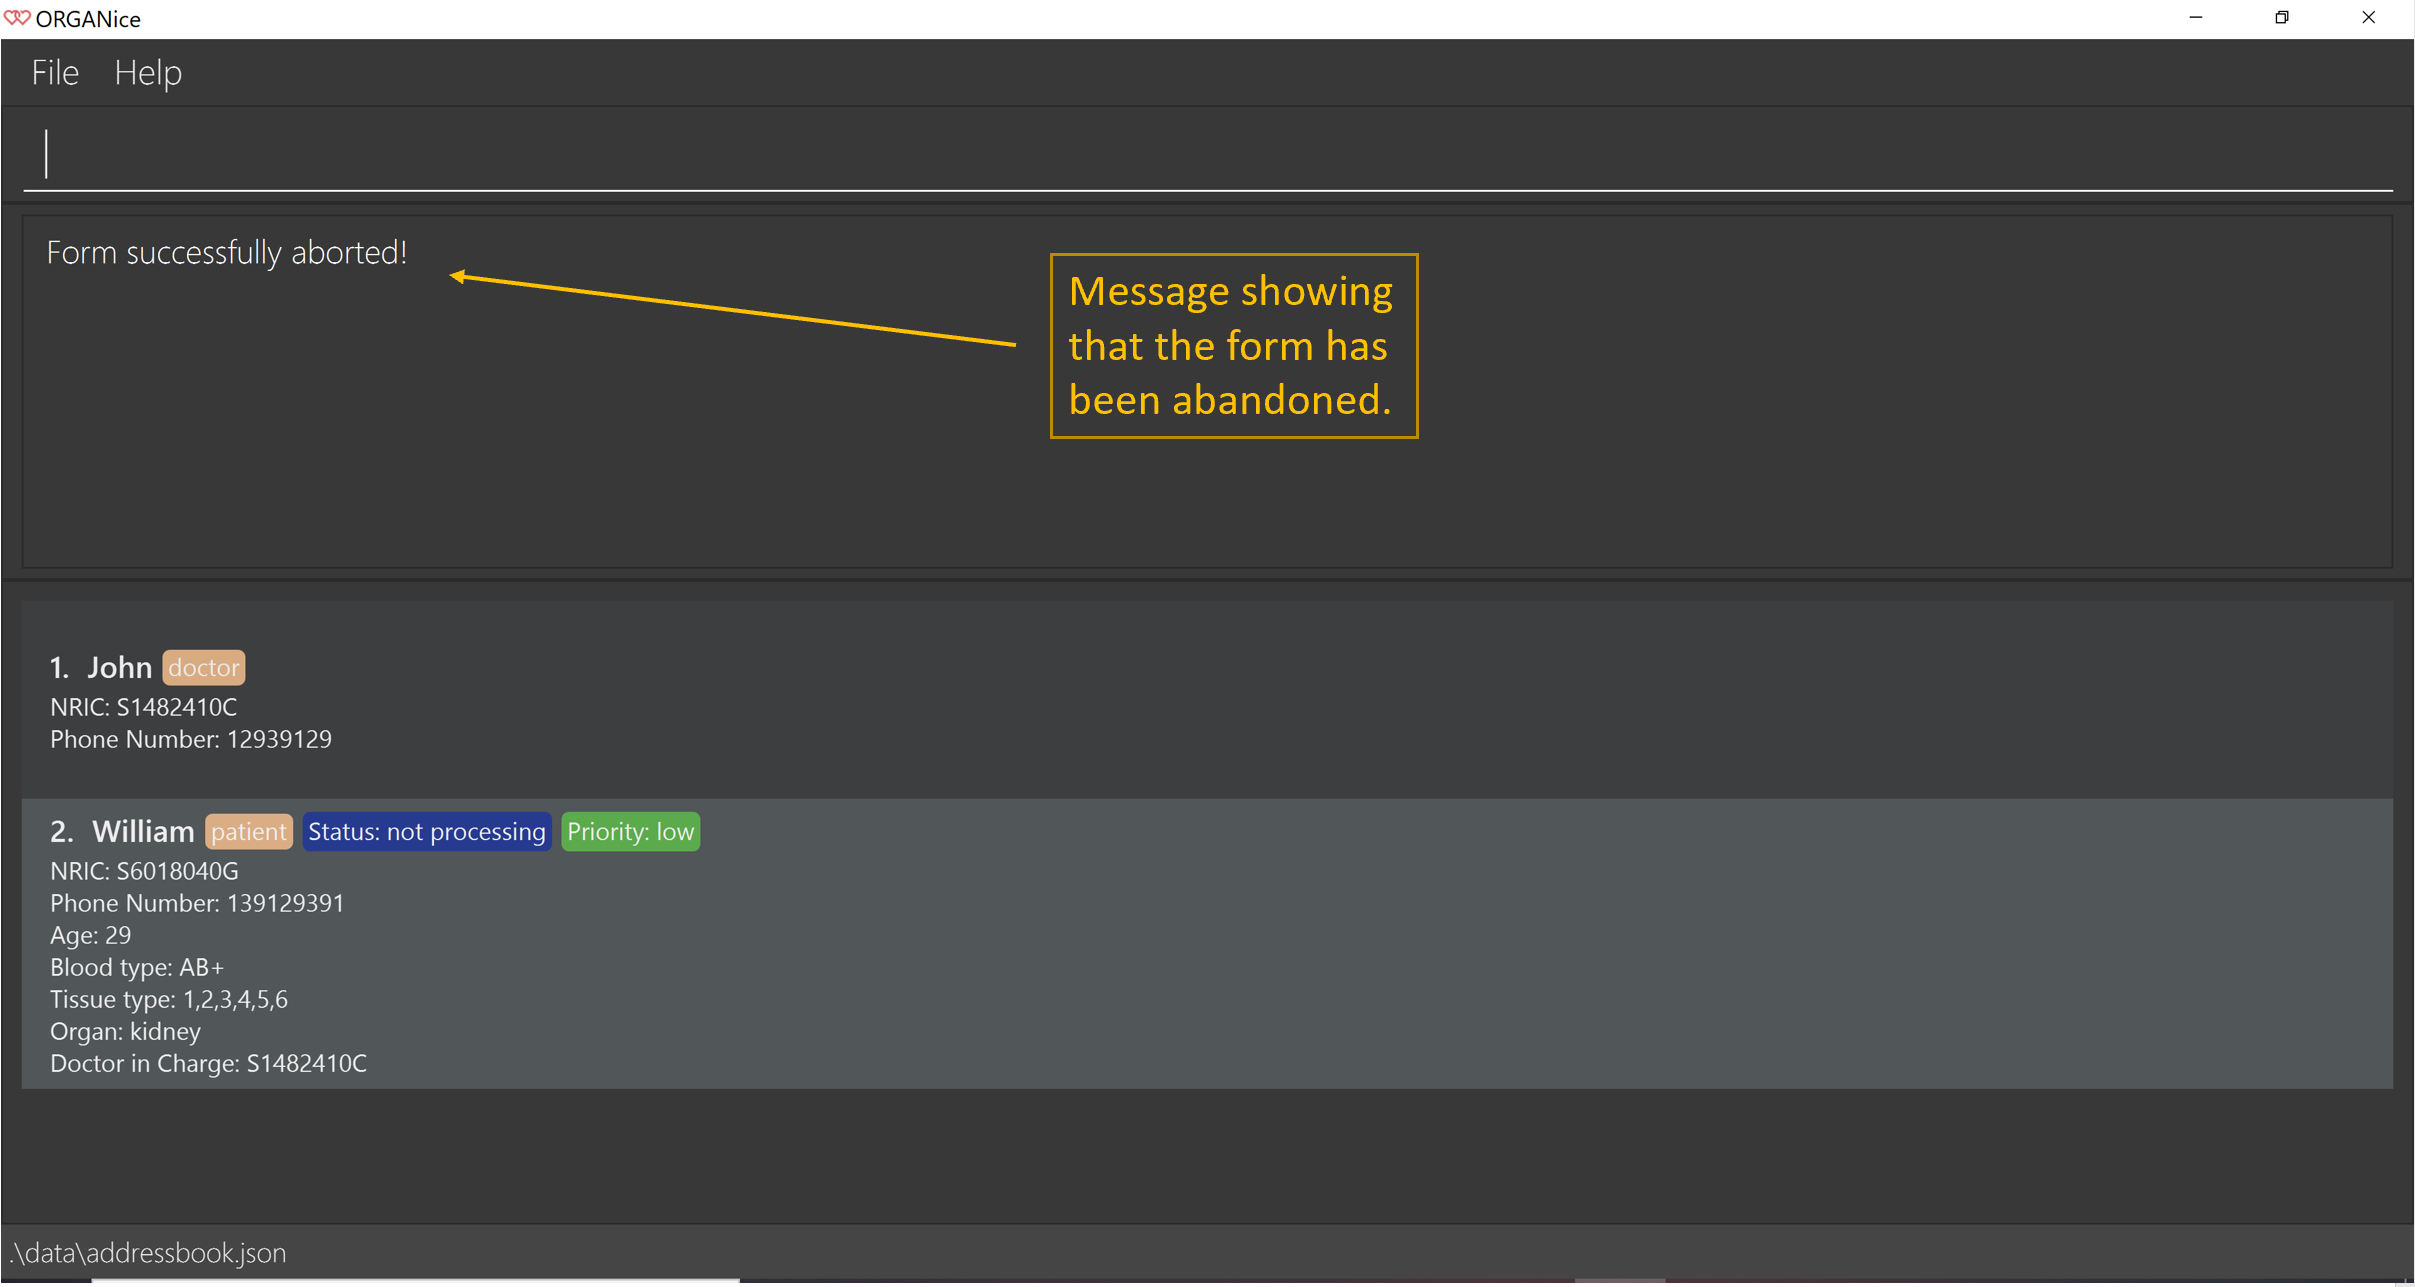
At any point in time, if you decided not to proceed with the addition and typed in /abort, you will be directed into the main page and notified that
you have abandoned the form as seen in Figure 10.
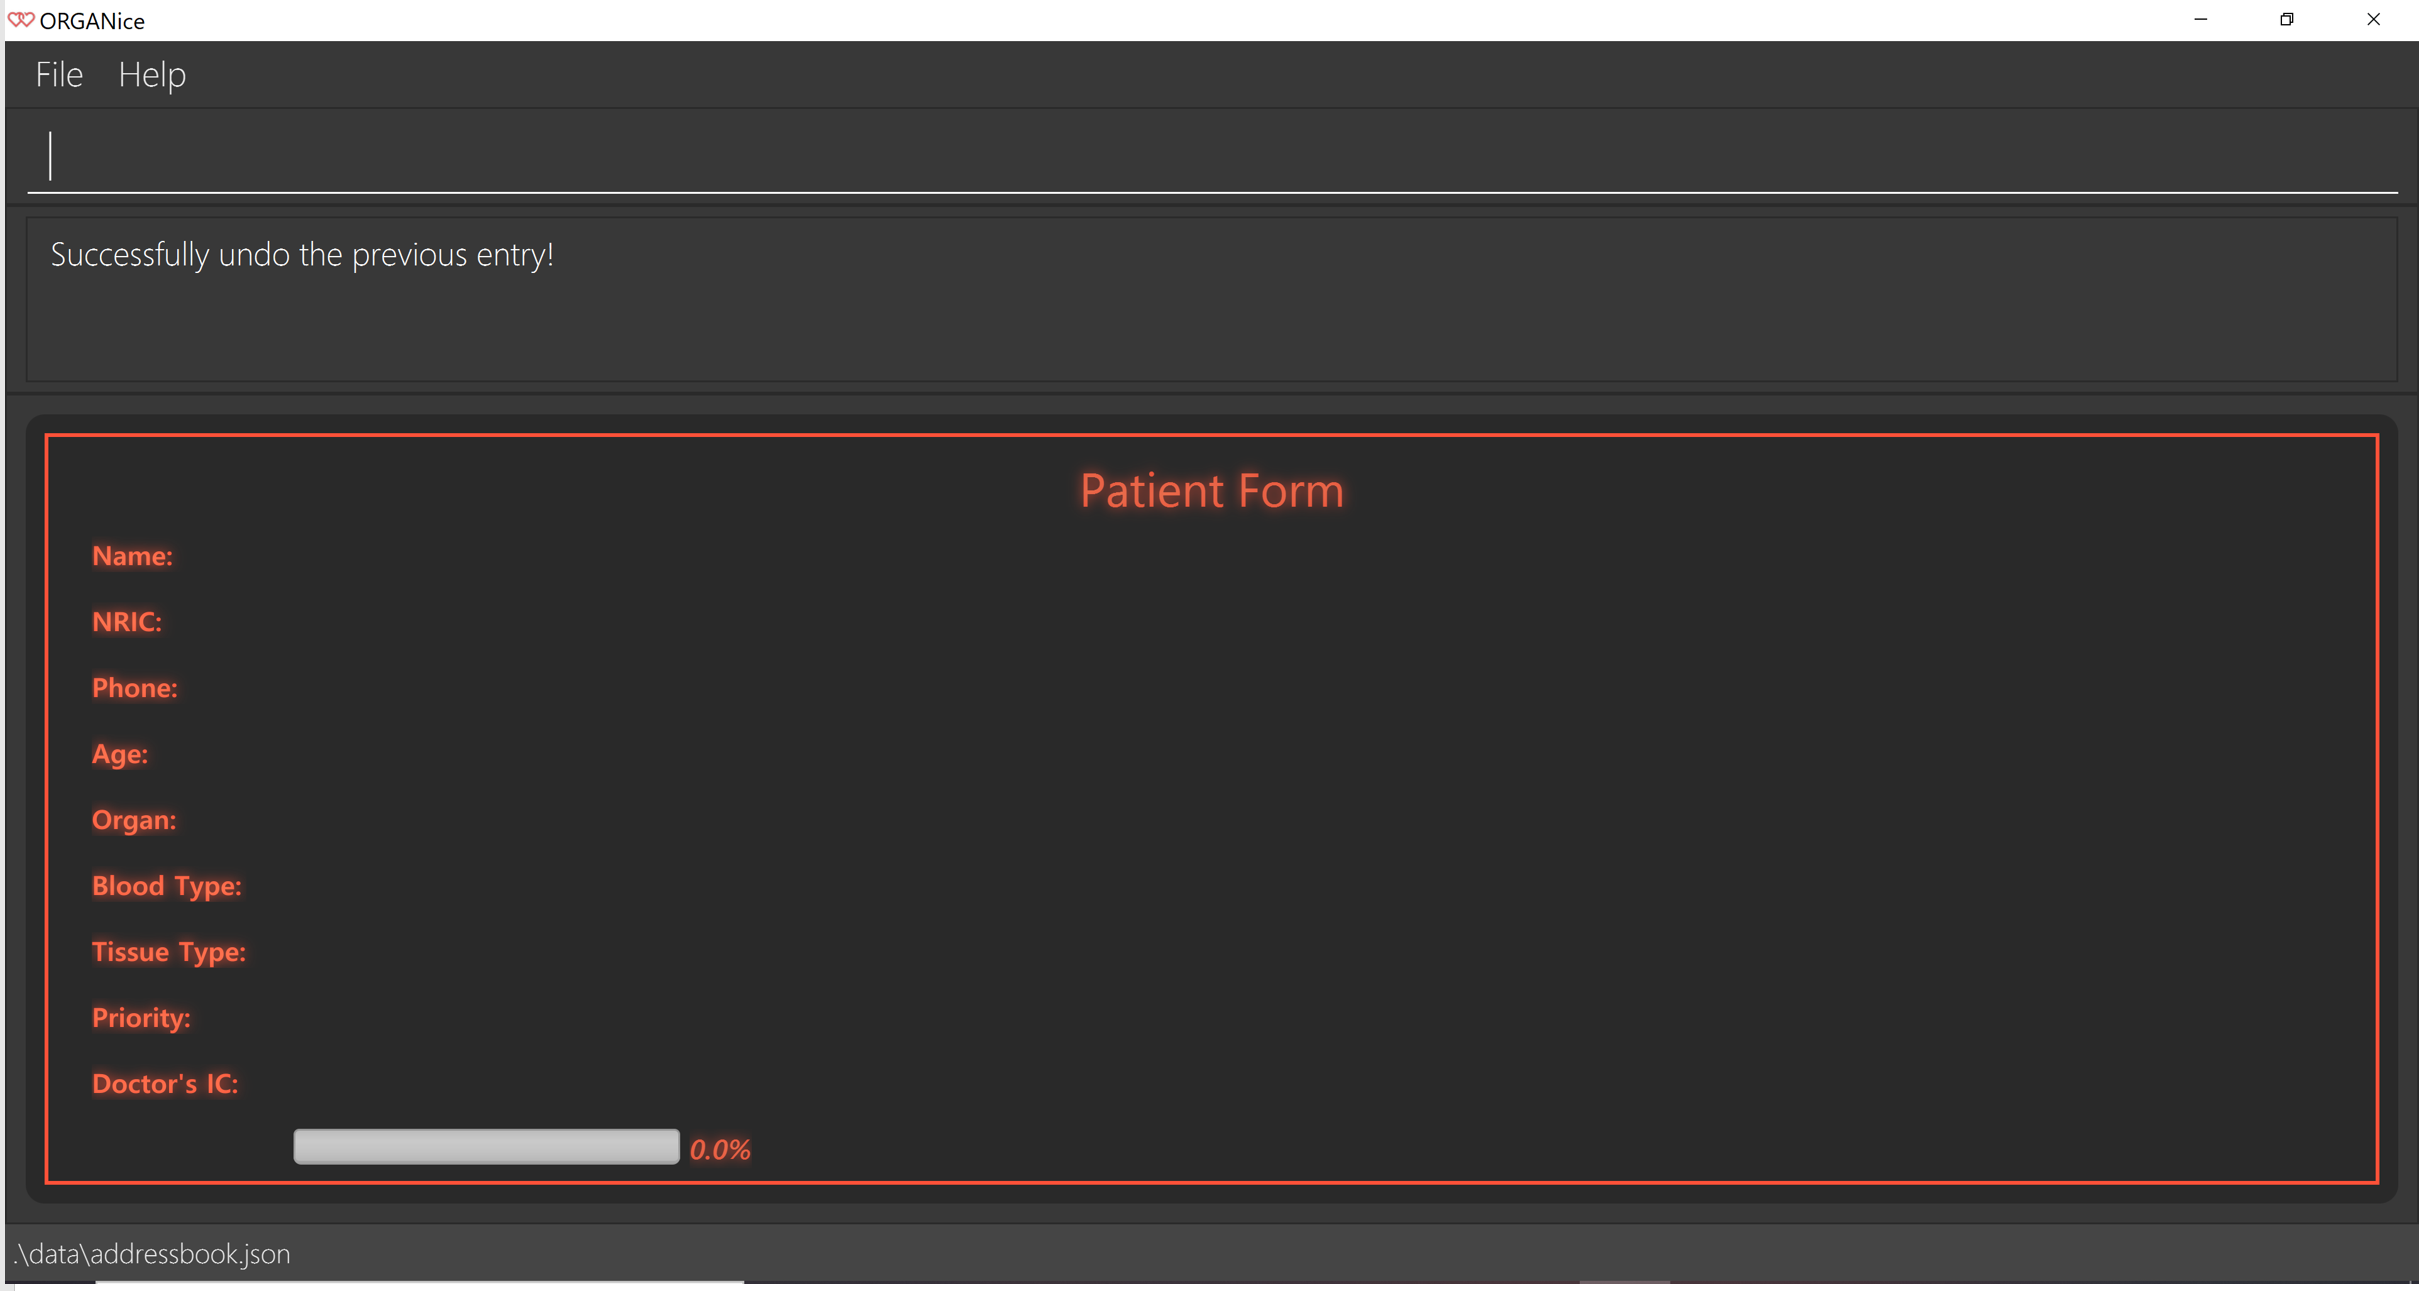
Furthermore, if you made any mistake while you are filling up the form, you can type in /undo to remove the last entry you entered.
For example, if you enter the wrong name and want to undo the action, type /undo in the Command Box and press Enter. Your previous input for the name will be removed from the form as seen in Figure 11
5.3. Listing persons: list
This list command can show you the list of persons in ORGANice.
5.3.1. Listing all persons
Simply type list in the Command Box and press Enter. ORGANice will show you all patients, doctors, and donors present in the system.
5.3.2. Listing persons of a specified type
If you wish to see a certain type of person only, you can provide the type parameter in the list command.
Optional parameter: Type - t/TYPE
For instance, if you only want to see all doctors, you can enter the following:
list t/doctor. Likewise, you can change the type parameter in the same manner to see only patients or donors.
5.4. Editing a person’s attribute: edit
If you want to make any changes to a person’s attribute, you can edit the information using an edit command. If there are multiple attributes to change, you can do so in the same edit command.
The format is such that after the edit keyword, provide the person’s NRIC, followed by the attribute(s) that you want to change in the edit command.
Format: edit NRIC followed by attributes to update
For instance, if you want to change a patient’s phone number to 91234567, you can provide his or her NRIC followed by the new phone number
as follows: edit S8732457G p/91234567.
You can only make changes to attributes that the person has. For example, you cannot change a doctor’s age because a doctor does not have that attribute in ORGANice.
Besides that, some attributes cannot be edited. These include:
-
NRIC
-
Type
You may want to refer to Section 4, “List of Attributes” to see what attributes apply to each type of person in ORGANice.
5.5. Finding persons by attributes: find
You can use the find command to search for persons whose attributes match your input keywords. A list of matching
persons along with the number of exact and possible matches will be displayed.
Format: find PREFIX/KEYWORD (PREFIX/KEYWORD…)
Optional parameters: Multiple keywords per prefix, multiple prefixes in the same find command.
| You may wish to reference Section 4, “List of Attributes”, to view the list of available prefixes to search by. |
The find command is case insensitive and performs OR matching within a prefix and AND matching between prefixes. It also matches similar looking words to account for possible typos in your keywords. The following example illustrates these concepts:
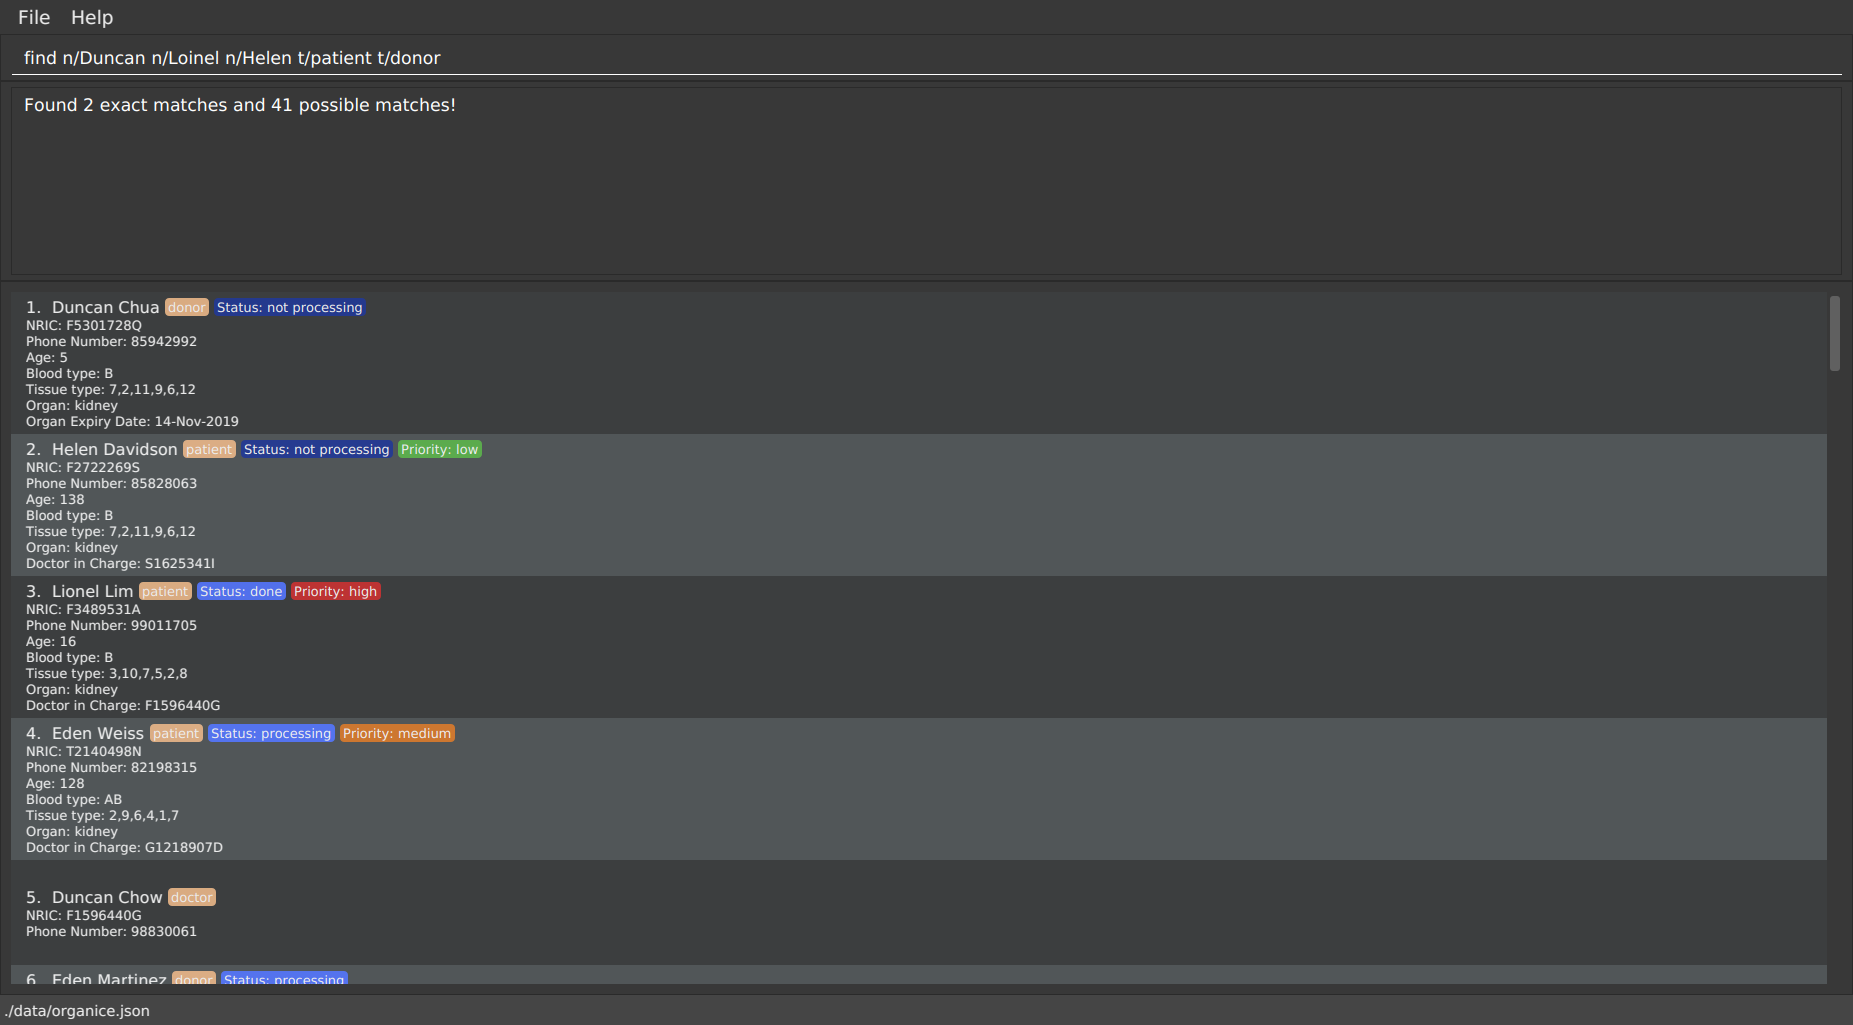
In Figure 12, you can see that find n/Duncan n/Loinel n/Helen t/patient t/donor shows a list of 44 matches. The two
exact matches are listed at the top; those below are possible matches, sorted according to how closely they match your
keywords.
'Duncan Chua' and 'Helen Davidson' are among the matched persons due to the fact that Duncan’s name matches either of 'Duncan' OR 'Loinel' OR 'Helen' AND he is also either a 'patient' OR 'donor'. The same is true for Helen. 'Lionel Lim' also appears in the search results as his name is similar to 'Loinel'. Hey, good thing we picked up on that typo or we’d have missed Lionel!
The only exception to this rule is tissue type matching, which uses AND matching within the prefix.
|
Lets take a look at some examples and pointers showcasing the use of find:
-
Use case with multiple keywords per prefix
-
find n/Laura n/Marisha Ray b/A b/B b/O
Displays all persons whose name contains either 'Laura' or 'Marisha Ray' and whose blood type is either 'A', 'B' or 'O'.
-
-
Use case demonstrating prefix order insensitivity
-
find b/A n/Benson Carter b/O n/Alice b/B
Displays the same result as the preceding example.
-
-
Use case demonstrating tissue type finding
-
find tt/4,1,2,3
Displays all persons whose tissue type contains tissues: 4, 1, 2 and 3; in any order.
-
Looking for exact matches only? No problem! Just replace find with exactFind!
|
That’s it for this section. Congratulations, you now know how to use the find command!
5.6. Detecting matches: match
This command runs a kidney matching test on patients and donors in ORGANice and displays potential matches. A patient-donor pair is considered a potential match if they pass the blood type and tissue compatibility tests. Refer to Section 7, “FAQ” for a better understanding of the procedure for kidney matching.
You can either run a kidney matching test on a specific patient or on all patients in ORGANice. To learn how to run kidney matching tests on a specific patient, refer to Section 5.6.1, “Matching a specific patient”. To learn how to run kidney matching tests on all patients, refer to Section 5.6.2, “Matching all patients”.
5.6.1. Matching a specific patient
This section will explain how to run kidney matching tests for a specific patient and illustrate
the process with an example.
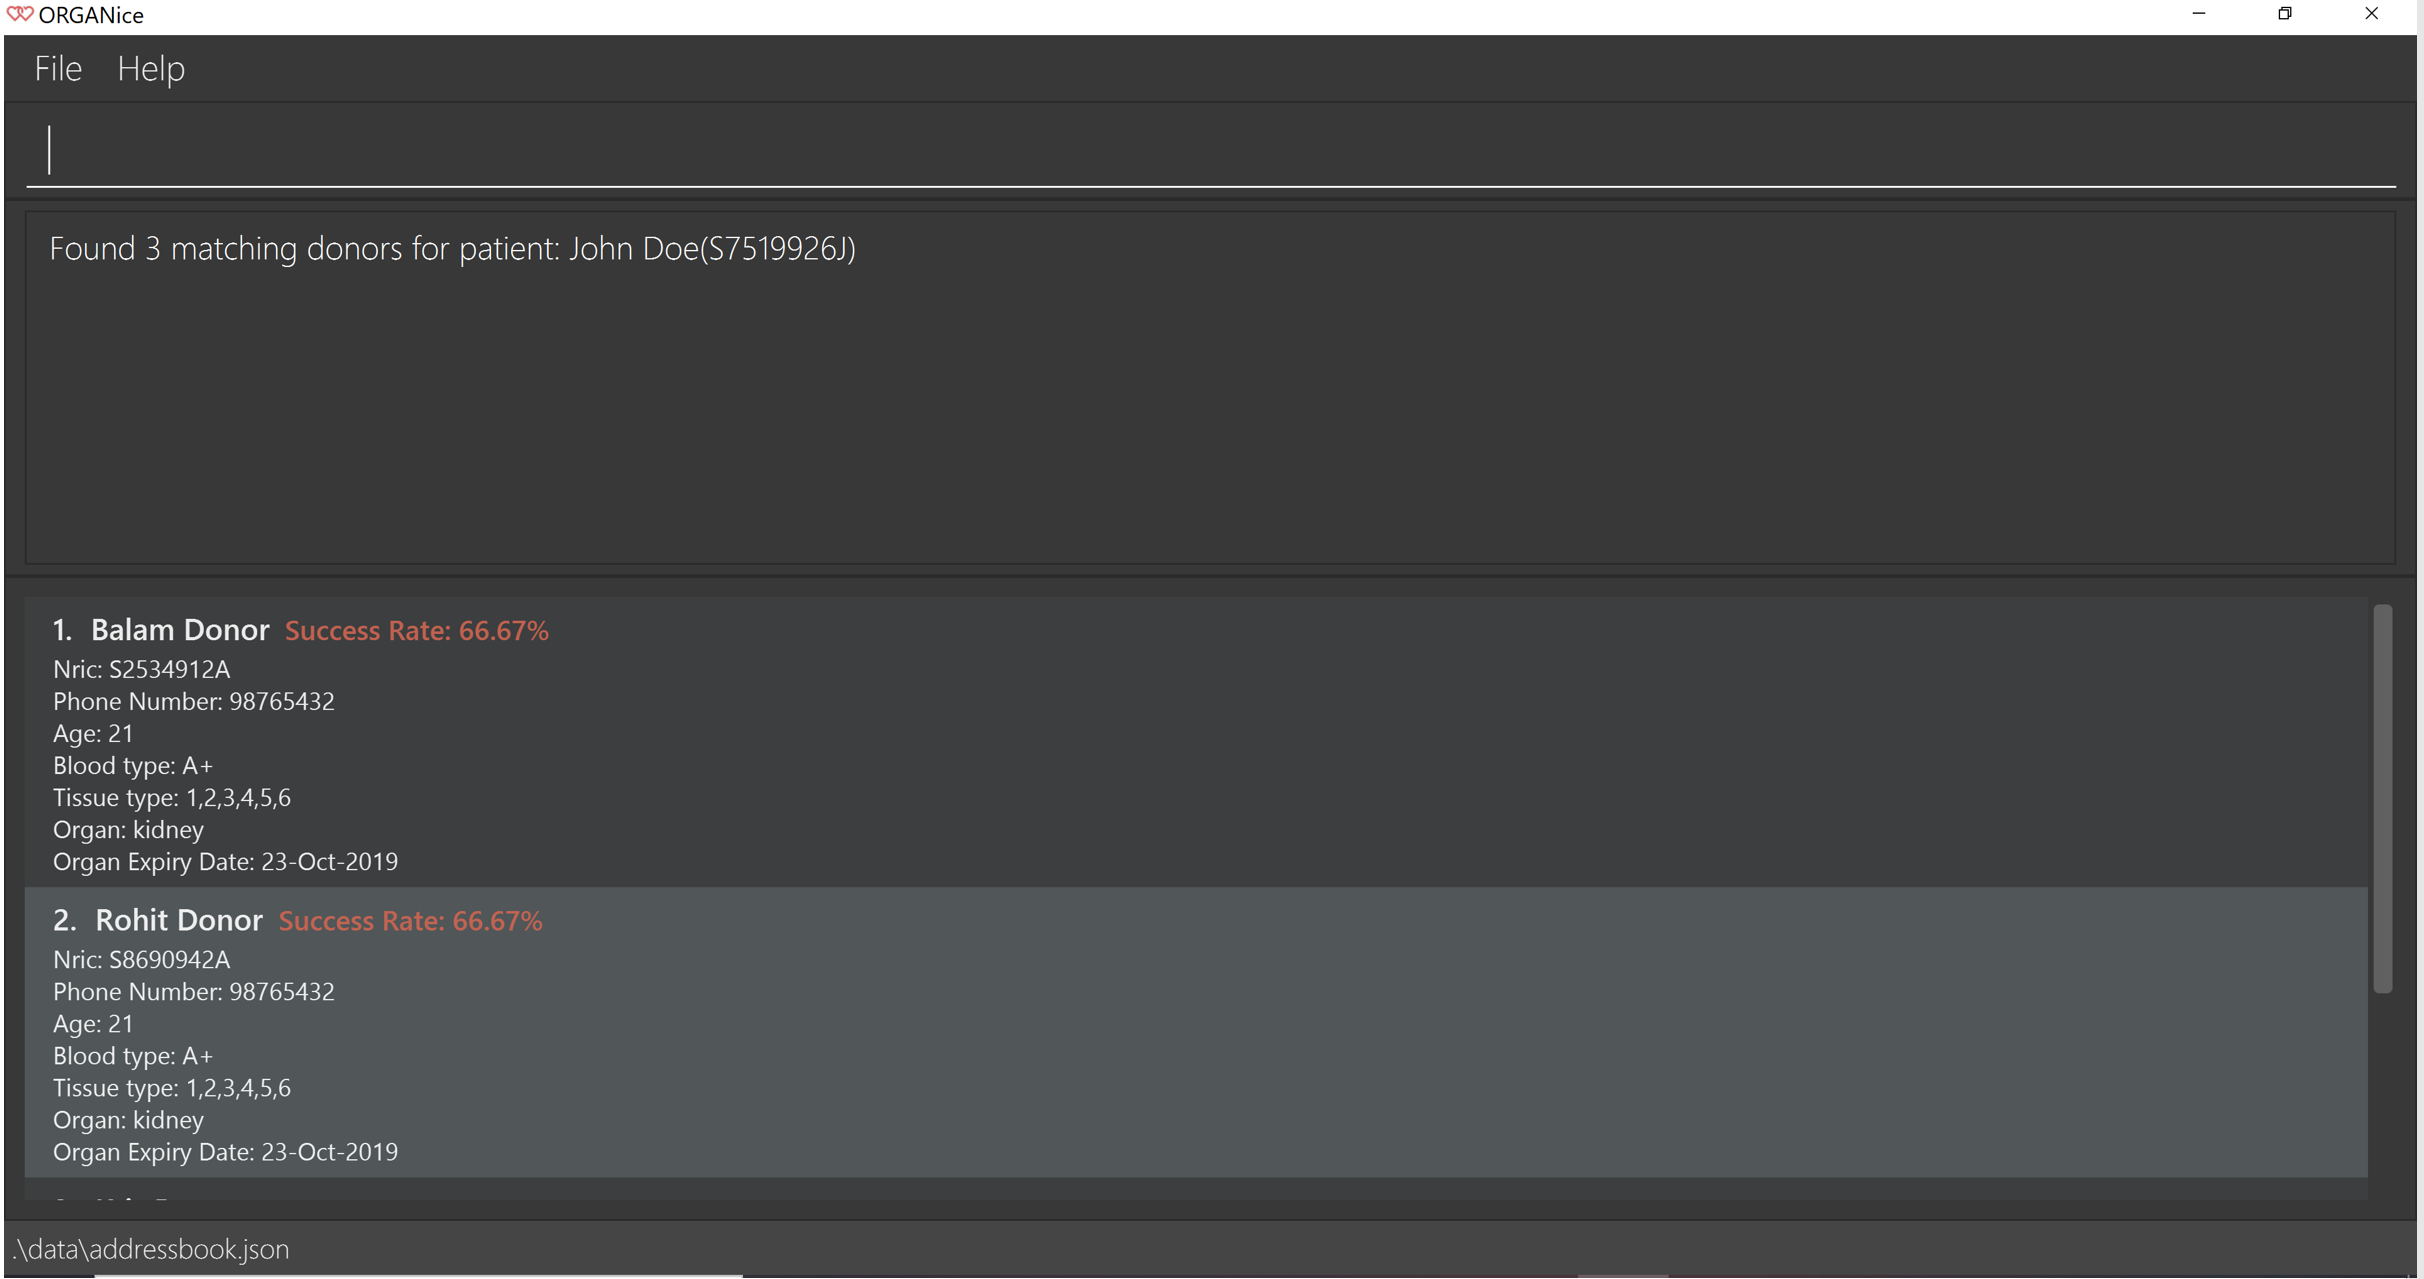
To get a list of potential donors for a patient, type in match ic/PATIENT NRIC.
Here is an example. Suppose you want to find potential donors for a patient "John Doe" and his NRIC is "S9941002G".
Type match ic/S9941002G in the Command Box and press Enter.
You will see a list of potential donors for John Doe along with the compatibility rate of each donor, similar to the figure below.
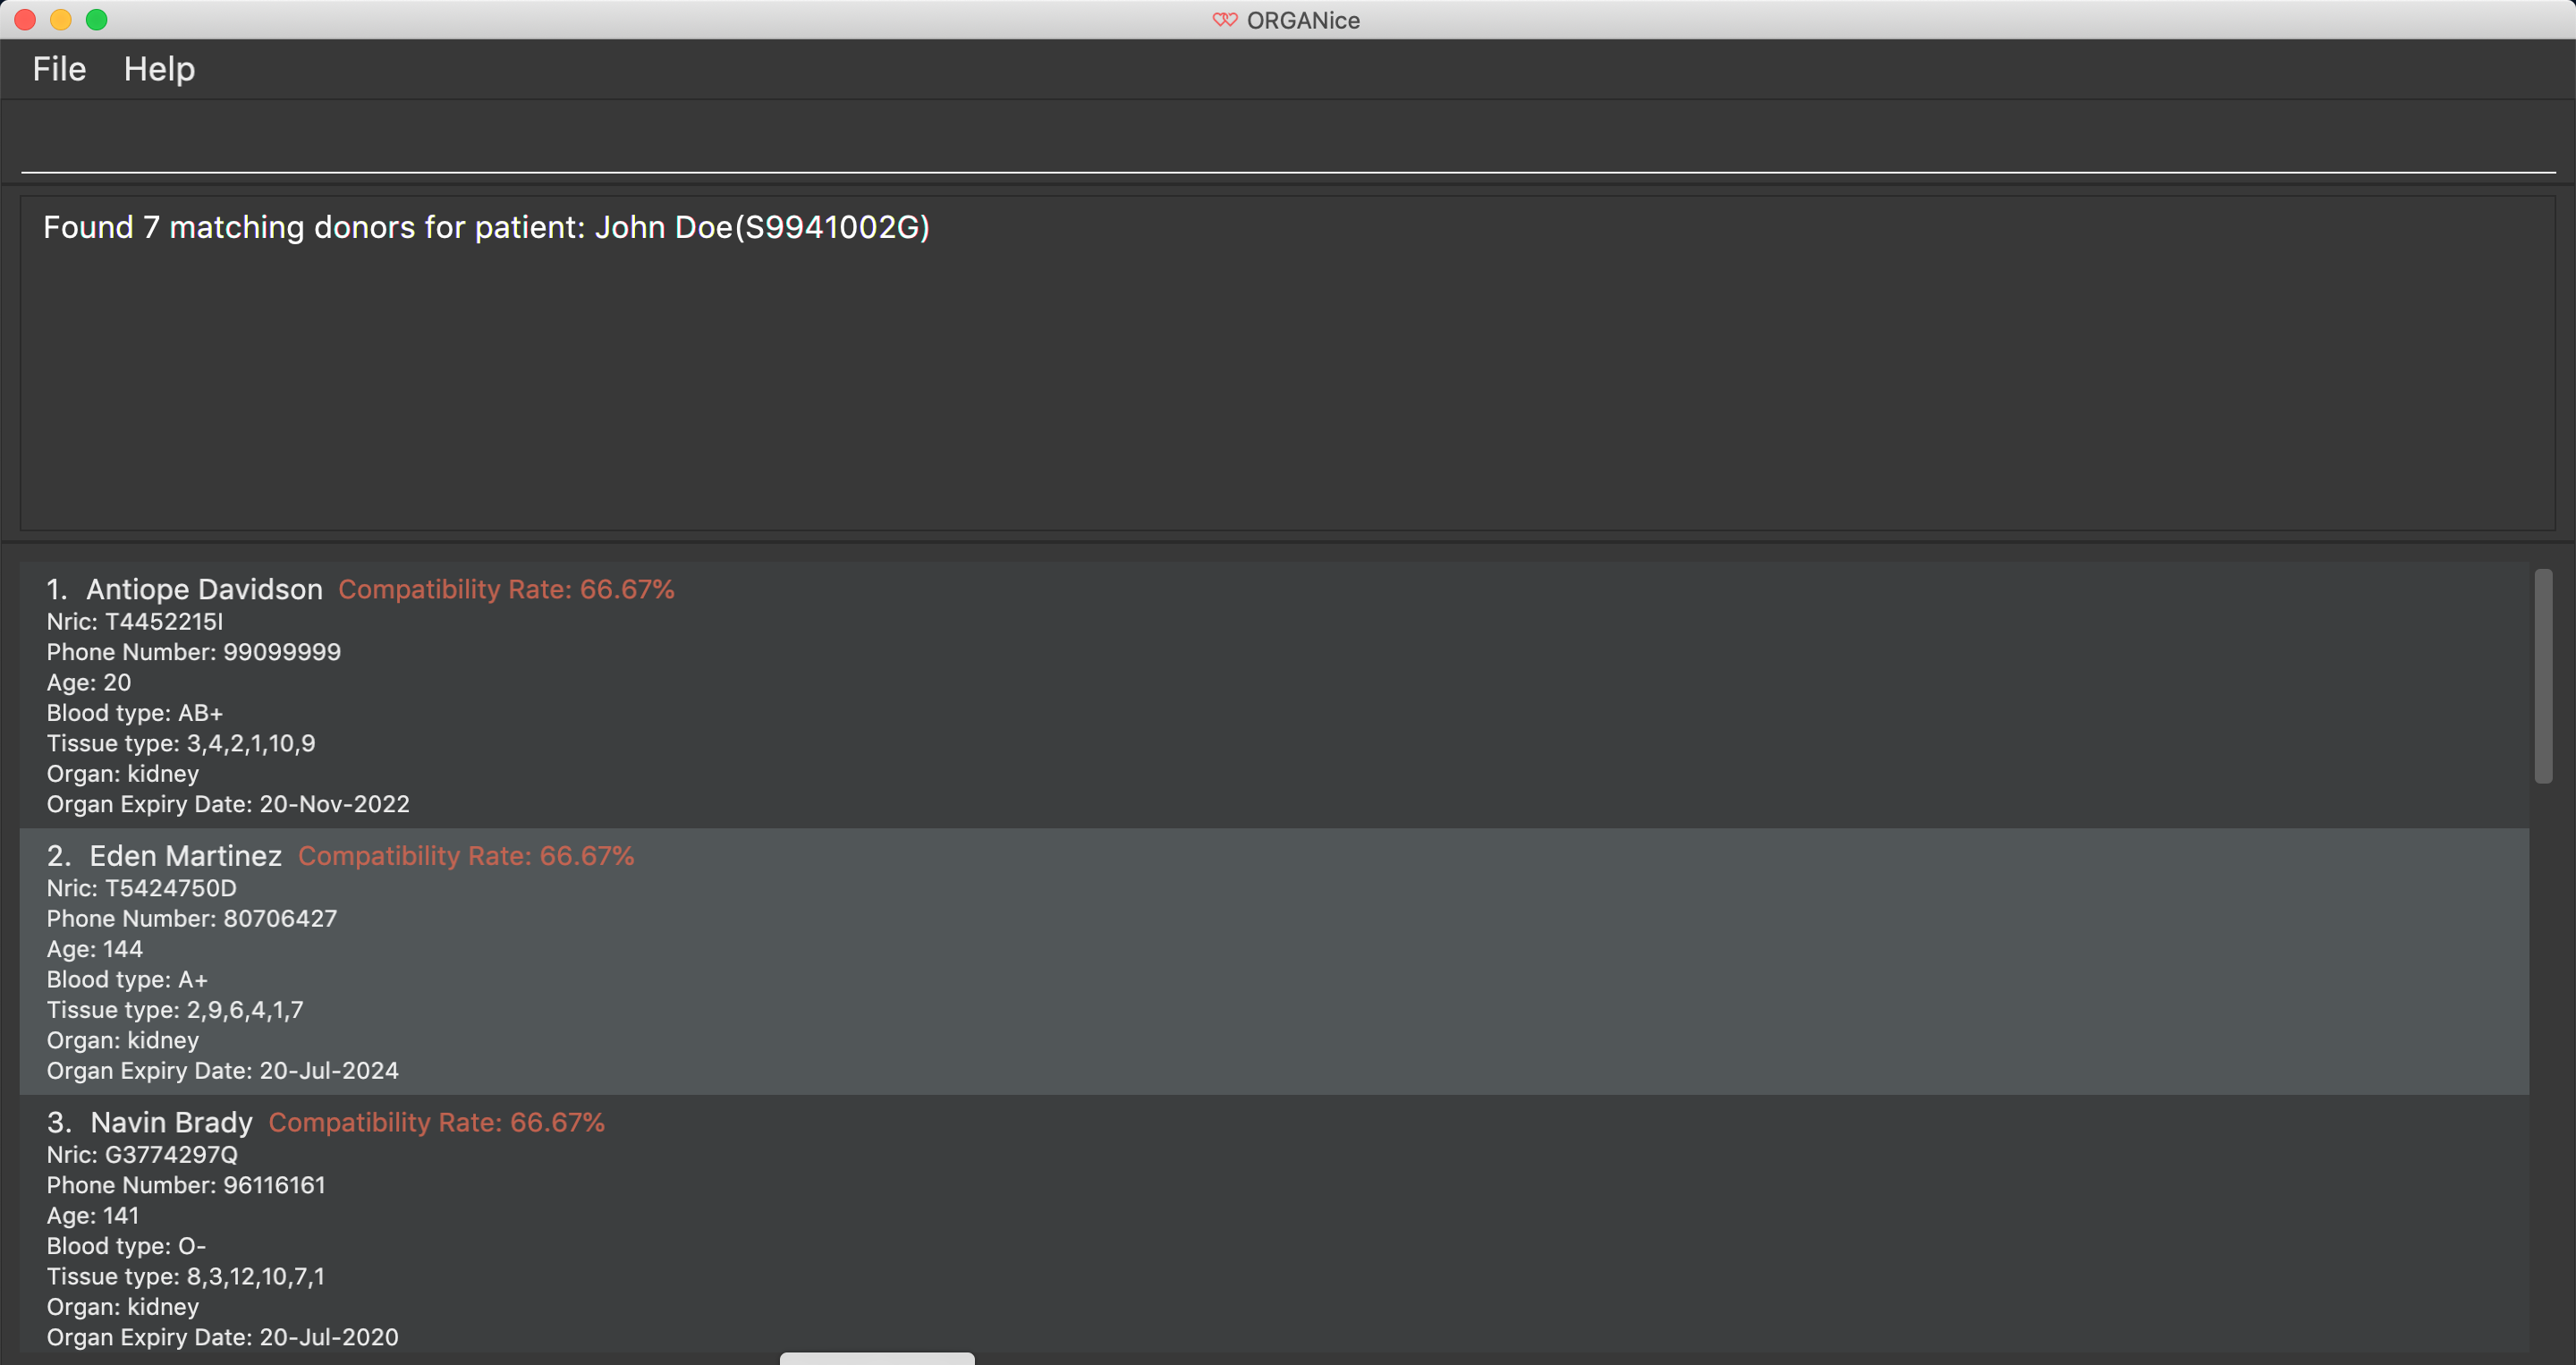
For more information on the compatibility rate, you may refer to Section 7, “FAQ”.
5.6.2. Matching all patients
This section will explain how to run kidney matching tests on all patients and illustrate the process
with an example.
If you want to find potential donors for all patients,
type match ic/all in the Command Box and press Enter.
You will see a list of all the patients in ORGANice along with the number of potential donors for each patient.
As seen in the figure below, 'Someone edited' is displayed with the red text 'Matches: 3'. This means that 'Someone edited' has 3 potential donors.
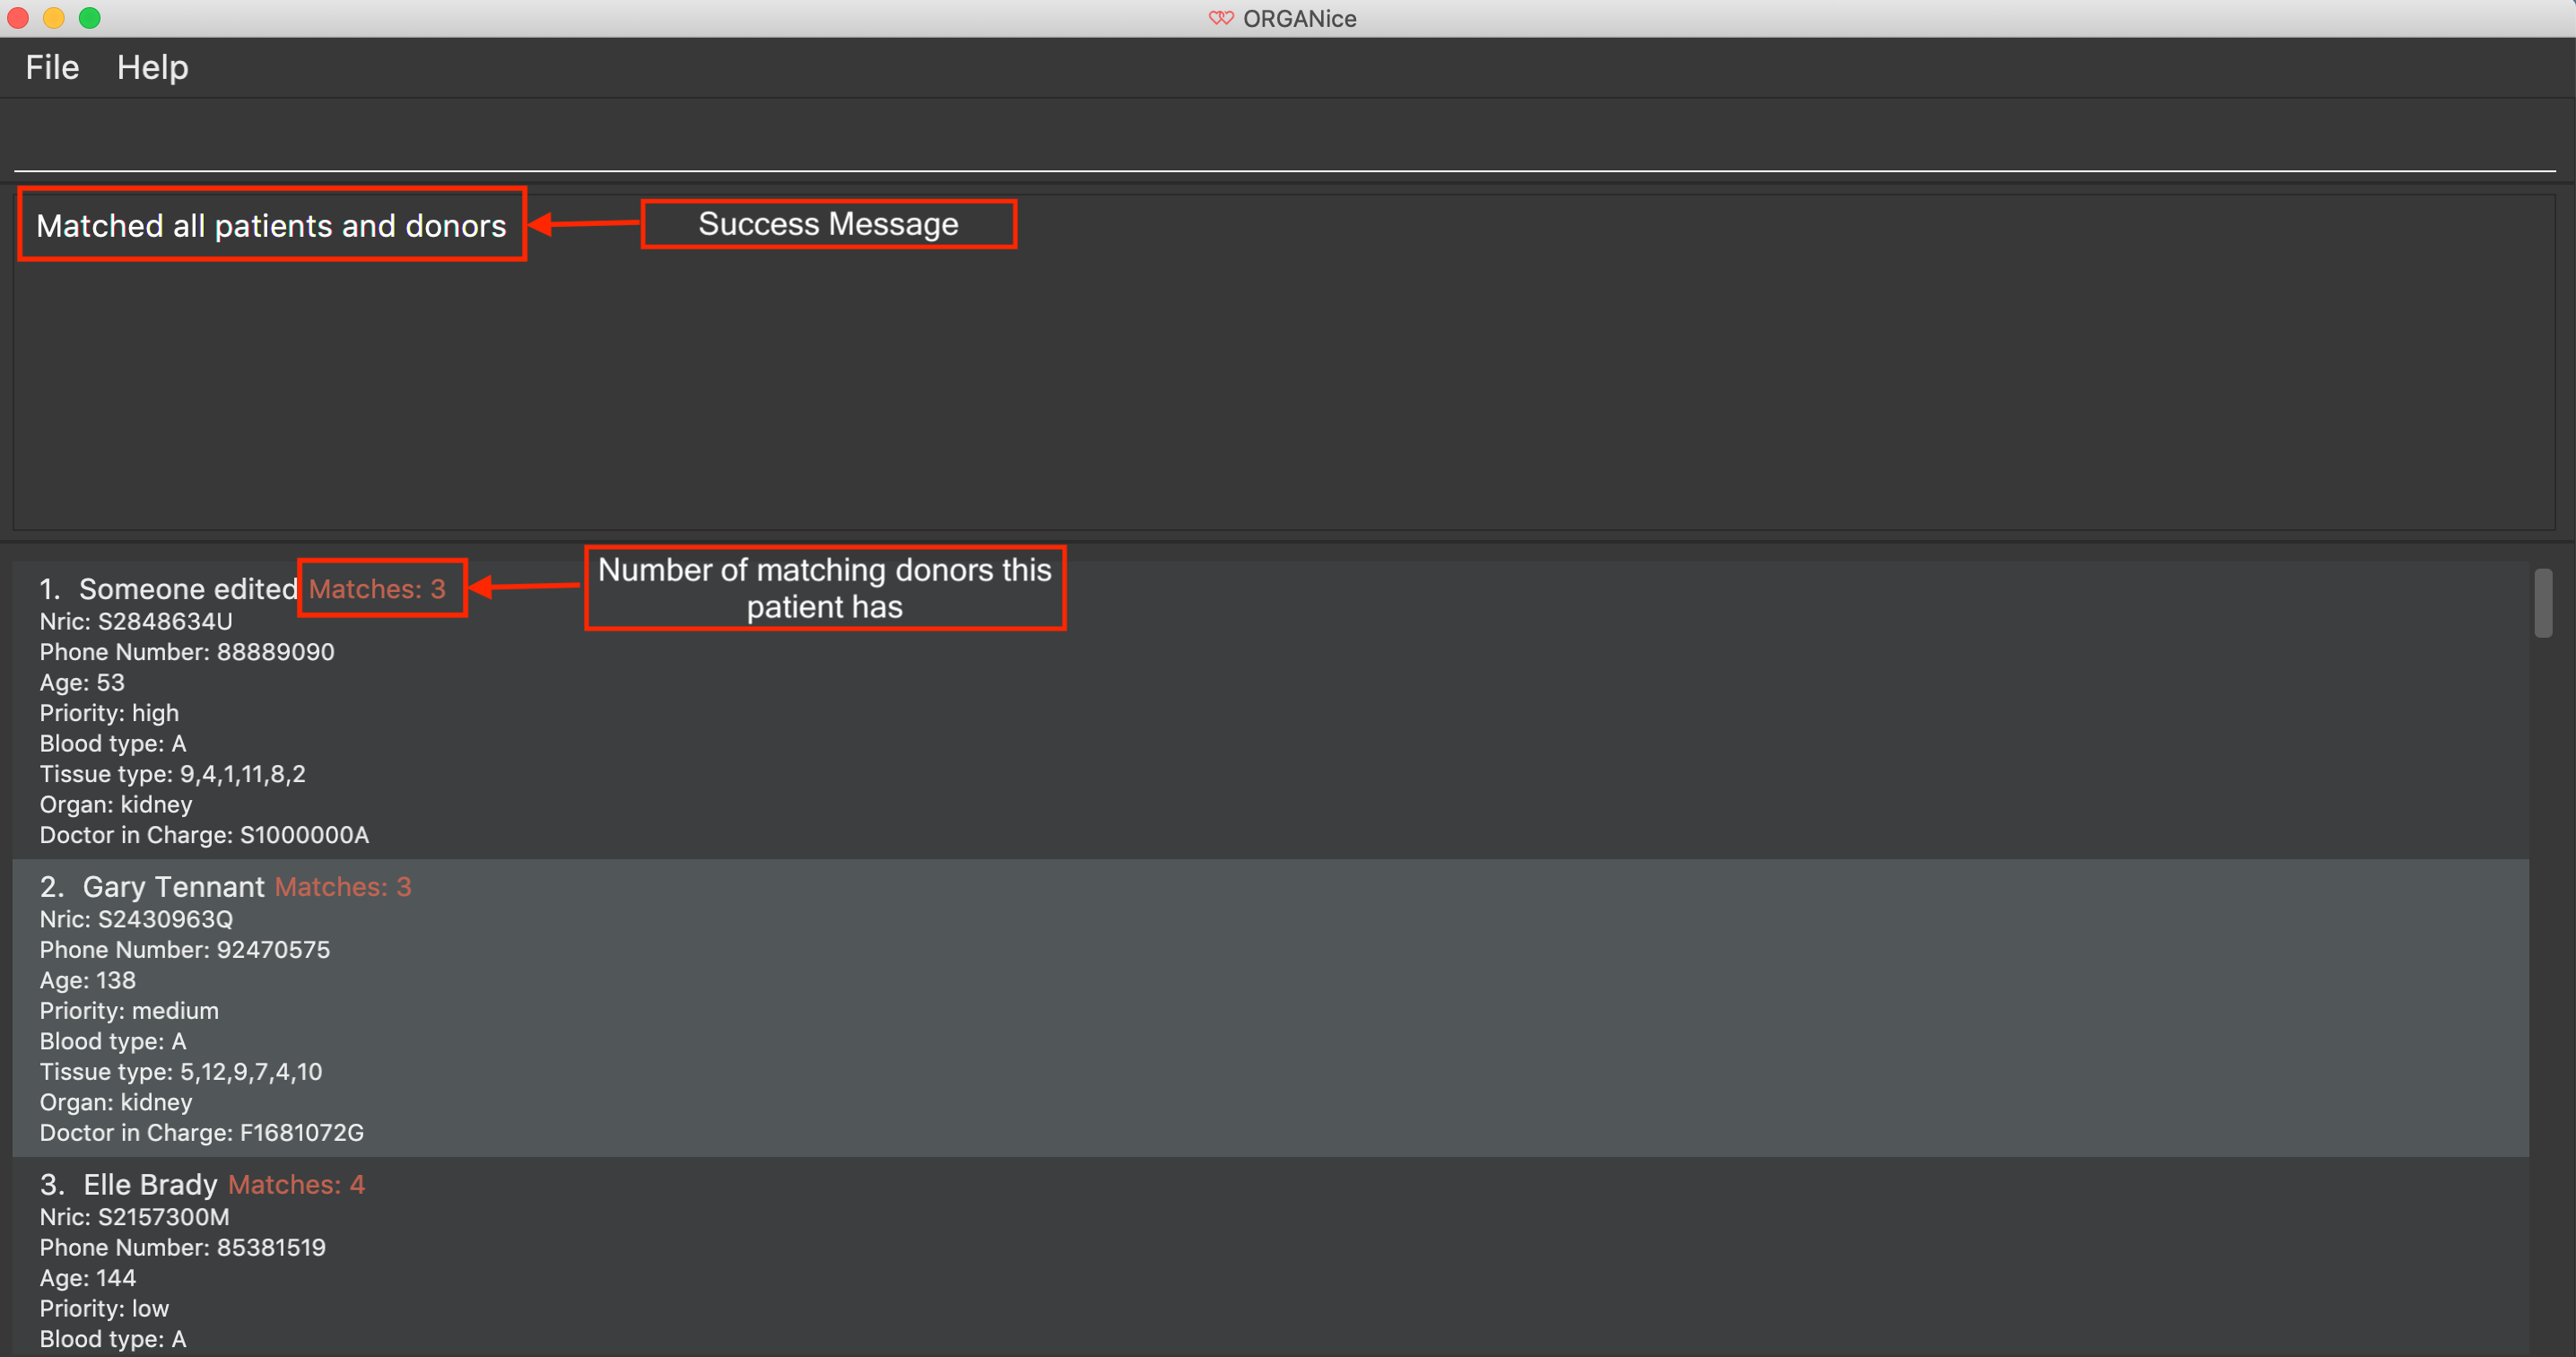
Following this, you can sort the matches based on different criteria to determine which patient to prioritize. Head over to the next section to find out how to sort matches.
5.7. Sorting matches: sort
After using the match command, you can sort the list of matches to determine which patients to prioritize for an organ transplant.
The sort command can only be used after a match command to sort the resulting list of patient-donor pairs generated. There are three criteria in which you can sort the matches, namely:
-
Sorting based on donor’s organ expiry date
-
Sorting based on priority
-
Sorting based on the compatibility rate of match
These criteria will be further explained below.
Note that only one criterion can be used in a single sort command.
5.7.1. Sorting based on donor’s organ expiry date
To find out which organs are expiring soon, you can sort the list of matched donors based on the donor’s organ expiry date (from the earliest to the latest expiry date).
Format: sort expiry
For example, after running a match command on a specific patient with match ic/NRIC, you will get the list of donors that are compatible with said patient.
You can then run sort expiry to obtain the list of donors with earlier organ expiry dates near the top of the list.
5.7.2. Sorting based on priority
To determine which patient to prioritize for an organ transplant, you can sort the list of matched patients based on their priority (from highest to lowest). You may refer to Section 9, “Glossary” to understand what priority means.
Format: sort priority
For example, after running match ic/all, you will obtain a list of patients.
You can then run sort priority to obtain the list with higher priority patients near the top of the list.
Note that in the case where patients have the same priority, those with more matched donors will be displayed first. If these two factors are the same for a group of patients, they will be displayed according to their names in alphabetical order.
5.7.3. Sorting based on the compatibility rate of match
To determine which patient-donor pair is the most compatible, you can sort the list of compatible donors of that patient based on the compatibility rate of the match (from highest to lowest). You may refer to Section 9, “Glossary” for more information on the compatibility rate.
Format: sort rate
Take for instance, after running a match command on a specific patient with match ic/NRIC, you will get a list of donors that are compatible with said patient.
You can then run sort rate to obtain the list of donors with higher compatibility rates near the top of the list.
5.8. Processing potential matches: processing
After finding a list of matches, the hospital will be able to schedule a cross-matching test between a specific donor and patient. To schedule a cross-matching test, there will be a lot of other administrative tasks to be done. Hence, this command will be able to allow you to have an overview of what kind of tasks you need to do for that particular pair of donor and patient before the cross-matching.
5.8.1. Status of the donor and patient pair
You can also view the current state of every donor and patient in ORGANice by looking at their Status.
The Status of patient and donor can be either Not Processing, Processing or Done.
-
Not Processing: The current donor or patient is not yet matched with anyone and is not going for any cross-matching test yet. -
Processing: The current donor or patient has already found a match and is in the midst of preparing for a cross-matching test. -
Done: The current donor or patient have completed the cross-matching and the result of the cross-matching shows a positive result. Hence, this donor or patient does not need to be in ORGANice anymore.
All the patients and donors should be Not Processing initially.
When the command is used for the first time for the patient and donor pair, the Status of the patient and donor will change from Not Processing to Processing.
If the patient and donor is being processed, their Status will remain as Processing.
5.8.2. Task list for the donor and patient
This command will show you the task list for the Processing donor and patient for you to be able to keep track of the necessary standard of procedure easily.
Currently you can:
-
Generate a default task list automatically for newly processed patient and donor if they are
Not Processinginitially. -
View the list which belongs to the patient and donor pair who are already
Processing. -
Mark a task as done in the task list generated from the patient and donor using another command
processingMarkDone ic/PATIENT NRIC ic/DONOR NRIC TASK NUMBERwhich will be explained further later.
5.8.3. Processing the donor and patient
When you use this command, the following will occur:
-
A default task list will be generated to show the necessary tasks the hospital needs to do for the respective donor and patient.
-
The task list will be unique to the specific donor and patient.
-
The task list can be updated using another command,
processingMarkDone ic/PATIENT NRIC ic/DONOR NRIC TASK NUMBER -
The task list will be saved automatically.
-
A donor can only be in
Processingstate with only one patient and vice versa. This means, if a donor and a patient is already inProcessingstate, they will not be able to be processed with another donor or patient. -
A screenshot of the list generated can be shown below:
Format: processing ic/PATIENT NRIC ic/DONOR NRIC
The order of the NRICs does not matter, as long as the patient and the donor must be valid.
Example:
processing ic/S6764235G ic/S5234567D
5.9. Checking the task list: processingMarkDone
As introduced above, this command serves to help you mark a task on the task list as done. This will allow you to be able to know what other administrative things you need to do for the specific donor and patient before the cross-matching test. Beside each task on the task list, there will be either a cross, ✘, or a tick, ✓. A tick would mean that the task is completed and a cross will mean that the task has not yet been completed. A screenshot of the list generated can be shown below:
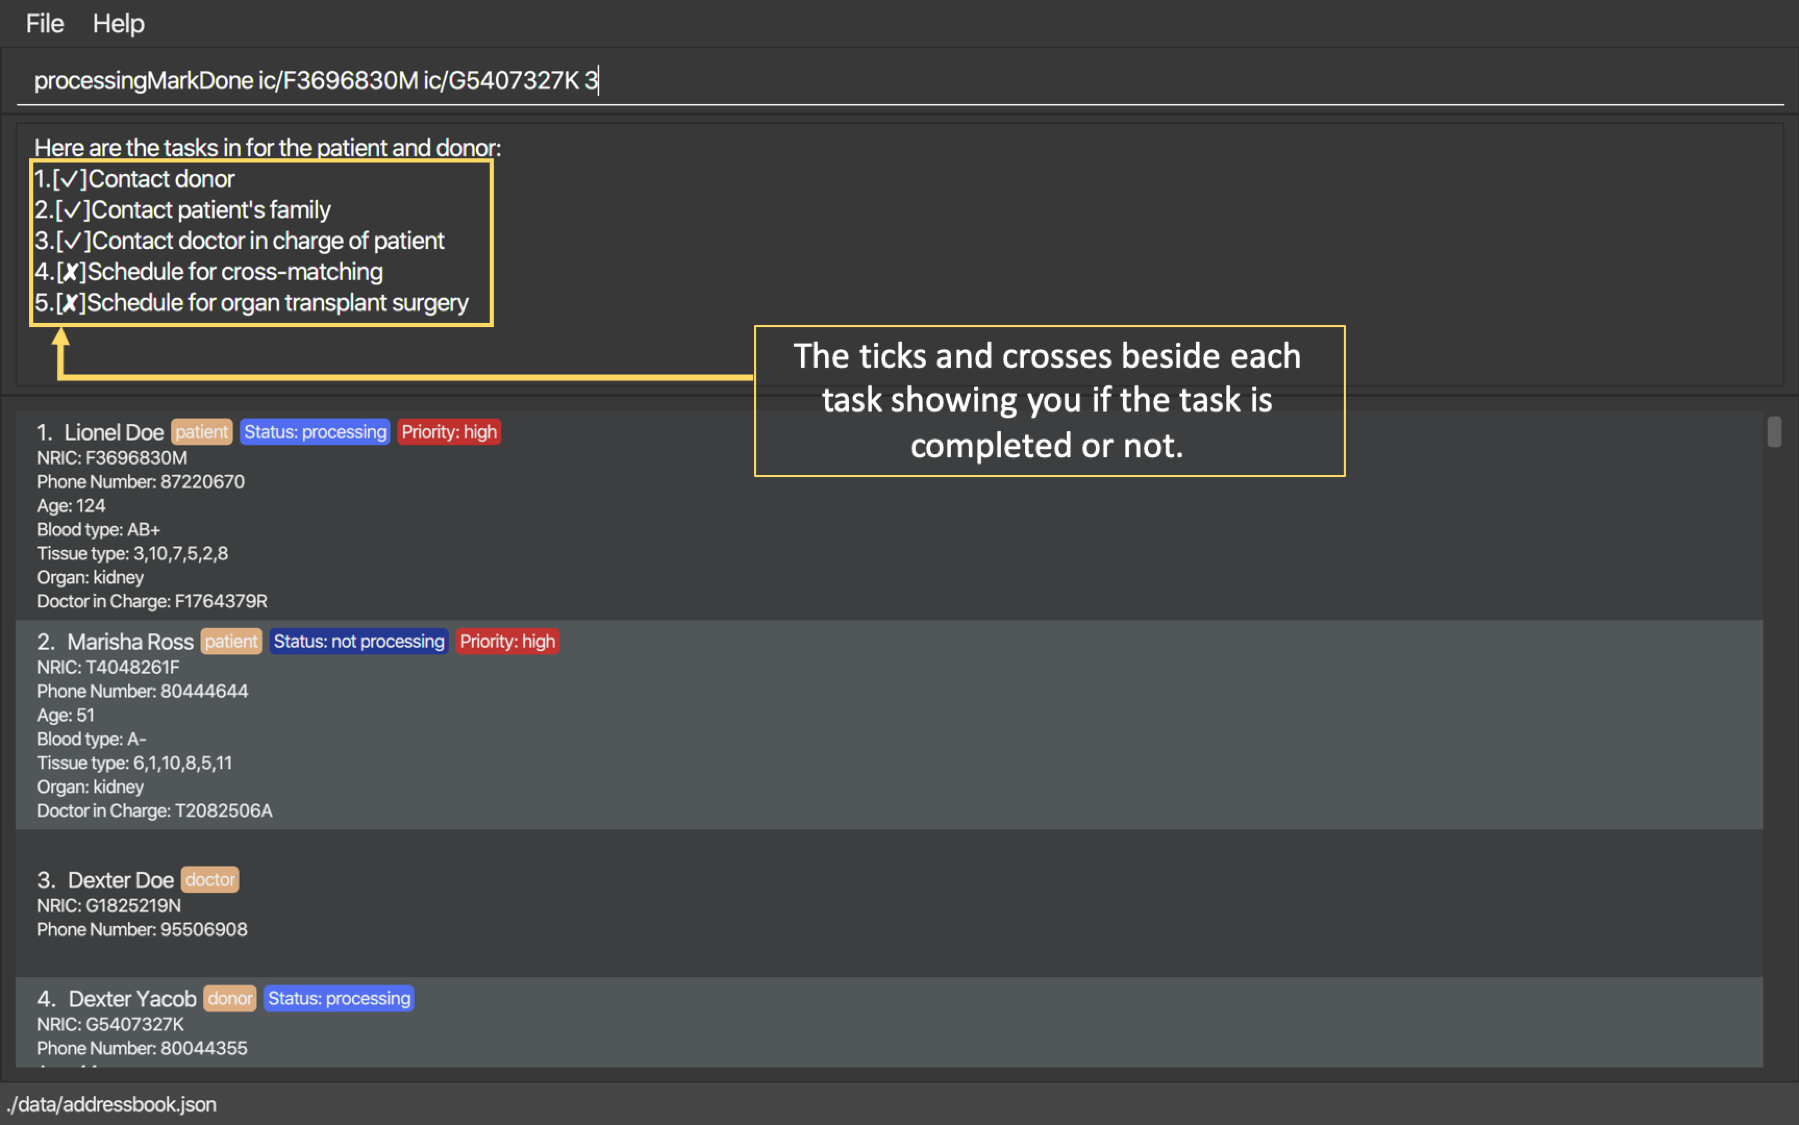
Format: processingMarkDone ic/PATIENT NRIC ic/DONOR NRIC TASK NUMBER
The order of the NRICs does not matter, as long as the task number, patient and donor must be valid.
The donor and patient need to be in Processing state to be considered valid.
Example:
processingMarkDone ic/S6764235G ic/S5234567D 1
5.10. Mark as done: done
After the hospital has the results of the cross matching test, they can update the results in ORGANice. Cross matching tests have two possible results: pass or fail.
Format: done ic/PATIENT NRIC ic/DONOR NRIC res/[pass/fail]
The order of the NRICs does not matter, as long as the patient and the donor must both be valid.
The following section outlines what happens based on the two results:
If the result of the cross matching is a 'pass':
-
Run the command based on the given format
-
It is up to you to schedule an organ transplant surgery between the patient and donor.
-
Mark the patient and donor as
Done, based on the command format. -
The patient and donor statuses will be marked as
Done. -
After running the command, the system removes the patient and donor from ORGANice.
If the result of the cross matching is a 'fail':
-
Run the command based on the given format
-
The donor and patient will be added back to the matching pool for match detection with other patients and donors.
-
The patient and donor statuses will be marked as
Not Processing. -
The donor and patient pair will not be considered a potential match anymore in future match detections.
Example:
-
done ic/S6764235G ic/S5234567D res/pass -
done ic/S5234567D ic/S6764235G res/fail
5.11. Deleting a person : delete
If you want to delete a person in ORGANice, you can type in a command of the following format: delete NRIC
ORGANice will prevent you from deleting a person if he/she is any of the following:
-
A patient whose status is currently under processing.
-
A donor whose status is currently under processing.
-
A doctor who is in charge of one or more patients in ORGANice.
Here is an example. If you want to delete a patient with the NRIC S4612296H and is not under processing, type the following command: delete S4612296H.
5.12. Clearing all entries : clear
You can clear all data in ORGANice by typing clear. You could use this command to remove all dummy data after you have familiarized yourself with how ORGANice works.
5.13. Exiting the program : exit
To exit ORGANice, type exit in the Command Box. ORGANice will close on its own.
5.14. Saving the data
Data is saved in the hard disk automatically after any command that changes the data.
There is no need to save manually.
6. Future improvements
This section describes features that can be added or improved in version 2.0. It is further divided into two sub-sections: Proposed New Features and Proposed Extensions.
6.1. Proposed New Features
This section describes features that can be added to ORGANice in version 2.0.
6.1.1. Implementing tab completion
This feature allows the program to automatically fill in partially typed commands upon pressing the Tab key.
6.2. Proposed Extensions
This section describes features that can be improved on and its proposed improvements.
6.2.1. Mass addition of data
This extension to the 'add' feature allows users to add more than one patient/doctor/donor from data in a specified text file.
6.2.2. Supporting more types of transplants
Currently ORGANice has patient-donor matching for kidneys only. Future versions can include matching for more types of organs.
6.2.3. Processing a match: process
Emails the doctor in charge of a patient when an organ match for the patient is found.
Format: process NRIC
7. FAQ
Q: How do I transfer my data to another computer?
A: Install the app in the other computer and overwrite the empty data file it creates with the file
that contains the data of your previous ORGANice folder.
Q: What are the steps to find a patient-donor kidney match?
A: There are three steps to finding a patient-donor match:
-
Do a blood test to determine donor and patient blood type.
-
Do a tissue typing test to determine the HLA antigens of the patient and the donor.
-
Do a cross match, which is a trial transfusion.
Q: What is the compatibility rate and how is it computed?
A: The compatibility rate measures the tissue compatibility between a donor and a patient. It is computed via this formula: (number of common tissue types between donor and patient) / 6 * 100%
8. Command Summary
This section summarises the commands to use this application. The following list contains the summary of the commands.
-
Add (Normal Mode):
-
Add patient:
add t/patient n/NAME o/ORGAN b/BLOOD TYPE tt/TISSUE TYPE p/PHONE pr/PRIORITY ic/NRIC d/DOCTOR a/AGE -
Add donor:
add t/donor n/NAME o/ORGAN b/BLOOD TYPE tt/TISSUE TYPE p/PHONE ic/NRIC exp/EXPIRY a/AGE -
Add doctor:
add t/doctor n/NAME ic/NRIC p/*PHONE
-
-
Add (System Prompt Mode):
add t/TYPE -
Edit :
edit NRIC-
Optional parameters: any parameter from Section 4, “List of Attributes”
-
-
Find :
find-
Optional parameters: any parameter from Section 4, “List of Attributes”
-
-
Match :
-
Match a specific patient:
match ic/NRIC OF PATIENT -
Match all patients:
match ic/all
-
-
Sort matches:
-
Sort based on compatibility rate:
sort/rate -
Sort based on organ expiry date:
sort expiry -
Sort based on patient priority
sort priority
-
-
Processing:
processing ic/NRIC OF PATIENT ic/NRIC OF DONOR TASKNUMBER -
Mark tasks as done:
processingMarkDone ic/NRIC OF PATIENT ic/NRIC OF DONOR -
List :
list t/TYPE -
Help :
help -
Done :
done ic/NRIC OF PATIENT ic/NRIC OF DONOR res/[pass/fail] -
Exit :
exit
9. Glossary
This section contains a list of words used in this user guide and its intended meaning. It is meant to clarify the meaning and context of the words used in this user guide.
-
user: refers to hospital administration staff who are using this desktop application
-
person: refers to doctors, patients or donors
-
blood type match: refers to a donor and patient whose blood types are compatible.
-
tissue match: refers to a donor and patient whose tissues match
-
cross match: a trial blood transfusion, where donor and patient’s blood are mixed in a test tube to check
for harmful interactions between patient and donor’s blood -
potential match: refers to a donor-patient pair whose organs pass the blood test and tissue typing test.
-
match: refers to a donor-patient pair whose organs pass all three matching tests
-
duplicate: refers to two persons of the same type which have the same NRIC
-
compatibility rate: A percentage from 0 to 100% that indicates the degree of compatibility between the patient and the donor. This percentage is calculated from the number of tissue matches between the patient and donor.
-
priority: used to indicate the level of importance or urgency of getting organ transplant for the patient. The different levels are include high, medium and low, and it is specified by the doctor after an assessment.